
User Manual


8
❏
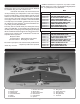
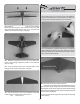
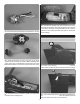
2. Center the horizontal stabilizer in the slot in the fuselage.
Stand back and look at the stab in relation to the wing. The
stab should be parallel with the wing. If not, sand the stab
saddle until the stab and wings are aligned.
❏
3. Measure the distance from the tip of the stab to the
center of the fuselage. Adjust the position of the stab until
they are equal.
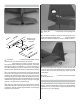
❏
4. Using a fi ne-point felt-tip pen, mark the outline of the
fuselage on the top and the bottom of the stab.
❏
5. Cut the covering on the top and bottom of the stab
inside the line you have drawn. Use care to cut only into the
covering and not into the wood.
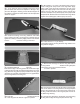
HOW TO CUT COVERING FROM BALSA
Use a soldering iron to cut the covering from the stabilizer.
The tip of the soldering iron doesn’t have to be sharp, but
a fi ne-tip does work best. Allow the iron to heat fully.
Use a straightedge to guide the soldering iron at a rate that
will just melt the covering and not burn into the wood. The
hotter the soldering iron, the faster it must travel to melt a
fi ne cut. Peel off the covering.
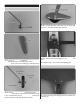
❏
6. Wipe away the lines you drew. Insert the elevator joiner
wire in the notch at the back of the stab saddle. Use epoxy to
glue the stab in place, being careful that the stab is properly
aligned. Wipe off any excess epoxy from the stab and fuselage
with a paper towel dampened with denatured alcohol. Recheck
that the stab is still aligned.
You can now remove the wings and continue with the assembly
of the fuselage.