21” 60V Cordless Self-propelled Mower MO60L01 Owner’s Manual TOLL-FREE HELPLINE: 1-855-345-3934 www.GreenWorksTools.com Read all safety rules and instructions carefully before operating this tool.
CONTENTS Contents .............................................................................................................................. 2 Product specifications .......................................................................................................... 2 Safety information ................................................................................................................ 3 Symbols ...........................................................................................
SAFETY INFORMATION GENERAL SAFETY RULES READ ALL INSTRUCTIONS CAREFULLY WA R N I N G This symbol indicates important safety instructions. If these instructions are not followed, it could endanger the personal safety and/or property of the operator and others. Read and understand all instructions in this manual before attempting to operate the mower. Failure to comply with these instructions may result in personal injury.
SAFETY INFORMATION – Do not smoke, strike a match, or cause a spark in the vicinity of the battery during charging. – Store indoors, and do not expose to rain or water, avoid direct sunshine. – Double insulation - When servicing, use only identical replacement parts. – For use only with Greenworks LB60A02 battery and Greenworks CH60A00 charger. See instruction manual for additional battery packs.
SAFETY INFORMATION • Mow only in daylight or in good artificial light. Do not rush a mowing job. • Stop the blade when crossing gravel driveways, walkways, or roads. • If the mower starts to vibrate excessively, stop the motor and check for the cause immediately. Excessive vibration is generally a sign the mower is not functioning properly. • Stop the motor and wait until the blade comes to a complete stop before removing the grass catcher or unclogging the chute.
SAFETY INFORMATION CHILD SAFETY Tragic accidents can occur if the operator is not aware of the presence of children. • Keep children out of the mowing area and under the watchful care of a responsible adult. • Do not allow children under the age of 14 to operate this mower. Children who are 14 years of age and older must read and understand the operating instructions and safety rules in this manual, and must be trained and supervised by a parent.
SAFETY INFORMATION • Always remove battery pack from your tool when you are assembling parts, making adjustments, cleaning, or when not in use. Removing battery pack will prevent accidental starting that could cause serious personal injury. • Always remove battery pack before storing the device. When battery becomes fully charged, unplug the charger from the power supply and remove the battery pack from the charger. • Always wear eye protection with side shields marked to comply with ANSI Z87.
SAFETY INFORMATION WA R N I N G When transporting or servicing unit, always remove the battery. WA R N I N G ( P R O P O S I T I O N 6 5 ) Some dust created by power sanding, sawing, grinding, drilling and other construction activities contains chemicals known to the state of California to cause cancer, birth defects or other reproductive harm.
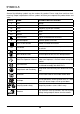
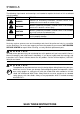
SYMBOLS Some of the following symbols may be used on this product. Please study them and learn their meaning. Proper interpretation of these symbols will allow you to operate the product better and safer.
SYMBOLS The following signal words and meanings are intended to explain the levels of risk associated with this product. SYMBOL SIGNAL MEANING DANGER Indicates an imminently hazardous situation, which, if not avoided, will result in death or serious injury. WARNING Indicates a potentially hazardous situation, which, if not avoided, could result in death or serious injury. CAUTION Indicates a potentially hazardous situation, which, if not avoided, may result in minor or moderate injury.
KNOW YOUR LAWN MOWER Read this operator's manual and safety rules before operating your lawn mower. Compare the illustration in Figure 1 to your lawn mower in order to familiarize yourself with the location of various controls and adjustments. Save this manual for future reference.
ASSEMBLY INSTRUCTIONS PART NAME FIGURE PART NO. Lawn Mower 1 Mulching Plug 1 Side Discharge Chute 1 Grass Catcher Bag 1 Handle Knob 2 Handle Bolt 2 21” 60V Cordless Self-propelled Mower MO60L01 Owner’s Manual 1 Owner’s Manual TOLL-FREE HELPLINE: 1-855-345-3934 www.GreenWorksTools.com Read all safety rules and instructions carefully before operating this tool.
ASSEMBLY INSTRUCTIONS UNPACKING • Carefully remove the product and any accessories from the box. Make sure that all items listed in the packing list are included. • Inspect the product carefully to make sure no breakage or damage occurred during shipping. • Do not discard the packing material until you have carefully inspected and operated the product. • If any parts are damaged or missing, please call (1-855-345-3934) for assistance.
ASSEMBLY INSTRUCTIONS UNFOLDING AND ADJUSTING LOWER HANDLE (See Figure 2) WA R N I N G Folding or unfolding the handle improperly can damage the cables, causing an unsafe operating condition. • Do not damage the cables when folding or unfolding the handle. • If a cable is damaged, contact an Authorized Service Dealer. • Pull and rotate the handle knobs (1) 90° on both sides to loosen the lower handles (2) on both sides. • Move the lower handles to the operating position.
ASSEMBLY INSTRUCTIONS INSTALLING THE UPPER HANDLE (See Figure 3) • Align the mounting holes on the upper handle (1) and the lower handle (2). Insert the carriage bolts (3) and use the knobs (4) to tighten them. Repeat the operation on the other side. (1) Upper handle (4) Knob (3) Bolt (4) Knob (2) Lower handle Fig.
ASSEMBLY INSTRUCTIONS INSTALLING THE GRASS CATCHER BAG (See Figure 4) • Lift the rear discharge door (1). • Lift the grass catcher by its handle (2) and place under the rear discharge door so that the hooks (3) on the grass catcher (4) are seated on the door rod (5). • Release the rear discharge door (1). When installed correctly, the hooks on the grass catcher will extend through the openings on the rear discharge door.
ASSEMBLY INSTRUCTIONS INSTALLING / REMOVING THE MULCHING PLUG (See Figure 5) • To remove the mulching plug, lift the rear discharge door (1). • Grasp the handle (2) of the mulching plug. Using this handle, lift and pull the mulch plug out. • The mulching plug (3) is inserted at an angle, so it requires some force to remove it. • The mulching plug must be removed in order to install the grass catcher bag. • The mulching plug must be re-installed when the grass catcher bag is removed.
ASSEMBLY INSTRUCTIONS INSTALLING SIDE DISCHARGE CHUTE (See Figure 6) • Lift the side discharge cover (1). • Align the grooves (2) on the side discharge chute (3) with the pins (4) on the underside of the discharge cover. • Lower the discharge chute until the hooks on the mower deck are secured in the openings of the discharge chute. • Release the side discharge cover. (1) Side discharge cover (4) Pins (3) Side discharge chute (2) Groove 18 Fig.
ASSEMBLY INSTRUCTIONS TO INSTALL BATTERY PACK (See Figure 7) • Lift and hold up the battery door (1). • Align the battery (2) with the mower’s battery port. • Make sure the battery release button (3) snaps in place and that battery is fully seated and secure in the mower before beginning operation. • Insert the safety key (4). If the machine is not going to be used immediately, do not insert the safety key. • Close the door. (2) Battery pack (1) Battery door (3) Battery release button (4) Safety key Fig.
OPERATING YOUR LAWN MOWER STARTING/STOPPING THE MOWER (See Figure 8) To start the motor: • Open the battery door. • Insert the battery. • Press and hold the safety lock-out button (1). • Pull the bail lever (2) upward to the handle to start the mower and release the button. To stop the motor: Release the bail lever (2). (2) Bail Lever (1) Lock Out Button Fig. 8 Soft-Start This battery powered mower is equipped with a “soft-start” feature. When initially starting up, the mower will take approx.
OPERATING YOUR LAWN MOWER SELF-PROPELLED MOWING (See Figure 9) To engage the self-propelled feature: • Open the battery door. • Insert the battery. • Pull the self propel lever (1) upward to meet the handle. To disengage the self-propelled feature: • Release the self propel lever. To adjust the speed of self-propelled feature: • Pull the variable speed control lever (2) towards the Rabbit Symbol to increase speed. • Push the variable speed control lever (2) towards the Turtle Symbol to decrease speed.
OPERATING YOUR LAWN MOWER CUTTING HEIGHT ADJUSTMENT (See Figure 10) When shipped, the wheels on the mower are set at the lowest cutting position. Before using the mower for the first time, raise the cutting position to the height best suited for your lawn. The average lawn should be between 1 1/2" to 2" (3.8 to 5 cm) during cool months and between 2" and 3 1/2" (5 cm to 8.3 cm) during hot months.
OPERATING YOUR LAWN MOWER SLOPE GAUGE (See Figure 11) WA R N I N G Slopes are a major factor related to accidents involving slips and falls, which can result in severe injury. Operating the mower on a slope requires extra caution. If you feel uneasy on a slope, do not mow it. For your safety, use the slope gauge that is included as part of this manual to measure slopes before operating this unit on a sloped or hilly area. Fig.
OPERATING YOUR LAWN MOWER • Mow across the face of a slope, and never up and down. Exercise extreme caution when changing direction on a slope. • Watch for holes, ruts, rocks, hidden objects, or bumps that may cause a slip or a trip. Tall grass can hide obstacles. • Always be sure of your footing. If you feel like you are losing your balance, release the blade/ motor control handle immediately. The blade will stop rotating within 3 seconds.
OPERATING YOUR LAWN MOWER MOWING TIPS NOTE: A sharp blade will greatly enhance the performance of the mower, especially when cutting high grass. Be sure to check the blade and to sharpen it at least once per year, as described in the Maintenance section. • Verify that the lawn is free of stones, sticks, wires, and other objects that could damage the blades or the motor.
OPERATING YOUR LAWN MOWER EMPTYING THE GRASS CATCHER BAG (See Figure 12) • Stop mower, allow blades to completely stop, and remove the battery. • Lift the rear discharge cover. • Lift the grass catcher bag by its handle to remove from mower. • Empty grass clippings. • Lift the rear discharge cover and reinstall the grass catcher bag as described earlier in this manual. Fig.
MAINTENANCE REPLACING THE CUTTING BLADE (See Figure 13-14) WA R N I N G Always protect your hands by wearing heavy gloves and/or wrapping the cutting edges with rags or other materials when performing any maintenance on the blades. ALWAYS remove the battery when servicing or transporting the mower. Use only a GREENWORKS replacement blade (Item#: 333041179). • REMOVE BATTERY.
MAINTENANCE CLEANING THE MOWER WA R N I N G In order to reduce the risk of electric shock, do not expose the mower to water. The underside of the mower deck should be cleaned after each use, because grass clippings, leaves, dirt, and other debris will accumulate, which will cause rust and corrosion. Remove any build-up of grass and leaves on or around the motor cover (do not use water). Occasionally wipe the mower clean with a dry cloth.
MAINTENANCE VERTICAL STORAGE FUNCTION (See Figure 15 ) • Remove the battery from the mower. • Remove the grass catcher bag. • Rotate the handle knobs to the unlocked position. • Lower the handle assembly and rotate the handle knobs to the locked position. • Lift the mower by the front end to the vertical position. WA R N I N G Always remove the battery from the mower before placing the unit in the vertical storage position. (1) Storage switch Locked position Unlocked position Fig.
MAINTENANCE • When servicing the mower, use only identical replacement parts that are available from the manufacturer. In order to obtain replacement parts, call the toll-free helpline, at 1-855-3453934. The use of parts that do not meet the original equipment specifications may lead to improper performance, and may compromise safety. • Before cleaning, repairing, or inspecting; verify that the blade and all moving parts have come to a complete stop.
ENVIRONMENTALLY SAFE BATTERY DISPOSAL The following toxic and corrosive materials are in the batteries used in this mower battery pack: Lithium-Ion, a toxic material. WA R N I N G All toxic materials must be disposed of in a specified manner to prevent contamination of the environment. Before disposing of damaged or worn out Lithium-Ion battery packs, contact your local waste disposal agency, or the local Environmental Protection Agency for information and specific instructions.
TROUBLESHOOTING PROBLEM POSSIBLE CAUSE SOLUTION The battery is not charged. Charge the battery. The switch is defective. Replace the switch (call the tollfree helpline, at 1-855-345-3934. Grass jammed between the deck and blade. Remove battery; check under deck for jams. The mower does Check the connection between the battery The battery is not fully inserted not start. and the mower. Make sure the battery clicks in the mower. into place.
LIMITED WARRANTY GREENWORKS™ hereby warranties this product, to the original purchaser with proof of purchase, for a period of four (4) years against defects in materials, parts or workmanship. GREENWORKS™, at its own discretion will repair or replace any and all parts found to be defective, through normal use, free of charge to the customer.
EXPLODED VIEW 82 83 81 84 85 86 87 80 79 89 76 64 63 62 61 77 78 88 75 73 74 72 70 71 69 68 67 66 65 53 54 55 56 57 58 59 37 60 48 46 47 52 51 49 50 33 36 32 34 35 31 30 45 29 28 27 26 44 43 42 41 40 39 38 24 23 22 21 20 12 19 18 17 25 16 15 14 13 11 10 9 4 3 34 2 1 8 7 6 5
PARTS LIST ITEM NO. 1 2 3 4 PART NO.
PARTS LIST ITEM NO. 31 32 33 34 PART NO.
PARTS LIST ITEM NO. 61 62 63 64 PART NO.
Greenworks Tools PO Box 1238 Mooresville, NC 28115 TOLL-FREE HELPLINE: 1-855-345-3934 Rev: 00 (04-12-17) Printed in China on 100% Recycled Paper