CS60L02 CS60L252 EN CHAINSAW OPERATOR MANUAL ES SIERRA DE CADENA MANUAL DEL OPERADOR CSC404 www.greenworkstools.
English 1 1.1 1.2 1.3 2 2.1 2.2 2.3 2.4 2.5 2.6 3 4 5 6 7 8 9 9.1 9.2 9.3 9.4 Description......................................... 4 Purpose.............................................................. 4 Overview........................................................... 4 Packing list........................................................ 4 EN Add bar and chain oil.........................................8 Install the battery pack.......................................8 Remove the battery pack......
English EN 1 DESCRIPTION 1.1 PURPOSE 2 WARNING This chainsaw is designed for cutting branches, trunks, logs and beams of a diameter determined by the cutting length of the guide bar. It is only designed to cut wood. Read all safety warnings and all instructions. Failure to follow the warnings and instructions may result in electric shock, fire and/or serious injury. It is only to be used in an outdoor, domestic application by adults. Save all warnings and instructions for future reference.
English • • 2.4 • • • • • • • 2.5 • • • • EN contacts eyes, immediately seek medical help. Liquid ejected from the battery may cause irritation or burns. If devices are provided for the connection of dust extraction and collection facilities, ensure these are connected and properly used. Use of dust collection can reduce dust related hazards. Do not let familiarity gained from frequent use of tools allow you to become complacent and ignore tool safety principles.
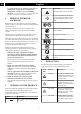
English EN • Cut wood only. Do not use chainsaw for purposes not intended. For example: do not use chainsaw for cutting plastic, masonry or non-wood building materials. Use of the chainsaw for operations other than intended could result in a hazardous situation. 4 Symbol Explanation Precautions that involve your safety. Read and understand all instructions before operating the product, and follow all warnings and safety instructions.
English 7 8 ENVIRONMENTALLY SAFE BATTERY DISPOSAL WARNING • • WARNING Discard all toxic materials in a specified manner to prevent contamination of the environment. Before discarding damaged or worn out Li-ion battery, contact your local waste disposal agency, or the local Environmental Protection Agency for information and specific instructions. Take the batteries to a local recycling and/or disposal center, certified for lithium-ion disposal.
English EN 9.2 ADD BAR AND CHAIN OIL 1. Align the lift ribs on the battery pack with the grooves in the battery compartment. Examine the amount of oil in the machine. If the oil level is low, add the bar and chain oil as follows. 2. Push the battery pack into the battery compartment until the battery pack locks into place. IMPORTANT 3. When you hear a click, the battery pack is installed. Use only bar and chain oil. 9.4 NOTE REMOVE THE BATTERY PACK 1.
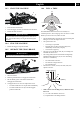
English 10.3 START THE MACHINE 10.6 EN FELL A TREE 23 24 25 25 1. Press the lock-out button (4). 24 2. Press the trigger (5) while you hold the lock-out button. 3. Release the lock-out button. Recommendation that the first-time user should, as a minimum practice, start cutting logs on a saw-horse or cradle. IMPORTANT Before you start to fell a tree, make sure that The chain brake must be disengaged for the chain saw to start. Activate the brake by moving the front hand guard forwards.
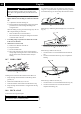
English EN It is important to make sure your footing is secure and your weight is evenly distributed. If possible, lift the log and hold it with branches, logs or chock. Obey the instructions below: CAUTION The level notching cut helps prevent pinching of the saw chain or the guide bar when you make the second notch. 33 2. Make the felling cut no less than 2 in. (50 mm) and higher than the level notching cut. Make sure that this cut a) Is parallel to the level notching cut.
English EN 3. Put the chain drive links (21) into the bar groove (20). 4. Put the chain cutters (22) in the direction of the chain operation. 39 38 5. Put the chain in position and make sure that the loop is behind the guide bar. When the log is on a slope, 1. 2. 3. 4. 6. Hold the chain and bar. Stand on the uphill side. Control the chain saw completely. Hold the chain saw handles tightly. Release the cutting pressure near the end of the cut. 22 When bucking is complete (38), 1.
English EN 11.3 Tension the chain so that it can only just be pulled away from the bar at its centre point. SHARPEN THE CUTTERS Sharpen the cutters if it is not easy for the chain to go into the wood. WARNING A slack chain may jump off and cause serious or even fatal injury. NOTE We recommend that a service center, which has an electric sharpener, perform important sharpening work. CAUTION Wear protective gloves if you touch the chain, bar or areas around the chain. 1. Tensioning chain. 1.
English • NOTE During the process, • • • • • • Keep the file flat with the surface to be sharpened. Use the midpoint of the file bar. Use light but firm pressure when sharpening the surface. Lift the file away on each return stroke. Sharpen the cutters on one side and then move to the other side. EN the groove does not fit with the height of the drive links (which must never touch the bottom). the inside of the guide bar is worn and makes the chain lean to one side.
English EN Problem Possible cause Solution Problem Possible cause The motor runs but the chain does not rotate. The chain is too tight. Adjust the chain tension. The machine does not start. Pull the chain The chain brake is brake in the direcengaged. tion of the user to disengage it. The guide bar and Replace the guide the chain are dam- bar and the chain aged. if it is necessary.
English 14 TECHNICAL DATA 4. Routine maintenance items such as lubricants, blade sharpening; 5. Normal deterioration of the exterior finish due to use or exposure. Voltage 60 V DC No load speed 20 m/s Guide bar length 16'' (406 mm) Chain pitch 3/8" LP (9.5 mm) Chain gauge .050" (1.27 mm) Drive links 56 Chain oil capacity 230 ml TRANSPORTATION CHARGES: Weight (without battery pack) 9.2 lbs (4.
English EN 16 EXPLODED VIEW 2 1 5 3 6 9 4 7 10 8 11 No Part No. . Qty Description No Part No. .
Español 1 1.1 1.2 1.3 2 2.1 2.2 2.3 2.4 2.5 2.6 3 4 5 6 7 8 Descripción.......................................18 Finalidad.......................................................... 18 Perspectiva general.......................................... 18 Lista de embalaje............................................. 18 Advertencias generales de seguridad para herramientas eléctricas...........................................18 Seguridad de la zona de trabajo....................... 18 Seguridad eléctrica.....
Español ES 1 DESCRIPCIÓN 1.1 FINALIDAD 2 Esta motosierra se ha diseñado para cortar ramas, troncos, leños y vigas de un diámetro determinado por la longitud de corte de la barra de guía. Se ha diseñado únicamente para cortar madera. AVISO Lea todas las advertencias de seguridad y todas las instrucciones. El incumplimiento de las advertencias e instrucciones puede provocar descargas eléctricas, incendios o lesiones graves. Para su uso únicamente en una aplicación doméstica en exteriores por adultos.
Español • • • • • 2.4 • • • • • conexión de herramientas eléctricas que tienen el interruptor activado fomenta los accidentes. Retire cualquier llave de ajuste antes de encender la herramienta eléctrica. Una llave que se quede fijada a una pieza giratoria de la herramienta eléctrica puede provocar lesiones personales. No se estire. Mantenga en todo momento una postura adecuada y el equilibrio. Esto permite un mejor control de la herramienta eléctrica en situaciones inesperadas.
Español ES • • • • • • • • • • 4 sujetar la motosierra, aumenta el riesgo de lesiones personales. Esto no debe hacerse nunca. Sujete la herramienta eléctrica solo por las superficies de agarre aisladas, ya que la cadena de la sierra puede entrar en contacto con cableado oculto o con su propio cable.
Español Símbolo 7 Explicación Debe leer y entender todas las instrucciones antes de manejar el producto, así como seguir todas las advertencias e instrucciones de seguridad. ELIMINACIÓN DE BATERÍA SEGURA PARA EL MEDIO AMBIENTE Lleve protección ocular y auditiva. No exponga el producto a la lluvia o a condiciones de humedad. Los materiales tóxicos y corrosivos que figuran a continuación se encuentran en las baterías utilizadas en esta máquina: Ion de litio, un material tóxico.
Español ES 8 PROPUESTA 65 9.2 AVISO Examine la cantidad de aceite que hay en la máquina. Si el nivel de aceite es bajo, añada el aceite para barras y cadenas de la siguiente manera. Este producto contiene una sustancia química conocida en el estado de California como causante de cáncer, defectos de nacimiento u otros daños reproductivos.
Español 2. Sujete las asas con los pulgares y los dedos alrededor de ellas. AVISO • • • Si la batería o el cargador ha sufrido daños, sustituya la batería o el cargador. Detenga la máquina y espere hasta que el motor se pare antes de instalar o retirar la batería. Debe leer y entender las instrucciones del manual de la batería y el cargador. 3. Asegúrese de que la mano izquierda sujete el asa delantera y que el pulgar esté debajo del asa. 10.3 PUESTA EN MARCHA DE LA MÁQUINA 1.
Español • ES • 10.6 El freno de la cadena no detiene la cadena inmediatamente. El freno de la cadena no permanece en la posición desacoplada sin ayuda. a) Tenga 1/3 de la anchura del diámetro del árbol. b) Sea perpendicular a la dirección de tala. PRECAUCIÓN El corte de muesca de nivel ayuda a evitar que la cadena de la sierra o la barra de guía queden pellizcadas cuando hace la segunda muesca. TALA DE UN ÁRBOL 23 2. Haga el corte de tala no inferior a 2 in.
Español Es importante asegurarse de que su equilibrio sea seguro y que su peso esté distribuido uniformemente. Si es posible, levante el tronco y sopórtelo con ramas, troncos o calzos. Respete las siguientes instrucciones: ES 33 39 32 Cuando el tronco se mantenga apoyado longitudinalmente (32), córtelo desde la parte superior (33). 38 Cuando el tronco esté en una pendiente, 36 1. 2. 3. 4. Debe colocarse en el lado cuesta arriba. Controle la motosierra totalmente.
Español 11. Apriete las tuercas cuando la cadena esté correctamente tensada. ES NOTA Si arranca la motosierra con una cadena nueva, haga una prueba de 2-3 minutos. Una cadena nueva se alarga después del primer uso, examine la tensión y apriete la cadena si es necesario. 3. Introduzca los eslabones de accionamiento de la cadena (21) en la ranura de la barra (20). 11.2 4. Ponga los cortadores de la cadena (22) en la dirección de funcionamiento de la cadena.
Español NOTA ES Durante el funcionamiento normal de la sierra, la temperatura de la cadena aumenta. Los eslabones de accionamiento de una cadena caliente correctamente tensada colgarán aproximadamente 1,58 mm (1/16") fuera de la ranura de la barra. 4. Afile todos los cortadores a los ángulos especificados y a la misma longitud. NOTA Durante el proceso, 1,58 mm (1/16") 11.3 • • • AFILADO DE LOS CORTADORES Afile los cortadores si la cadena no penetra fácilmente en la madera.
Español 13 NOTA ES Asegúrese de que se gire periódicamente para mantener el desgaste simétrico en la barra. 1. Lubrique los rodamientos en el piñón de la punta (si está presente) con la jeringa (no incluida). 2. Limpie la ranura de la barra con el gancho de rascado (no incluido). 4. Elimine las rebabas de los bordes y nivele las cuchillas con una lima plana. Sustituya la barra si: • la ranura no se ajusta a la altura de los eslabones de accionamiento (que nunca deben tocar la parte inferior).
Español Problema Posible causa El motor funciona, La cadena está depero la cadena no masiado tensa. gira. La barra de guía y la cadena han sufrido daños. El motor ha sufrido daños. Solución Problema Ajuste la tensión de la cadena. La máquina no se pone en marcha. Sustituya la barra de guía y la cadena en caso necesario. 1. Retire la batería de la máquina. 2. Retire la cubierta de la barra de guía. 3. Retire la barra y la cadena de la sierra. 4. Limpie la máquina. 5.
Español ES Problema Posible causa Solución La máquina ha dejado de funcionar para proteger los circuitos internos. La temperatura de funcionamiento de la máquina es demasiado alta. Lleve la máquina a un lugar fresco y seco. Déjela descansar al menos 5-10 minutos. Si la protección es frecuente, aumente el tiempo de enfriamiento.
Español 16 VISTA DESPIEZADA ES 2 1 5 3 6 9 4 7 10 8 11 Nº Nº pieza Cant. Descripción Nº Nº pieza Cant.
HT60L211 HT60L01 EN HEDGE TRIMMER OPERATOR MANUAL ES CORTADOR DE SETOS MANUAL DEL OPERADOR HTC402 www.greenworkstools.
English 1 1.1 1.2 1.3 2 2.1 2.2 2.3 2.4 2.5 2.6 2.7 3 4 5 6 Description......................................... 4 7 Purpose.............................................................. 4 Overview........................................................... 4 Packing list........................................................ 4 8 8.1 General power tool safety warnings............................................. 4 9 9.1 9.2 9.3 Work area safety................................................
English EN 1 DESCRIPTION 2.3 1.1 PURPOSE • This machine is intended for cutting and trimming hedges and bushes in domestic use. It is not intended to be used for cutting above shoulder level. 1.2 OVERVIEW • • 1 2 3 4 1.3 1. 2. 2 Battery release button Auxiliary handle Handle switch Guard • 5 Blade 6 Trigger 7 Rotating button • PACKING LIST Hedge trimmer Blade cover 3. Manual 2.
English 2.5 • • • • 2.6 • 2.7 • • • • • • • • BATTERY TOOL USE AND CARE Avoid body contact with earthed or grounded surfaces, such as pipes, radiators, ranges and refrigerators. There is an increased risk of electric shock if your body is earthed or grounded. • Recharge only with the charger specified by the manufacturer. A charger that is suitable for one type of battery pack may create a risk of fire when used with another battery pack.
English EN Symbol Explanation Hz Frequency (cycles per second) W Power min Time SYMBOL Type or a characteristic of current Precautions that involve your safety. 7 Read and understand all instructions before operating the product, and follow all warnings and safety instructions. SIGNAL MEANING CAUTION (Without Safety Alert Symbol) Indicates a situation that may result in property damage.
English 8 INSTALLATION 8.1 UNPACK THE MACHINE • If the blade jams on an electrical cord or line, DO NOT TOUCH THE BLADE! IT CAN BE LIVE AND DANGEROUS. Do the steps below: It is not necessary to assemble the machine. • Remove all objects such as cords, lights, wire, or string which can become entangled in the cutting blade and create a risk of personal injury. WARNING WARNING • • If the parts have damage, do not use the machine. If you do not have all the parts, do not operate the machine.
English EN 12 2. Release the rotating button until it locks into position. 10 MAINTENANCE TROUBLESHOOTING Problem CAUTION Possible cause The battery pack is not installed tightThe motor does not start when you ly. pull the trigger. The battery pack is out of power. Do not let brake fluids, gasoline, petroleum-based materials touch the plastic parts. Chemicals can cause damage to the plastic, and make the plastic unserviceable.
English LIMITED WARRANTY 15 EXPLODED VIEW C ST IN LASS BE TÉGOR IE • CA M SA EJ S N 2 1 R O CLASE EN MEILLEU RD A 14 EN GARANTIE OUTIL & BATTERIE • GARANTÍA PARA HERRAMIENTAS Y BATERÍAS Greenworks hereby warranties this product, to the original purchaser with proof of purchase, for a period of four (4) years against defects in materials, parts or workmanship.
Español ES 1 1.1 1.2 1.3 2 2.1 2.2 2.3 2.4 2.5 2.6 2.7 3 4 5 Descripción.......................................11 Finalidad.......................................................... 11 Perspectiva general.......................................... 11 Lista de embalaje ............................................ 11 Advertencias generales de seguridad para herramientas eléctricas........................................... 11 Seguridad de la zona de trabajo....................... 11 Seguridad eléctrica..
Español 1 DESCRIPCIÓN 1.1 FINALIDAD • Esta máquina se ha diseñado para cortar y podar setos y arbustos en un entorno doméstico. No se ha diseñado para cortes por encima del nivel del hombro. 2.2 1.2 • PERSPECTIVA GENERAL 2.3 • 1 2 3 4 1.
Español ES • • • • 2.5 • • • • 2.6 • idénticas. Esto garantizará el mantenimiento de la seguridad de la herramienta eléctrica. reducen el riesgo de que la herramienta eléctrica se arranque accidentalmente. Almacene las herramientas eléctricas inactivas fuera del alcance de los niños y no permita que personas que no estén familiarizadas con la herramienta eléctrica o estas instrucciones puedan utilizarla. Las herramientas eléctricas son peligrosas en manos de usuarios inexpertos.
Español 3 PROPUESTA 65 Símbolo AVISO Este producto contiene una sustancia química conocida en el estado de California como causante de cáncer, defectos de nacimiento u otros daños reproductivos. El polvo generado por el lijado eléctrico, el serrado, el esmerilado, la perforación y otras actividades de construcción contiene sustancias químicas que se sabe que son causantes de cáncer, defectos de nacimiento u otros daños reproductivos.
Español ES SÍMBO- INDICACIÓN LO SIGNIFICADO PRECAUCIÓN (Sin símbolo de alerta sobre seguridad) Indica una situación que puede provocar daños materiales. 7 8 INSTALACIÓN 8.1 DESEMBALAJE DE LA MÁQUINA AVISO No es necesario montar la máquina. AVISO ELIMINACIÓN DE BATERÍA SEGURA PARA EL MEDIO AMBIENTE • • • Si las piezas presentan daños, no utilice la máquina. Si no tiene todas las piezas, no utilice la máquina. Si faltan piezas o hay piezas dañadas, hable con el centro de servicio. 1.
Español • No utilice la máquina si alguna pieza ha sufrido daños o está doblada. Retire todos los objetos, como cordones, luces, cables o cuerdas que puedan enredarse en la cuchilla de corte y generar un riesgo de lesiones personales. • Puede utilizar el botón de rotación para ajustar el asa posterior en posiciones diferentes para cortar los setos más fácilmente. 1. Tire del botón de rotación y gire el asa posterior. 2. Suelte el botón de rotación hasta que encaje en su posición.
Español 1. Retire la batería. 2. Deje que el motor se enfríe. 3. Compruebe que no haya componentes sueltos o dañados. En caso necesario, sustituya los componentes dañados, apriete los tornillos y los pernos o consulte con una persona de un centro de servicio autorizado. 4. Almacene la máquina en un lugar fresco y seco. 12 1.1" (28 mm) Peso (sin batería) 7.17 lbs. (3.
Español del comprador. Es responsabilidad del comprador pagar los costes de transporte de cualquier pieza enviada para su sustitución bajo esta garantía, a menos que dicha devolución sea solicitada por escrito por Greenworks. Dirección en EE.UU.: Dirección en Canadá: Greenworks Tools Greenworks Tools Canada Inc. P.O. Box 1238 P.O. Box 93095, Newmarket, Ontario Mooresville, NC 28115 L3Y 8K3 15 ES VISTA DESPIEZADA 2 1 3 Nº Nº pieza 1 R0201807-0 1 0 Cant.