
Installation Guide
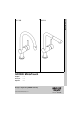


2
English
Maintenance
Inspect and clean all components and replace if necessary.
Shut off hot and cold water supply.
Remove battery and separate plug-in connectors,
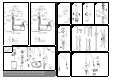
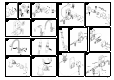
see fold-out page III, Fig. [25].
I. Cartridge, see fold-out page III, Fig. [26].
Assemble in reverse order. When installing the cartridge,
ensure that the seals are correctly seated. Replace screws
and tighten alternately.
II. Pull out spray with non-return valve, see fold-out page III,
Fig. [27].
Assemble in reverse order.
III. Battery, see fold-out page III, Fig. [25].
The battery must be replaced at the latest 10 years after
putting the fitting into service.
A battery which is almost discharged is indicated by three
water pulses. When the battery is discharged the indicator
lamp in the control lamp also starts flashing.
Assemble in reverse order.
Insert battery with correct polarity.
IV. Solenoid valve, see fold-out page III, Figs. [28] and [29].
Assemble in reverse order.
V. Control, see fold-out page III, Figs. [28] to [30].
Assemble in reverse order.
VI. Check valve and filter, see fold-out page III, Fig. [31].
Assemble in reverse order.
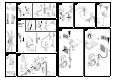
Replacement parts
See fold-out page IV (* = special accessories).
Care
Instructions for care of this faucet will be found in the Limited
Warranty supplement.
Disposal instructions
This category of device does not belong in the
domestic waste, but must be disposed of
separately in accordance with the relevant national
regulations.
Dispose of batteries in accordance with national
regulations.
Fault Cause Remedial action
Water not flowing • Water supply interrupted - Open shut-off valves/service valves
Water flow does not
start after touching
• Water supply interrupted
• Filter in solenoid valve blocked
• Plug-in connector of solenoid valve without
contact
• Solenoid valve defective
• No voltage
- Battery discharged
- Plug-in connector without contact
• Cleaning mode activated
• Sensor system not correctly adjusted to
ambient conditions
- Open shut-off valves/service valves
- Clean filter
- Attach plug-in connector
- Replace solenoid valve
- Replace battery
- Check plug-in connectors
- Wait 2 minutes
- Increase touch parameters
(5 highest value...1 lowest value)
Water flowing
continuously
• Solenoid valve defective
• Sensor system not correctly adjusted to
ambient conditions
- Replace solenoid valve
- Reduce touch parameters
(5 highest value...1 lowest value)
Undesired water
flow
• Sensor system not correctly adjusted to
ambient conditions
• Hoses are touching
• Hoses were extended
• Activation by moisture
• Potential equalisation not provided
• Fitting not correctly calibrated
- Reduce touch parameters
(5 highest value...1 lowest value)
- Check contact and insulate where appropriate
- Insulate extension hoses
- Do not place damp cloths on the fitting
- Provide potential equalisation, see section Putting
into service
- Remove battery and re-insert it. Check again after
the indicator lamp goes out
Flow rate too low • Mousseur dirty
• Filter in solenoid valve dirty
• Shut-off valves, service valves not fully open
- Clean or replace mousseur
- Clean filter
- Fully open shut-off valves, service valves and
check supply lines
Flow rate too high
(only for touch
function)
- Exchange snap coupling 48 220 with 64 999 see
Fig. [31].