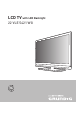
LCD TV with LED Backlight 22 VLE 5421 WG NL
Inhoud--------------------------------------------------------------------------------------------------------------------------------------------4 Set-up EN VEILIGHEID 6 6 6 7 Algemene informatie Speciale kenmerken van uw televisie Grundig SCR-systeem Belangrijke opmerkingen betreffende milieubescherming Opmerkingen over stilstaand beeld 7 8 8 9 Aansluiting en voorbereiding De antenne en het netsnoer aansluiten Batterijen in de afstandsbediening plaatsen 10 Overzicht 10 Aansluitingen op de televisie
Inhoud--------------------------------------------------------------------------------------------------------------------------------------------47 47 54 55 Speciale instellingen Automatisch digitale televisiezenders zoeken via satelliet Handmatig zoeken naar digitale televisiezenders van een satellietontvanger LNB-instellingen Instellingen voor gemotoriseerde antennes (DiSEqC 1.
Set-up EN VEILIGHEID--------------------------------------------------------------------------------------------Neem de volgende instructies in acht bij het installeren van het televisietoestel: Deze televisie is bestemd voor het ontvangen en afspelen van beeld- en geluidssignalen. 7 Elk ander gebruik is uitdrukkelijk verboden. De ideale kijkafstand is vijf maal de diagonale afmeting van het beeldscherm. Zorg dat het netsnoer of de voeding (indien geleverd) niet beschadigd raken.
Set-up EN VEILIGHEID--------------------------------------------------------------------------------------------Sluit geen apparatuur aan als uw toestel is ingeschakeld. Schakel voor het aansluiten ook de andere apparatuur uit. 7 Steek de stekker van het apparaat pas in het stopcontact als u de externe apparatuur en de antenne hebt aangesloten. 7 Zorg dat de stekker vrij toegankelijk is.
Algemene informatie-----------------------------------------------------------------------------------Speciale kenmerken van uw televisie Met deze televisie kunt u digitale zenders ontvangen en bekijken (via DVB-S, DVB-T en DVB-C), inclusief High-Definition programma´s (HD). Het ontvangen van digitale zenders in HD is momenteel echter beperkt tot een paar Europese landen.
Algemene informatie-----------------------------------------------------------------------------------Belangrijke opmerkingen betreffende milieubescherming Met de volgende informatie kunt u het milieu én geld besparen. 7 Als u de televisie enkele dagen niet gebruikt, dient u deze om milieu- en veiligheidsredenen van het elektriciteitsnet los te koppelen. Op deze manier verbruikt de televisie geen elektriciteit.
AAnSLuItInGenVoorbereIdInG-----------------------------------------deantenneenhetnetsnoeraansluiten 4 3 2 1 1 Om digitale satellietzenders (DVB-S/S2) te ontvangen, moet de kabel van de satellietantenne worden aangesloten op de antenneaansluiting »SAteLLIet« van de televisie.
Aansluiting en voorbereiding------------------------------------------Batterijen in de afstandsbediening plaatsen Milieu-opmerkingen 7 Dit symbool op de oplaadbare batterijen/batterijen of op de verpakking geeft aan dat de oplaadbare batterij/batterij niet als huishoudelijk afval mag worden behandeld. Voor bepaalde oplaadbare batterijen/batterijen wordt dit symbool gebruikt in combinatie met een chemisch symbool.
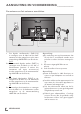
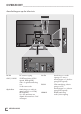
oVerzIcht---------------------------------------------------------------------------------------------------------------------------------Aansluitingenopdetelevisie dcIn DC externe ingang. AV1/S-VhS SCART-aansluiting (CVBSsignaal, RGB-signaal); video- en geluidsaansluiting voor S-video-camcorder. opticout Aansluiting voor audio-uitgang (optisch) voor PCM/ AC3-signalen. Voor het aansluiten van digitale AV-versterkers of AVontvangers.
Overzicht----------------------------------------------------------------------------------------------------------------------------------ANT IN Antenneaansluiting voor een DVB-T, DVB-C en analoge antenne. SATELLIET ntenneaansluiting voor de A satellietantenne (DVB-S/S2). U J ack koptelefoon (3,5 mm jackplug); aansluitingen voor audiouitgang. USB SB-aansluiting voor externe U datamedia zonder eigen stroomtoevoer. HDMI1 DMI-aansluiting, H audio-/video-ingang.
Overzicht----------------------------------------------------------------------------------------------------------------------------------De afstandsbediening - Hoofdfuncties Geluid aan/uit (mute). chakelt het televisietoesS tel in vanuit stand-by. Selecteert kanalen rechtstreeks. Opent het keuzemenu om beeldformaten te veranderen.Selecteer vervolgens met »B« of »A« en druk op »OK« om te bevestigen. Past het volume aan. Opent het menu.
Overzicht----------------------------------------------------------------------------------------------------------------------------------De afstandsbediening – Alle functies 16:9 ● (geel) 7 F reeze-frame (stilstaand beeld); selecteert een pagina in teletekstmodus; Activeert verschillende functies. Beëindigt de weergave in de bestandsbrowser. ● (blauw) W electeert een pagina in S teletekstmodus; activeert verschillende functies.
Instellingen----------------------------------------------------------------------------------------------------------------------Eerste instelling en afstemmen van televisiezenders Taal- en landinstellingen en de werkingsmodus -De televisie is uitgerust met de functie Aut. Zoeken Naar Zenders, die satellietzenders (DVB-S/S2), terrestriële zenders (DVB-T), kabelzenders (DVB-C) en analoge zenders zoekt. 1 Zet de televisie aan vanuit de stand-bymodus met »POWER«, »1…0« of »P+« or »P-«.
InSteLLInGen---------------------------------------------------------------------------------------------------------------------- fstemmenvantelevisiezenders A vanafdesatelliet(dVb-S/S2) Geavanceerdeinstallatie U hebt twee opties voor het afstemmen van digitale satellietzenders. 1 In het menu »Set-up bron« bij »Verbindingstype«, selecteert u de optie »Satelliet« met »B« or »A«. A De eenvoudige installatie, die alle antenne-instellingen voor de satellietzenders op Astra 19.
InSteLLInGen----------------------------------------------------------------------------------------------------------------------6 Kies het menu »DISEqC-modus« met »C« of »D«. Kies »DiSEqC 1.0« of »DiSEqC 1.1« in overeenstemming met het bestaande antennesysteem »B« of »A«. – DiSEqC 1.0 maakt het mogelijk maximaal vier satellieten tegelijk te ontvangen. – DiSEqC 1.1 maakt het mogelijk maximaal 16 satellieten tegelijk te ontvangen. 7 Selecteer »LNB-selectie« met »C« of »D«.
Instellingen----------------------------------------------------------------------------------------------------------------------Terrestriële televisiezenders afstemmen (DVB-T) 1 In het menu »Set-up bron« bij »Verbindingstype« selecteert u de optie »Lucht« met »B« of »A«. 2 Kies het menu »Scantype« met»C« of »D«.
InSteLLInGen----------------------------------------------------------------------------------------------------------------------progr.bewerk.voordedigitale zendersaanpassen zenderlijstenselecteren 1 Open het menu met »m«. Zenders die met de scanfunctie zijn gevonden, worden opgeslagen onder » PROGR. BEWERK.«. 2 Selecteer het menu »SET-UP BRON« met »C« of »D« en druk op »ok« om te bevestigen. – Het menu »SET-UP BRON« verschijnt. U kunt onnodige zenders verwijderen van progr. bewerk.
Instellingen----------------------------------------------------------------------------------------------------------------------Zenders verwijderen uit Progr. bewerk. 2 Sorteer digitale televisiezender van de kabelleverancier met »●« (blauw). 1 In het menu »PROGR. BEWERK.« selecteert u de modus Bewerk. door op »●« (rood) te drukken. Zenders overslaan 2 Kies de te verwijderen televisiezender met »C«, »D«, »B« of »A« en druk op »●« (geel) om deze te verwijderen.
Instellingen----------------------------------------------------------------------------------------------------------------------3 “Duw” de zender in de favorietenlijsten 1 tot 4 met »B« of »A« en druk op »OK« om te bevestigen. – De positie in de favorietenlijst wordt aangegeven met »✔«. – U kunt dezelfde zender aan meer dan één favorietenlijst toevoegen. – Elke favorietenlijst biedt plaats voor 250 zenders. Opmerkingen: 7 Zenders kunnen ook uit de favorietenlijsten worden verwijderd.
InSteLLInGen----------------------------------------------------------------------------------------------------------------------beelinstellingen 1 Open het menu met »m«. 2 Selecteer het menu »BEELDINSTELL.« met »C« of »D« en druk op »ok« om te bevestigen. – Het menu »BEELDINSTELL.« verschijnt. 20.09.2010 15:46 BEELDINSTELLINGEN Beeldmodus Gebruiker Helderheid 50 Contrast 100 Scherpte 75 Kleur 65 Kleurtemperatuur Middel Verhoogde beeldinstellingen DNR Uit Mpeg NR.
InSteLLInGen----------------------------------------------------------------------------------------------------------------------Geluidinstellingen Automatischvolume 1 Open het menu met »m«. Televisiezenders zenden uit op verschillende volumes. De functie automatische volumebeperking (AVL) betekent dat het volume op hetzelfde niveau wordt gehouden wanneer u tussen zenders schakelt. 2 Selecteer het menu »BEELDINSTELL.« met »C« of »D« en druk op »ok« om te bevestigen. – Het menu »GELUIDSINSTELL.
Instellingen----------------------------------------------------------------------------------------------------------------------Geluidseffecten Equalizer Dit menu biedt drie vooraf ingestelde geluidseffecten (Muziek, Neutraal en Spraak) en één door u (Gebruiker) te creëren instelling. De equalizer biedt een geluidsinstelling die u kunt creëren. 1 Kies het menu »Geluidkeuze« met »C« of »D«. De equalizer verschijnt in het menu als de »Geluidmodus« op »Ruimtel.
Televisie - BEDIENING------------------------------------------------------------------------------------------Basisfuncties In-en uitschakelen 1 Druk op »POWER«, »1…0« of »P+« of »P-« om de televisie uit stand-by in te schakelen. 2 Druk op »POWER« om de televisie naar stand-by te schakelen. Zenders kiezen 1 Druk op »1…0« om de voorinstellingen te selecteren. 2 Selecteer zenders stapsgewijs met »P+« of »P-«.
Televisie - BEDIENING------------------------------------------------------------------------------------------Zoomfunctie Elektronische tv-gids Deze functie maakt het mogelijk om het beeld indien nodig te vergroten. De elektronische Tv-gids biedt een overzicht van alle programma's die in de volgende week worden uitgezonden (alleen voor digitale zenders). 1 Druk herhaaldelijk op »N« om het scherm in drie stappen te vergroten.
Televisie - BEDIENING------------------------------------------------------------------------------------------Het beeldformaat veranderen De televisie schakelt automatisch over op het formaat 16:9 als dit formaat via de SCART-aansluiting wordt herkend. Formaat »Panorama« Deze instelling is geschikt voor films in een uitzonderlijk breed formaat. 1 Selecteer het beeldformaat met »16:9«. – Het beeldformaat (bijv. »16:9«) wordt weergegeven.
USB-BEDIENING-----------------------------------------------------------------------------------------------------------------BESTANDSFORMATEN Beeldbestanden Uw televisie kan de volgende formaten die via de USB-aansluitingen worden aangevoerd, verwerken: Uw televisie kan de afbeeldingformaten JPEG, PNG en BMP afspelen. JPEG staat voor Joint Picture Experts Group. Het verwijst naar een proces voor het comprimeren van afbeeldingen.
uSb-bedIenInG-----------------------------------------------------------------------------------------------------------------externedatamediaaansluiten Voordat u het datamedium aansluit, wordt het aanbevolen de televisie in stand-by te schakelen. O m g e g eve n s ve r l i e s t e vo o r ko m e n moet het televisietoestel in stand-by worden gezet voordat u het externe datamedium verwijdert.
USB-BEDIENING-----------------------------------------------------------------------------------------------------------------De bestandsbrowser De bestandsbrowser geeft video's, audiobestanden en afbeeldingen weer die zijn opgeslagen op externe datamedia. Als een extern datamedium bestanden in verschillende formaten bevat, kunt u indien nodig, de onnodige formaten filteren. Hoofdmenu van de bestandsbrowser 4 1 HFDM Selecteer het menu »SET-UP BRON« met »C« of »D« en druk op »OK« om te bevestigen.
USB-BEDIENING-----------------------------------------------------------------------------------------------------------------DivX® VOD Basis afspeelfuncties U moet uw apparaat registreren om de beveiligde video weer te geven die u hebt gekocht bij DivX®. 1 Selecteer het datamedium door te drukken op »I«, gebruik »C«, »D«, »B« of »A« om de optie »USB« te kiezen en druk op »OK« om te bevestigen. – De bestandsbrowser wordt weergegeven. 1 Kies »DivX® VOD« met »C« of »D« en bevestig met »OK«.
USB-BEDIENING-----------------------------------------------------------------------------------------------------------------Opmerkingen: 7 Gebruik »D« om »Map hoger« te kiezen wanneer u naar de laatste map wilt terugkeren. Gebruik »Hfdm« (en druk op »OK«) om naar de hoofdmap terug te keren. Het is mogelijk dat bestanden die eigenlijk worden ondersteund, niet correct werken in de USB-modus.
USB-BEDIENING-----------------------------------------------------------------------------------------------------------------Stapsgewijs selecteren van een track of afbeelding (SKIP) Afbeeldingen draaien (alleen voor afbeeldingen) 1 Tijdens het afspelen kiest u de volgende track/ afbeelding met »U«. U kunt afbeeldingen 90° draaien. 2 Tijdens het afspelen kiest u de vorige track/ afbeelding met »C«. – Het afspelen begint met de track of afbeelding die u hebt gekozen.
BEDIENING VAN Teletekst-------------------------------------------------------------------------Modus TOP-tekst of FLOF-tekst De tekenhoogte vergroten 1 Druk op »TXT« om teletekst in te schakelen. Als u problemen hebt om de tekst op het beeldscherm te lezen, kunt u de tekenhoogte vergroten. 2 Selecteer teletekstpagina´s rechtstreeks met »1...0« of stapsgewijs met »C« en »D«. Ga terug naar teletekstpagina 100 met »İ«.
GemAkSfunctIeS--------------------------------------------------------------------------------------------------------openenvanhetmenu InSteLLInGen deaudiotaalveranderen 1 Open het menu met »m«. U kunt een primaire en secundaire audiotaal instellen. (alleen voor digitale televisiezenders) 2 Selecteer het menu »INST.« met »C« of »D« en druk op »ok« om te bevestigen. – Het menu »INST.« verschijnt. 20.09.
Gemaksfuncties--------------------------------------------------------------------------------------------------------Tijd en datum instellen Timerinstellingen Automatische instelling Invoeren van de uitschakeltijd (slaaptimer) In het menu »Slaaptimer« kunt u voor de televisie Uw televisietoestel detecteert automatisch het tijdsverschil met Greenwich Mean Time (GMT), op voorwaarde dat de geselecteerde zender een tijdsignaal uitzendt.
Gemaksfuncties--------------------------------------------------------------------------------------------------------6 Kies »Volume« met »C« of »D« en gebruik »B« of »A« om het volume in te stellen. 7 Kies »Uur ins.« met »C« of »D« en voer de tijd in met »1…0«. 8 Sla de gegevens op met »●« (groen). 9 Druk op »M« om de instelling the beëindigen. Uitschakeltimer In het menu »Auto uit« kunt u voor de televisie een uitschakeltijd invoeren.
Gemaksfuncties--------------------------------------------------------------------------------------------------------Opmerking: 7 Gebruik om de functie uit te schakelen »B« of »A« om de instelling (»Uit«) te selecteren. 4 Druk op »M« om de instelling te beëindigen. Televisiezenders vergrendelen U kunt afzonderlijke televisiezenders die niet geschikt zijn voor kinderen vergrendelen door middel van een persoonlijke pincode. Toetsen vergrendelen (Kinderslot) 1 Open het menu met »M«.
Gemaksfuncties--------------------------------------------------------------------------------------------------------Een vergrendelde televisiezender bekijken U kunt een tv-zender die vergrendeld is met een pincode bekijken door de tv-zender te selecteren en de pincode in te voeren. 1 Selecteer de zender met »1…0« of »P+«, »P–«. 2 Open het menu met »M«. 3 Selecteer het menu »INSTELLINGEN« met »C« of »D« en druk op »OK« om te bevestigen.
BEDIENING GEBRUIK VAN EXTERNE APPARATUUR---DIGILINK Uw televisie is uitgerust met de DIGILINK-functie. Deze functie maakt gebruik van het CEC-protocol (Consumer Electronics Control). CEC maakt het mogelijk om externe apparatuur die via een HDMI-kabel op de »HDMI«-aansluitingen is aangesloten (bijv. dvd-speler), te bedienen met een afstandsbediening Voorwaarde is dat de aangesloten apparatuur CEC moet ondersteunen.
bedIenInGGebruIkVAneXterneAppArAtuur---Apparaatbediening U kunt kiezen of uw externe apparatuur al dan niet moet reageren op de afstandsbediening van uw televisie. 1 Druk op »I«, gebruik »C«, »D«, »B« of »A« om de optie »HDMI1« of »HDMI2« te kiezen en druk op »ok« om te bevestigen. opmerkingen: 7 »RC Passthrough« kan worden gebruikt voor alle apparaten. »Deck« en »Tuner« kunnen worden geselecteerd in overeenstemming met het externe apparaat dat is aangesloten. 7 2 Open het menu met »m«.
bedIenInGGebruIkVAneXterneAppArAtuur---highdefinitionhdready bronnen). Verbind de overeenkomstige signaalbronnen (bijv. HDTV-ontvanger of HD dvd-speler) met de »hdmI«-aansluitingen (voor digitale HDTV- Hiermee kunt u zonder problemen digitale HDTV programma’s bekijken, zelfs wanneer deze beschermd zijn tegen kopiëren (HDCP High Bandwidth Digital Content Protection).
BEDIENING GEBRUIK VAN EXTERNE APPARATUUR---Aansluiten van externe apparaten ... met SCART-aansluiting (FBAS-/RGB-signaal) Geschikte apparaten: Digitale satellietontvangers, Playstation, BluRay-speler, dvd-speler/recorder, set-top box, notebook, pc's. Geschikte apparaten: Digitale satellietontvanger, dvd-speler/-recorder, set-top box, gameconsole, videorecorder, decoder. 7 Videosignaal: FBAS/RGB. 7 Audiosignaal: stereo, analoog. 7 »AV1« voorinstelling.
BEDIENING GEBRUIK VAN EXTERNE APPARATUUR---Een dvd-speler, dvd-recorder, videorecorder of set-top box gebruiken 1 Schakel het externe apparaat aan en selecteer de gewenste functie. 2 Druk op » «, gebruik »V«, »Λ«, »<« of »>« om de optie voor het ingangsignaal (»AV1«, »AV2«, »S-VHS«, »HDMI1«, »HDMI2« of »Component«) te kiezen en druk op »OK« om te bevestigen.
BEDIENING GEBRUIK VAN EXTERNE APPARATUUR---Opmerkingen: 7 Indien»Aanpasbaar« wordt geselecteerd, zal het Line Out-volume gelijk zijn aan het volume van de huidige luidsprekers. Als u het volume verandert met »V+« of »V–«knop zal het volume van de luidspreker en Line Out samen veranderen. Als het audiosignaal alleen via het hifisysteem of de AV-ontvanger moet worden uitgezonden, selecteert u de optie»Uit« bij »Tv-ldspr met »B« of »A«. 7 6 Druk op »M« om de instelling te beëindigen.
GebruIkALSpc-monItor------------------------------------------------------------------------ Aansluitenvaneenpc 1 Verbind de »pc-In«-aansluiting op het televisietoestel met de betreffende aansluiting op de computer door middel van een VGAkabel (videosignaal).
GebruIkmetcommonInterfAce----------------------------------------- WatiscommonInterface? Common Interface (CI) is een interface voor DVB-ontvangers. 7 Gecodeerde zenders kunnen alleen worden bekeken met een CA-module die voor het coderingssysteem en de corresponderende smartcard geschikt zijn. 7 De televisie is uitgerust met een Common Interface-slot waarin CI-modules van verschillende aanbieders te plaatsen zijn.
SpecIALeInSteLLInGen-----------------------------------------------------------------------------------Automatischdigitaletelevisiezenderszoekenviasatelliet Satellietgegevens veranderen zeer vaak, er worden doorlopend nieuwe zenders toegevoegd. Daarom moet u van tijd tot tijd een automatische zoekopdracht uitvoeren. Hierbij worden alle transponders voor nieuwe zenders opgezocht. 1 Open het menu met »m«. 2 Selecteer het menu »SET-UP BRON« met »C« of »D« en druk op »ok« om te bevestigen.
Speciale instellingen-----------------------------------------------------------------------------------Handmatig zoeken naar digitale televisiezenders van een satellietontvanger Als u de parameters van een nieuwe televisiezender weet, kunt u ook handmatig zoeken. De huidige transpondergegevens zijn te vinden op teletekst, in satelliet-tv-bladen of op internet. 1 Open het menu met »M«. 2 Selecteer het menu »SET-UP BRON« met »C« of »D« en druk op »OK« om te bevestigen. – Het menu »SET-UP BRON« verschijnt.
Speciale instellingen-----------------------------------------------------------------------------------– »LNB-selectie«: Als er meer dan een satelliet wordt gebruikt in het actuele SCR-systeem, kies »1/2« tot »2/2« voor de satelliet overeenkomstig de relevante posities met de knoppen »B« of »A«. Opmerkingen: Gebruik installatie-apparatuur die wordt ondersteund/aangeraden door uw multiswitch.
Speciale instellingen-----------------------------------------------------------------------------------DiSEqC 1.2-instellingen U kunt de richting van de satellietantenne voor elke individuele satelliet aanpassen. Deze instellingen kunnen worden opgeslagen zodat de antenne later gemakkelijk volgens alle opgeslagen richting kan worden ingesteld. 1 Selecteer »DiSEqC 1.2-INSTELLINGEN« met »C« of »D« en druk op »OK« om te bevestigen. – Het menu »DiSEqC 1.2-INSTELLINGEN« verschijnt.
SpecIALeInSteLLInGen-----------------------------------------------------------------------------------Automatischzoekennaartelevisiezendersvandekabelleverancier 1 Open het menu met »m«. 2 Selecteer »SET-UP BRON« met »C« of »D« en druk op »ok« om te bevestigen. – Het menu »SET-UP BRON« verschijnt. 3 Selecteer »Bron« met »C« of »D« en druk op »ok« om te bevestigen. Selecteer de optie »Kabel« met »B«, »A«, »C« of »D« en druk op »ok« om te bevestigen. 4 Selecteer het menu »Aut.
SpecIALeInSteLLInGen-----------------------------------------------------------------------------------handmatigzoekennaartelevisiezendersvandekabelleverancier 1 Open het menu met »m«. 2 Selecteer »SET-UP BRON« met »C« of »D« en druk op »ok« om te bevestigen. – Het menu »SET-UP BRON« verschijnt. 3 Selecteer »Bron« met »C« of »D« en druk op »ok« om te bevestigen. Selecteer de optie »Kabel« met »B«, »A«, »C« of »D« en druk op »ok« om te bevestigen.
Speciale instellingen-----------------------------------------------------------------------------------6 Selecteer menu »Scantype« met»C« of »D« en stel de optie »DTV« in met »B« of »A«. 7 Start de scan met »●« (rood). – Alle zenders en favorietenlijsten worden verwijderd en opnieuw samengesteld. Opmerking: Als de scan is gestart, verschijnt er een veiligheidsvraag. Druk op »●« (groen) om de optie »Ja« te bevestigen. 7 – Het menu »Result.« verschijnt en het scannen naar televisiezenders begint.
SpecIALeInSteLLInGen----------------------------------------------------------------------------------- nalogetelevisiezendersafA stemmen Deze instelling is alleen noodzakelijk wanneer u geen digitale zenders kunt ontvangen en wanneer u tijdens de eerste set-up geen analoge zoekopdracht hebt uitgevoerd. De televisiezenders kunnen rechtstreeks of via de zoekopdracht worden ingesteld. Alleanalogetelevisiezendersinstellen Analoge zenders worden in de zenderlijst weergegeven na de digitale zenders.
Speciale instellingen-----------------------------------------------------------------------------------De televisiezenders afstellen door middel van het invoeren van de zendernummers 1 Open het menu met »M«. 2 Selecteer »SET-UP BRON« met »C« of »D« en druk op »OK« om te bevestigen. – Het menu »SET-UP BRON« verschijnt. 3 Selecteer »Handmatig digitaal afstemmen« met »C« of »D« en druk op »OK« om te bevestigen. – Het menu verschijnt.
Speciale instellingen-----------------------------------------------------------------------------------Zendernamen invoeren (maximaal 8 tekens) 1 In het menu »PROGR. BEWERK.« kiest u de televisiezender met »C«, »D«, »B« of »A« en drukt u op »●« (rood) om te bevestigen. 2 Open het invoertoetsenbord met (groen). »●« Opmerking: 7 Indien nodig verwijdert u de huidige zendernaam. Kies hiervoor de knop » « met »B« of »A« en verwijder door herhaaldelijk op »OK« te drukken.
INFORMATIE-----------------------------------------------------------------------------------------------------------------------------Weergave signaalinformatie (alleen voor digitale zenders) 1 Open het menu met »M«. 2 Selecteer »SET-UP BRON« met »C« of »D« en druk op »OK« om te bevestigen. 3 Selecteer »Signaalinformatie« met »C« of »D« en druk op »OK« om te bevestigen. – Er wordt informatie weergegeven over de zender, het netwerk, de modulatie, de symboolsnelheid, de kwaliteit en de signaalsterkte.
INFORMATIE-----------------------------------------------------------------------------------------------------------------------------Productfiche GRUNDIG 22 VLE 5421 WG Energiezuinige klasse: A Beeldschermgrootte: 55 cm/22 inch Stroomverbruik: In modus 22 W / 30 W max.
INFORMATIE-----------------------------------------------------------------------------------------------------------------------------Service-informatie voor dealers Het product voldoet aan de volgende EU-richtlijnen en -reglementeringen: 2006/95/EC. Richtlijn betreffende de harmonisatie van de wetgevingen der lidstaten inzake gebruik binnen bepaalde spanningsgrenzen. 2004/108/EC. Richtlijn inzake elektromagnetische compatibiliteit. 2009/125/EC.
INFORMATIE-----------------------------------------------------------------------------------------------------------------------------Probleemoplossing Als de volgende informatie niet tot een bevredigend resultaat leidt, neemt u best contact op met een bevoegde GRUNDIG-dealer. Houd er rekening mee dat storingen ook door externe apparatuur, zoals videorecorders en satellietontvangers kunnen worden veroorzaakt.