
Use and Care Guide


3
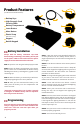
Product Features
(For MicroVault and MicroVault XL)
Always hold the battery connection cap while
disconnecting or attaching a new battery. Do not pull
on the power cables as this could cause the power
supply to become disconnected from the lock.
STEP 1 - Open the unit using the backup keys provided.
STEP 2 - Locate the battery compartment in the interior
panel. Connect the recommended 9V alkaline battery
following the Positive (+) and Negative (-) guides on the
connecting cap.
STEP 3 - When the battery is connected you will hear a
single beep signaling that the unit is powered.
STEP 4 - After you have connected the battery to the
cable, place the battery into the compartment and
secure the cover.
*GunVault recommends the use of either a Duracell
or Energizer 9V alkaline battery with an expiration
date of 5 years into the future.
Battery Installation
STEP 1 - Open the unit by using provided backup keys
or factory default code. The factory default code is a
single sequential press of each button moving from the
left to right.
STEP 2 - Locate the Learn button on the interior panel of
the unit.
STEP 3 - Press and hold the Learn button. A beep will
sound and the keypad back lighting will turn green and
remain illuminated. This will indicate the enrollment
procedure has been initiated.
STEP 4 - The keypad back lighting will remain activated
as you enter a new access code. The code can be a
minimum of three entries or maximum of six entries.
STEP 5 - Press and hold the Learn button a second
time. A beep will sound, and the keypad backlighting
will turn
red and remain illuminated.
STEP 6 - Enter your new access code a second time.
During this step, the red keypad back lighting will
remain illuminated.
STEP 7 - Press the Learn button a third time. The keypad
back lighting will flash green and the unit will beep six
times confirming that the new code has been accepted.
If the keypad back lighting illuminates in red and the
unit beeps six times, an error has occurred and you will
need to repeat steps 3-7.
STEP 8 - Test your access code to confirm that your unit
has been properly programed.
STEP 9 - Your safe is now ready for use.
Programming
An access code is a series of entries on the keypad. An
entry is a single press of one or more buttons at the
same time. Leave the unit door open while you
program your safe.
Backup Keys
High-Strength Steel
Security Cable
Battery Compartment
Learn Button
Mute Button
Elastic Strap
(MV1050-19 Only)
Keyport
Backlit Keypad
1
2
3
4
5
6
7
8
3
5
4
1
6
8
7
2