
User Guide


Using Your Steam Cleaner
pg 8 877-HAAN DIRECT / 877-422-6347 www.haanusa.com
!
i
CAUTION
After plugging in the power
cord and beginning to heat,
a fixed amount of water is
released due to the build-up
of internal pressure. After
heating is complete, spray
the steam 2 to 3 times before
affixing or switching any
additional attachment.
Operating the Steam Cleaner:
NOTE: Your Steam Cleaner is designed to clean hard
surfaces and upholstery that will withstand high
heat. DO NOT use on soft plastic and cold glass.
On surfaces that have been treated with wax, or
on some no-wax floors, the sheen may be removed
by the heat and steam action. DO NOT use on
unsealed wood. This could cause the wood panel
to rise. It is recommended that an isolated surface
area be tested to verify suitability before
proceeding to the rest of the area.
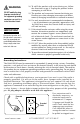
7) If using the Steam Cleaner for the first time, fill
the tank and then discard this water. Refill the
tank with fresh water There may be a slight odor
emitted on the first use.
8) Once you have attached the accessory that suits
your need and filled the unit with water, plug the
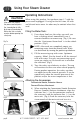
unit into a grounded outlet. The green ‘POWER’
light will come on. (Fig 9)
9) Wait 2-3 minutes and once the ‘STEAM READY’
light comes on, press the easy Control Trigger to
begin steaming. (Fig 10) During use the light will
turn on and off as the unit reheats to make steam.
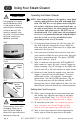
10) Steam will emit from the nozzle every time the
trigger is pressed and/or held down. To access
continuous steam, just slide the ‘Continuous
Steam Lock’ into the LOCKED position. (Fig 11)
The steam pressure will be affected and will
become low after a fixed amount of time. Use the
MicroCham™ towel to absorb any surface moisture.
Relling Water Tank During Use:
11) When you no longer have steam emitting from
the nozzle, this signifies that there is no more
water in the Water Tank. The ‘STEAM READY’
light will also go out when the tank is empty.
12) To refill the water tank, first unplug the power
cord, and press the Control Trigger to fully
release all steam remaining inside the tank.
13) Wait at least three minutes before opening the
safety cap to allow the pressure to dissipate.
Fig 9
Fig 10
Control
Trigger
Fig 11
Lock for
Continuous
Steam
!
i
CAUTION
Pressure always exists within
the product. Make sure to
press the Control Trigger to
eliminate this pressure prior to
opening the safety cap.