01 Safety Warnings Welcome 2 SOUND MENU Important Information 2 TIME MENU 18 18 Safety notice 3 OPTION MENU 19 Warning and cautions 4 LOCK MENU 19 EPG Menu(Electronic Program Guide) 19 PVR function 20 02 Introduction Main Parameter 5 Prepare to record the program Base Stand Assembly Instruction 7 Record the program Wall Mounting Installation Guidelines 8 Play the record Control Panel 9 Rear/Side Sockets 9 Prepare to record the program 22 Connecting your Haier TV 10 USB Dr
01 Safety warnings Thanks for buying this 39"/42" LED LCD TV . This guide will help you set up and begin using your TV. 39" Full HD 1080P Digital LED LCD TV Remote control AAA battery x2 Instruction Manual Quick start guide Scart Cable x 1 Stand 42" Full HD 1080P Digital LED LCD TV Remote control AAA battery x2 Instruction Manual Quick start guide Scart Cable x 1 Stand Now you can get started! IMPORTANT INFORMATION READ ALL INSTRUCTIONS BEFORE USE AND KEEP FOR FUTURE REFERENCE.
Safety notice the WARNING: TO avoid any injury caused by lean of the product,please always ensure the whole product was placed within the table surface in horizontal.
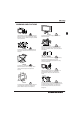
WARNING AND CAUTIONS Warning High voltages are used in the operation of this television receiver. Do not remove the cabinet back from your set. Refer servicing to qualified service personnel. Warning To prevent fire or electrical shock hazard, do not expose the television receiver to rain or moisture. Caution Do not trap the power supply cord under the television receiver. Caution Never stand on, lean on, or suddenly push the television or its stand. You should pay special attention to children.
Introduction 02 Introdution CAUTION INSTALLATION Never tamper with any components inside the TV, or any other adjustment controls not described in this manual. All LED-TV's are high voltage electrical equipment. When you clean dust or any water drops off the SCREEN or CABINET or around any of the buttons or connectors, the power cabled should be removed from the power socket. Wipe the TV with a soft, dry, dust free cloth.
Introduction PC PRESET MODE RESOLUTION V.Freq.(KHz) H.Freq.(KHz) 1 640x480 60 31.47 2 800x600 60 37.88 3 1024x768 60 48.36 4 1360x768 60 47.7 5 1280x1024 60 63.98 6 1920x1080 60 66.
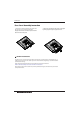
Introduction Base Stand Assembly Instruction 1. Place the TV with the display side down on a flat surface. Use a cloth to protect the display. Position the stand base plate onto the bottom of the stand pole. 2. Attach the stand base plate to the stand pole by firmly tightening the supplied screws. INSTALLATION NOTES Locate the TV in a room where light does not strike the screen directly. Total darkness or a reflection on the screen can cause eyestrain.
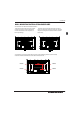
Introduction WALL MOUNTING INSTALLATION GUIDELINES This television can be wall mounted as follows: 1.Place the LED LCD Television onto a solid surface. Please place some soft material over the front of the screen to protect it from any damage. 2.Remove the screws from the lower part of the television, where the base joins to the TV, and take away the stand (put the stand somewhere safe for future use). 3.
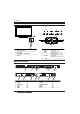
Introduction Front control panel 2 1 MENU SOURCE 3 2 3 CH- VOL- 1 2 3 SOURCE MENU CH+/CH- 4 VOL+/VOL- 5 STANDBY VIDEO L Y R Pb Pr HDMI2 AC-INPUT 100-240V~50/60Hz 6 1 2 3 4 5 6 EN-9 AV L/R AUDIO AC Power Source YPbPr HDMI2 HDMI1 1 7 8 input input input input input input VOL+ STANDBY Display the input source menu. Display main MENU. In TV mode,press CH+ or CH- to change the channel up and down. In MENU, press CH+ or CH- to select items . Adjust sound level.
Introduction Connecting to your Haier TV Connecting a DVD player / Satellite / cable set top box receiver / games console / PC or Laptop There are several options to connecting a DVD player / Satellite or Cable set top box receiver / games console / PC or Laptop to your TV. Option 1 SCART Connect a SCART cable (not supplied) from the SCART socket on the TV to the DVD player / Satellite or cable set top box receiver or games consol.
Introduction COMMON INTERFACE The common interface (CI) slot is designed to accept the conditional Access (CA) Module and Smart card in order to view the pay TV programmes and additional services. Contact your Common Interface service provider to get more information about the modules and subscription. Please noted that CA modules and smart cards are neither supplied nor optional accessories from us.
Remote Control 03 Remote Control Insert Batteries Into the Remote Control 1. Remove the battery cover. 2. Inserting the 2 AAA 1.5V batteries making sure the polarity(+ or -) of the batteries matches the polarity marks inside the unit 3. Mount the battery cover. Replace with new batteries when the TV set begins to show the following symptoms: Operation is unsteady or erratic. Sometimes the TV set does not function with Remote Control Unit. Remark: 1) Alkaline Battery Recommeded.
Remote Control TELETEXT Press: TEXT SELECTING A PAGE DIRECT ACCESS TO THE ITEMS INDEX SUB PAGE HOLD REVEAL LIST EN-13 You will obtain: E Teletext is an information system broadcast by certain channels which can be consulted like a newspaper. It also offers access to subtitles for viewers with hearing problems or who are not familiar with the transmission language(cable networks, satellite channels, etc.) This is used to call or exit teletext modes.
Operation 04 OPERATION Installation Guide The installation guide only appear when the TV first time turn on or reset to factory set. Please select an OSD language Czech Spanish Italiano Polski Arabic Deutsch Greek Magyar Russian Lithuania English French Nederlands Romanian OK HOME or SHOP modes 1. Home Mode is an energy-saving Mode. Home Mode is recommended for normal viewing setting and is set as default during manufacturer. 2.
Operation Congratulations!!! Completed Initial Quick Setup. Enjoy your Haier TV Press OK to Exit 1. CHANNEL MENU 3). Channel tuning will commence. This operation 1. 1)Auto Tuning (DVB-T) may take up to 6 minutes. The display will show 1). Press the MENU button and then press the ▼▲buttons to select the CHANNEL menu and then press the OK button. the progress of the tuning and the number of channels found. 4). If you want to skip the ATV tuning, press the MENU button to interrupt the tuning half way.
Operation 2). Press the▼▲buttons to select Auto Tuning and then press the OK button. CHANNEL Germany Italy Norway SOUND Greece Luxembourg Poland TIME Hungary Nederlands Portugal OK OPTION will show the progress of the tuning and the number of channels found. OK CADTV Manual Tuning ATV Manual Tuning Programme Edit Signal Information CI Information Software Update(USB) LOCK 5). Channel tuning will commence. This operation may take up to 6 minutes.
Operation 6). Channel tuning will commence. This operation may take up to 6 minutes. The display will show the progress of the tuning and the number of channels found. 7). If you want to skip the ATV tuning, press the MENU button to interrupt the tuning half way. A pop-up screen will be displayed, press the button to select YES to confirm. You will then go straight to DTV tuning. You may repeat the above step if you also want to skip the DTV tuning.
Operation 3) ATV Manual tuning : You can change the sound system to search the analog TV channels and fine tune the channels , then storage the channels you selected. 5). CI information: (optional) This menu can display the CI card' s information. 2. PICTURE MENU The second item of the MENU is PICTURE MENU. You can adjust picture effect here, such as contrast, brightness, etc. Press OK to move, press OK to adjust.
Operation CHANNEL Clock Off Time PICTURE SOUND TIME Restore factory default will clear all the programs and password. OK On Time Sleep Timer Auto Sleep Time Zone 6.LOCK MENU OPTION LOCK MENU BACK MOVE OK OK The sixth item of the menu is the LOCK MENU You can lock system, set password, block program and set parental guidance Once you set the lock system on you can not search the channels or change any programs.
Operation 3. Record Press the red key ,It can set the program to be recorded. OSD Language Audio Languages Subtitle Language Country PVR File System CHANNEL Remind 4. Press the blue key to choose one program and set up one reminder time, the TV screen will skip to the choosed program in the reminder time automatically.
Operation (Suggest to format the device by “High Speed Fs...”, which can speed up the record.) Format disk Format disk 2.Record the program As playing the DTV source, choose the channel and click “record”, the record frame will pop up. Click “record” again, the record frame will disappear and the “REC” icon still on the left top. It will disappear until you click “stop”. Warning! All data will be lost. Start Exit OK Format disk Do not unplug USB device.
Operation 9.Timeshift function Prepare to record the program This TV allows you to pause and record the currently watched digital program to a USB storage device, and to resume to the point where it was paused. Please do not unplug the USB storage device when the Time Shift function is activated. Approximately 4GB of memory buffers about offer 140 minutes. Formatting a USB 2.0 storage device will be needed. Save your original data before formatting.
Operation Time Shift limitations: 1. When the Time Shift feature is activated, only the PLAY/PAUSE/STOP/FWD/REV/ VOL+/VOL-/MUTE keys and some basic operation keys (ENTER/EXIT/navigation keys) are available. 2. Video playback may not be smooth and skip if USB recording speed does not meet the minimum requirements . 3. Do Not remove USB disk or switch off the power during Time Shift operations. It will abort once the signal is lost. 4. Do Not remove the signal source during Time Shift operations. 5.
Operation 10.USB Player Press source key, and select USB in source list, press OK button to enter the USB menu. play 00:04:22 Pause FB 00:04:22 FF Prev. Next Stop Repeat ALL Haier Innovation Life AB Set A Press◀▶to select the function icon, press OK button to confirm the function. Press▼or EXIT button to exit the control bar except for music. PHOTO MUSIC USB2.0 EXIT TEXT Back MOVIE Move OK Select Please make sure that the USB device have plugged in the slot.
Trouble Shooting 05 Trouble shooting Trouble phenomenon Symptom Picture Audio Snow Noise antenna position, direction or connection Ghost Normal audio antenna position, direction or connection Interference Noise electronic equipment,car/ motorcycle,fluorescent light Normal Picture Mute Volume(check if mute is activated or if the audio system connections are not correct) Power cord is not inserted Power switch is not opened Contrast and brightness/volume setup Press standby key on the remote con
Trouble Shooting Trouble Shooting My TV does not display the picture on my laptop / PC when connected. I have connected my PC/Laptop to the TV and get a picture but no sound. Why ? Most PC's and laptops when connected with a VGA Plug (the blue 15 pin plug on your PC or laptop) require you to press some buttons on your key board to get a picture on a TV or other external display. This is usually the F7 (Dell) or F4 (HP / Samsung) or F5 (Toshiba).
Trouble Shooting Trouble Shooting Digital TV Problems and possible Solutions. Picture Breaks into Pixels A typical example of a reception problem includes the break up of pictures (pixilation) or the picture freezing, sometimes there are clicking or squeaking sounds or the sound drops out or there is NO reception at all. Your picture may break into pixels due to the digital video signal dropping.
Trouble Shooting Specification 39" Full HD 1080P Digital LED LCD TV Television picture quality: Connectivity: FULL HD Integrated digital. Screen Size: 99cm Resolution 1920 x 1080 pixels 50Hz. 2 HDMI sockets. 1 SCART socket. PC input socket. Component video socket. Composite. 1 USB port. Sound quality: NICAM stereo sound system. 2 x 8 watts RMS power output. Standby Power consumption <0.5W Digital features: Digitally interactive. Digital text. Digital video broadcasting (DVB) subtitles available.
Trouble Shooting Specification 42" Full HD 1080P Digital LED LCD TV Television picture quality: Connectivity: FULL HD Integrated digital. Screen Size: 106.7cm Resolution 1920 x 1080 pixels 50Hz. 2 HDMI sockets. 1 SCART socket. PC input socket. Component video socket. Composite. 1 USB port. Sound quality: NICAM stereo sound system. 2 x 8 watts RMS power output. Standby Power consumption <0.5W Digital features: Digitally interactive. Digital text. Digital video broadcasting (DVB) subtitles available.
LCD-Fernseher mit dem LED-Bildschirm BEDIENUNGSANLEITUNG Bitte lesen Sie diese Bedienungsanleitung vor der Inbetriebnahme des Geräts sorgfältig durch und bewahren Sie diese für späteres Nachschlagen auf.
Inhaltsverzeichnis Inhaltsverzeichnis 01 Sicherheits- und Warnhinweise Willkommen 2 TONMENÜ Wichtige Informationen 2 ZEITMENÜ Sicherheitshinweise 3 EINSTELLUNGSMENÜ 19 Warnhinweise 4 SPERRMENÜ 19 EPG-Menü (Elektronische Programmzeitschrift) 19 02 Einleitung Parameter PVR-Funktion 5 Vorbereitung der Aufnahme Standfuß montieren 7 Programm aufzeichnen Wandmontage 8 Aufnahme wiedergeben 18 18 20 20 21 21 22 Vorderes Bedienfeld 9 TV-Anschlussfeld 9 Vorbereitung der Aufnahme 22
Sicherheits- und Warnhinweise 01 Sicherheits- und Warnhinweise WILLKOMMEN Vielen Dank, dass Sie sich für diesen 39"/42".Zoll LED LCD-Fernseher entschieden haben. Diese Anleitung hilft Ihnen bei der Einstellung und Bedienung Ihres Fernsehers.
Sicherheits- und Warnhinweise SICHERHEITSHINWEISE Warnung: Zur Vermeidung von Feuer und Stromschlag öffnen Sie nicht das Gerätegehäuse. Es befinden sich keine vom Verbraucher wartbaren Teile im Innern des Gerätes. Wenden Sie sich mit Wartungs- und Reparaturarbeiten stets an den autorisierten Kundendienst. Warnung: Zur Vermeidung von Feuer und Stromschlag setzen Sie das Gerät nicht Regen oder Feuchtigkeit aus.
Sicherheits- und Warnhinweise WARNHINWEISE Warnung Dieser Fernseher wird mit Hochspannung betrieben. Öffnen Sie nicht das Gerätegehäuse. Wenden Sie sich mit Wartungs- und Reparaturarbeiten stets an den autorisierten Kundendienst. Warnung Zur Vermeidung von Feuer und Stromschlag setzen Sie das Gerät nicht Regen oder Feuchtigkeit aus. Vorsicht Klemmen Sie das Netzkabel nicht unter dem Fernseher ein.
Einleitung 02 Einleitung ACHTUNG INSTALLATION Machen Sie sich nicht an Bauteilen im Fernsehgerät oder an irgendwelchen anderen Einstellungssteuerungen zu schaffen, die nicht in diesem Handbuch beschrieben sind. Alle LEDFernsehgeräte sind elektrische Hochspannungsgeräte. Wenn Sie Staub oder Wassertropfen von dem Bildschirm oder dem Gehäuse oder um die Knöpfe oder Anschlüsse herum abwischen, sollte das Stromkabel aus der Steckdose aus gesteckt sein.
Einleitung PC VGA-Timingtabelle De Auflösung V. Freq. (kHz) H. Freq. (kHz) 1 640x480 60 31.47 2 800x600 60 37.88 3 1024x768 60 48.36 4 1360x768 60 47.7 5 1280x1024 60 63.98 6 1920x1080 60 66.
Einleitung Montageanleitung für den Standfuß 1. Legen Sie den Fernseher mit dem Bildschirm auf eine flache Arbeitsfläche. Legen Sie ein Tuch unter, um den Bildschirm zu schützen. Setzen Sie den Standfuß unten an. 2. Schrauben Sie den Standfuß von unten mit der Schraube fest an. HINWEISE ZUR INSTALLATION Stellen Sie den Fernseher vor direkter Sonneneinstrahlung geschützt auf. Dunkelheit und Reflektionen auf dem Bildschirm können zu einer Überforderung der Augen führen.
Einleitung WANDMONTAGE Dieser Fernseher kann wie folgt an der Wand montiert werden: 1.Legen Sie den Fernseher mit dem Bildschirm auf eine flache Arbeitsfläche. Legen Sie ein Tuch unter, um den Bildschirm zu schützen. 2.Schrauben Sie die Halterung für den Standfuß unten am Fernseher ab (bewahren Sie den Standfuß für späteren Gebrauch auf ). De 3.Schrauben Sie den Fernseher mit den vier vorgesehenen Schrauben an eine VESA-Wandhalterung (nicht mitgeliefert).
Einleitung Vorderes Bedienfeld 1 SOURCE 3 2 3 CH+ 4 CH- VOL- VOL+ 1 2 3 SOURCE MENU CH+/CH- 4 VOL+/VOL- 5 STANDBY Schaltet den Fernseher in den Standby-Betrieb. VIDEO L Y R Pb Pr HDMI2 AC-INPUT 100-240V~50/60Hz 6 1 2 3 4 5 6 AV L/R AUDIO DC Netzteil YPbPr HDMI2 HDMI1 1 7 8 Eingang Eingang Eingang Eingang Eingang Eingang STANDBY Menü der Eingangsquellen anzeigen. Hauptmenü anzeigen. Im TV-Modus schalten Sie mit CH+ oder CHzwischen den Kanälen auf und ab.
Einleitung Anschließen an Ihren Haier Fernseher Anschließen eines DVD-Players / Satellits / Kabel-SetTop-Box-Receivers / einer Spielkonsole / eines PCs oder Laptops. Es gibt mehrere Optionen zum Anschließen eines DVDPlayers / Satelliten- oder Kabel-Set-Top-Box-Receivers / einer Spielkonsole / eines PCs oder Laptops an Ihren Fernseher.
Einleitung COMMON INTERFACE Der Schacht Common Interface (CI) dient der Aufnahme des Conditional Access Moduls (CAM) und der SmartCard für Bezahlsender. Bitte wenden Sie sich an Ihren Dienstanbieter für weitere Informationen. Bitte beachten Sie, dass CI-Module und SmartCards von uns nicht geliefert werden. Warnung Schalten Sie den Fernseher aus, bevor Sie das Modul in den Common Interface Schacht einschieben.
Fernbedienung 03 Fernbedienung Batterien in die Fernbedienung einsetzen 1. Öffnen Sie das Batteriefach. 2. Setzen Sie 2 AAA 1,5-V-Batterien mit korrekter Polarität ein, so wie im Batteriefach angezeigt. 3. Schließen Sie das Batteriefach wieder. Tauschen Sie die Batterien aus, wenn die Reichweite der Fernbedienung nachlässt. Bitte beachten Sie: 1) Benutzen Sie Alkali-Batterien. 2) Bei längerer Nichtbenutzung oder wenn die Batterien erschöpft sind, entnehmen Sie sie bitte aus der Fernbedienung. 1.
Fernbedienung VIDEOTEXT Drücken Sie: TEXT SEITE WÄHLEN UNTERSEITEN DIREKT AUFRUFEN INDEX Sie haben folgende Funktion: E Videotext ist ein Informationssystem, das von einigen Sendern übertragen wird und wie eine Zeitung aufgebaut ist. Hier haben Sie ebenfalls Untertitel für Hörgeschädigte (Kabelnetzwerke, Satellitenkanäle usw.). Mit dieser Taste rufen Sie den Videotext auf oder Sie verlassen ihn. Eine Liste mit Menüpunkten wird angezeigt. Jede Seite hat eine 3-stellige Nummer.
BEDIENUNGSHINWEISE 04 BEDIENUNGSHINWEISE Installation Zuhause- oder Geschäftsmodus ①. Der Zuhause-Modus ist ein Energiesparmodus. Der Der Installationsmodus erscheint nur beim ersten Start des Fernsehers oder nach Zurücksetzen des Fernsehers auf Werkseinstellungen.
BEDIENUNGSHINWEISE DVB Suchmenü Suchart Herzlichen Glückwunsch! Voll Häufigkeit Die Erstinstallation ist erfolgreich abgeschlossen. 610000 Netzwerk ID Auto Symbol(ks/s) Auto Viel Freude mit Ihrem Haier TV Drücken Sie OK zum Beenden 1.KANALMENÜ 3). Kanalsuchlauf beginnt. Dies kann bis zu 6 Minuten dauern. In der Anzeige sehen Sie den Fortschritt und die Anzahl der gefundenen Kanäle. 4).
BEDIENUNGSHINWEISE 2). Drücken Sie die ▲▼ Tasten, um den Automatischen Suchlauf auszuwählen und drücken Sie dann die OK Taste. Tuning typ KANAL Deutschland Italien Norwegen Griechenland Luxemburg Polen TON ZEIT Niederlande Ungarn Automatisches Tuning BILD Portugal OPTION OK OK CADTV Manuelles Tuning ATV Manuelles Tuning Programme bearbeiten Signalinformationen CI Daten Software-Aktualisierung (USB) De SPERREN 5).Kanalsuchlauf beginnt. Dies kann bis zu 6 Minuten MENU ZURÜCK dauern.
BEDIENUNGSHINWEISE 6). Kanalsuchlauf beginnt. Dies kann bis zu 6 Minuten dauern. In der Anzeige sehen Sie den Fortschritt und die Anzahl der gefundenen Kanäle. 7).Wenn Sie den ATV-Suchlauf überspringen möchten, drücken Sie die MENU Taste, um den Suchlauf während des Vorgangs zu unterbrechen. Ein Pop-Up Fenster wird angezeigt, drücken Sie die Taste, um OK auszuwählen. Gehen Sie dann direkt weiter zum DTV-Suchlauf. Sie können den Schritt wiederholen, wenn Sie auch den DTV-Suchlauf überspringen möchten.
BEDIENUNGSHINWEISE 3) ATV Manueller Kanalsuchlauf: 5). CI-Informationen (optional) Stellen Sie das Tonsystem zur Suche nach Analogkanälen ein, dann nehmen Sie die Feinabstimmung vor und speichern Sie den gewählten Kanal. In diesem Menü zeigen Sie die Informationen auf Ihrer CI-Karte an. 2.BILDMENÜ Das zweite Menü ist das Bildmenü (PICTURE). Hier stellen Sie Kontrast, Helligkeit usw. ein. Mit OK bestätigen Sie Ihre Einstellung.
BEDIENUNGSHINWEISE KANAL BITTE BEACHTEN SIE: Uhr Ausschaltzeit BILD Mit Zurücksetzen auf Werkseinstellung (Restore Factory Default) werden alle Kanäle und das Passwort gelöscht. OK Einschaltzeit Sleep-Timer Automatischer Ruhemodus Zeitzone TON ZEIT 6.SPERRMENÜ Das sechste Menü ist das Sperrmenü (LOCK). Hier sperren Sie das System, stellen Sie das Passwort ein, blockieren Sie Programme und stellen Sie die Kindersicherung ein. Nach Aktivierung der Sperre können Sie den Kanal nicht mehr auswählen.
BEDIENUNGSHINWEISE 3. Aufnahme Drücken Sie die rote Taste, um die Aufnahme des Programms einzustellen. OSD Spracheinstellung KANAL Audiosprachen Untertitel-Sprache Land PVR Dateisystem BILD Erinnerung 4. Drücken Sie die blaue Taste und stellen Sie eine Erinnerungszeit ein. Der Fernseher schaltet dann automatisch auf das gewählte Programm um. TON OK ZEIT Werkseinstellungen wiederherstellen Automatische Abschaltung (4 Std.
BEDIENUNGSHINWEISE (Wir empfehlen, das Gerät mit „High Speed FS“ zu formatieren, wodurch sich die Aufnahme beschleunigt.) Festplatte formatieren Festplatte formatieren Warnung! Alle Daten gehen verloren. Start VERLASSEN 2.Programm aufzeichnen Während der DTV-Wiedergabe wählen Sie den gewünschten Kanal, dann drücken Sie „Aufnahme“ (Record) zur Anzeige des Aufnahmemenüs. Drücken Sie erneut „Aufnahme“ (Record). Das Aufnahmemenü erlischt und „REC“ wird oben links im Bild angezeigt.
BEDIENUNGSHINWEISE 9.TimeShift-Funktion Vorbereitung der Aufnahme Mit dieser Funktion können Sie das aktuelle Programm unterbrechen und auf einem USB-Speichermedium zwischenspeichern. Sie können die Sendung zu einem späteren Zeitpunkt weitersehen. Die Wiedergabe startet zeitversetzt, ab der Unterbrechung. BITTE BEACHTEN SIE: Ziehen Sie das USB-Speichermedium während der aktivierten TimeShift-Funktion nicht ab. 4 GB Speicher puffern ca. 140 Minuten. BITTE BEACHTEN SIE: De Das USB 2.
BEDIENUNGSHINWEISE Limitierungen der TimeShift-Funktion: 1. Bei aktivierter TimeShift-Funktion stehen Ihnen nur WIEDERGABE/PAUSE/STOPP/VORLAUF/RÜCKLAUF/VOL+ /VOL-/MUTE sowie einige allgemeine Funktionstasten (ENTER/EXIT/Navigation) zur Verfügung. 2. Die Videowiedergabe ist nicht gleichmäßig und kann springen, falls die USB-Aufnahmegeschwindigkeit nicht den Mindestanforderungen entspricht. 3. Ziehen Sie das USB-Speichermedium nicht ab, schalten Sie das Gerät während der TimeShift-Funktion nicht aus.
BEDIENUNGSHINWEISE 10.USB-Media-Player Drücken Sie die SOURCE-Taste (Eingangsquellen) auf Ihrer Fernbedienung um die Signalquellen anzuzeigen und wählen Sie „USB“ aus. Drücken Sie dann OK, um das USB-Menü aufzurufen. Haier Innovation Life FOTO USB2.0 MUSIK EXIT FB Vorherige Nächste FF Stopp Repeat ALL AB Satz A BITTE BEACHTEN SIE: FILM Bewegen OK Sie können den Audiotrack oder das Programm während der Videowiedergabe einstellen. Mit Info oder OK zeigen Sie das Infomenü an.
BEDIENUNGSHINWEISE Hotel-Modus: Um in den Hotel-Modus zu gelangen, geben Sie bitte die folgenden Tastenkombinationen auf Ihrer Fernbedienung ein: Drücken Sie erst „Source“ und geben auf dem Ziffernfeld „1001“ ein. HOTEL MENÜ Hotelmodusbetrieb Bedienfeldsperrung Max. Lautstärke Start Quelle Start Kanal Menüanzeige einrichten Quelländerung eingeben Auf USB Festplatte speichern Laden...
Störungserkennung 05 Störungserkennung Problem Bild Überprüfen Ton verschneit gestört Schatten normaler Ton Störungen normales Bild kein Bild keine Farbe Bild verschwindet keine Farbe Sie sehen einen schwarzen Balken oben und unten.
Störungserkennung Fehlerbehebung Mein Fernseher zeigt nicht das Bild auf meinem Laptop/PC, wenn er eingeschaltet ist. Ich habe meinen PC/Laptop an den Fernseher angeschlossen und empfange ein Bild, aber keinen Ton. Warum? Das Bild hat keine automatische Größenanpassung beim Senderwechsel. Ich habe gerade an einen DVD-Player oder einen anderen Artikel in meinem Fernseher angeschlossen, und er funktioniert nicht.
Störungserkennung Problembehandlung bei dem Digitalfernsehen und möglich Lösungen Bild zerlegt sich in Pixel Ein typisches Beispiel für ein Empfangsproblem stellt das Auseinanderbrechen von Bildern (Pixilation) oder das Einfrieren der Bilder dar, manchmal gibt es Klick- oder quietschende Geräusche oder der Ton fällt aus oder es gibt gar KEINEN Empfang. Ihr Bild kann in Pixel aufgrund des digitalen Videosignalausfalls brechen.
Störungserkennung Spezifikationen 39" Full HD 1080P digitaler LED LCD-Fernseher Fernsehbildqualität: FULL HD Integriert digital. Bildschirmgröße: 99cm Auflösung 1920 x 1080 Pixel 50Hz. Konnektivität: 2 HDMI-Anschlüsse. 1 SCART-Anschluss. PC-Eingang. Component-Video-Anschluss. Composite. 1 USB-Anschluss. Tonqualität: NICAM Stereo-Soundsystem. 2 x 8 Watt RMS-Ausgangsleistung . Stromverbrauch (Standby) <0.5W Digitale Funktionen: Digital interaktiv. Digitaler Text.
Störungserkennung Spezifikationen 42" Full HD 1080P digitaler LED LCD-Fernseher Fernsehbildqualität: FULL HD Integriert digital. Bildschirmgröße: 106.7cm Auflösung 1920 x 1080 Pixel 50Hz. Konnektivität: 2 HDMI-Anschlüsse. 1 SCART-Anschluss. PC-Eingang. Component-Video-Anschluss. Composite. 1 USB-Anschluss. Tonqualität: NICAM Stereo-Soundsystem. 2 x 8 Watt RMS-Ausgangsleistung . Stromverbrauch (Standby) <0.5W Digitale Funktionen: Digital interaktiv. Digitaler Text.
Téléviseur à écran plat à LED GUIDE D'UTILISATION Lisez attentivement ces instructions avant d'utiliser l'appareil et conservez-les pour toute référence ultérieure.
Table des Matières Table des Matières 01 Avertissment de sécurité Bienvenue 2 Menu Image Menu Audio 18 18 18 Information Importante 2 Menu Temps Instruction de sécurité 3 Menu Options 19 Avertissements et mise en garde 4 Menu Verrouillage 19 Menu EPG (Guide Électronique des Programmes) 19 02 Introduction Fonction PVR Principaux Caractéristiques 5 Préparer l'enregistrement d'un programme Installation Murale 7 Enregistrer le programme Wandmontage 8 Lire l'enregistrement Fonction T
Avertissements et mesures de sécurité 01 Avertissements et mesures de sécurité BIENVENUE Nous vous remercions d'avoir acheté ce téléviseur LCD LED 39"/42" . Ce guide va vous aider à régler et utiliser votre téléviseur.
Avertissements et mesures de sécurité INSTRUCTIONS DE SÉCURITÉ Attention : Pour réduire le risque d'électrocution, ne pas ouvrir le capot arrière. Aucun des éléments internes ne peut être réparé par l'utilisateur. Confiez l'entretien à un technicien qualifié. Attention : POUR REDUIRE LES RISQUES D'INCENDIE OU D'ELECTROCUTION, N'EXPOSEZ PAS CET APPAREIL A LA PLUIE OU A L'HUMIDITE.
Avertissements et mesures de sécurité Avertissements et mise en garde Avertissement Des hautes tensions dangereuses existent à l'intérieur de cet appareil. Ne retirer pas le panneau de sécurité à l'arrière du téléviseur. Pour toute réparation, veuillez faire appel à un technicien qualifié. Attention Ne coincez pas le cordon d'alimentation sous le récepteur de télévision.
Introduction 02 Introduction ATTENTION INSTALLATION Ne modifiez aucun composant interne et bouton de commande du téléviseur non décrit dans ce manuel. Tous les téléviseurs à LED sont des équipements de haute tension électrique. Il faut débrancher le téléviseur avant de nettoyer de la poussière ou des gouttes d'eau sur l'écran, du boîtier ou autour de l'un des boutons ou des connecteurs. Utilisez un chiffon doux et sec et non pelucheux pour essuyer le téléviseur.
Introduction PC MODE PRÉDÉFINI FR RESOLUTION V. Fréq. (KHz) H. Fréq. (KHz) 1 640x480 60 31.47 2 800x600 60 37.88 3 1024x768 60 48.36 4 1360x768 60 47.7 5 1280x1024 60 63.98 6 1920x1080 60 66.
Introduction Instructions pour l'assemblage du support 1. Placez le téléviseur sur une surface plane avec l'écran orienté vers le bas. Utilisez un chiffon pour le protéger. Localisez la base du socle. 2. Fixez le socle TV en serrant les vis au maximum. REMARQUES SUR L'INSTALLATION Placez le téléviseur dans une pièce où la lumière ne frappe pas directement sur l'écran. L'obscurité totale ou une réflexion sur l'écran peut provoquer une fatigue visuelle.
Introduction DIRECTIVES D'INSTALLATION DU SUPPORT MURAL Ce téléviseur peut être accroché au mur en suivant la procédure suivante : 1. Placez le téléviseur LCD LED sur une surface solide. Mettez un matériau souple à l'avant de l'écran pour le protéger contre tout dommage. 2. Retirez les vis de la partie inférieure du téléviseur, où le socle est fixé au téléviseur, et enlevez le socle (rangez le socle dans un endroit sûr pour une utilisation ultérieure). 3.
Introduction Panneau frontal 1 SOURCE 3 2 3 4 CH- VOL- 1 2 3 SOURCE MENU CH+/CH- 4 VOL+/VOL- 5 VEILLE VIDEO L Y R Pb Pr HDMI2 AC-INPUT 100-240V~50/60Hz 6 1 2 3 4 5 6 1 7 AV Audio Gauche/Droite Sources d'alimentation CC YPbPr HDMI2 HDMI1 STANDBY Pour afficher le Menu Source Pour ouvrir le Menu principal En mode TV, appuyez sur CH+ ou CH- pour passer au canal suivant ou précédent. Dans MENU, appuyez sur CH+ ou CH- pour sélectionner des fonctions. Pour régler le niveau sonore.
Introduction Connexion à votre TV Haier Connexion d'un lecteur DVD / décodeur satellite / câble / console de jeux / PC ou ordinateur portable Il y a plusieurs options pour la connexion d'un lecteur DVD / décodeur satellite ou par câble / console de jeux / PC ou ordinateur portable à votre téléviseur. Option 1 SCART Branchez un câble péritel (non fourni) de la prise péritel du téléviseur au lecteur DVD / décodeur satellite ou par câble ou console de jeux.
Introduction INTERFACE COMMUNE Le logement de l'interface commune (CI) est destiné à un module d'accès conditionnel (CA) et une carte à puce pour pouvoir regarder des programmes télé et des services supplémentaires payants. Contactez votre câble opérateur pour obtenir plus d'informations sur les modules et l'abonnement. Notez que les modules CA et les cartes à puce ne sont ni fournis ni des accessoires en option.
Télécommande 03 Télécommande Insertion des piles dans la télécommande 1. Ouvrez le compartiment des piles. 2. Insérez 2 piles AAA 1,5 V en respectant les indications de polarité (+/-) des piles à l'intérieur du compartiment. 3. Remettez le couvercle du compartiment des piles en place. Remplacez par des piles neuves en cas de dysfonctionnement de télécommande et que le téléviseur ne réponde pas à la télécommande. Remarque: 1) Utilisation de piles alcalines conseillée.
Télécommande TÉLÉTEXTE E Le télétexte est un système d'information diffusé par certaines chaînes, qui se consulte comme un journal. Il offre également l'accès aux sous-titrages pour les personnes malentendantes ou qui ne sont pas familiers avec la langue de transmission (réseaux câblés, chaînes satellites, etc.) Appuyez sur : Vous obtenez TEXTE Il est utilisé pour appeler ou quitter le mode télétexte. Le sommaire apparaît avec une liste d'éléments qui peuvent être accédés.
Utilisation 04 Utilisation Guide d'installation Modes Accueil ou Boutique le guide d'installation apparait seulement quand le téléviseur est mise en marche pour la première fois ou lorsque qu'il est réstauré en paramétrage usine. Sélectionner une langue de menu, SVP. Tchèque Espagnol Italien Allemand Grèce Anglais Français Néerlandais Magyar Polonais Arabe Russe Lithuania Roumain OK ①. Le mode Accueil est un mode d'économie d'énergie.
Utilisation 6) Menu recherche TNT Type de recherche Full Fréquence 610000 Identification Reseau Auto Symbole(ks/s) Auto 3). La recherche des chaînes démarre. Cette opération peut prendre jusqu'à 6 minutes. L'écran affiche l'état d'avancement de la recherche et le nombre de chaînes trouvées. 4). Si vous voulez ignorer la recherche ATV, appuyez sur la touche MENU pour l'interrompre. Un écran s'affiche, appuyez sur la touche◀pour sélectionner YES (OUI) pour confirmer.
Utilisation Type de recherche Chaîne Règlage automatique IMAGE Allemagne Italie Norvège Grèce Luxembourg Pologne Hongrie Hollande Portugal SON Heure OPTIONS OK CADTV Manual Tuning Recherche analogique manuelle Editer Programme Informations signal CI Information Mise à jour logiciel(USB) FR Verrouiller OK 5).La recherche des chaînes démarre. Cette opération peut prendre jusqu'à 6 minutes.
Utilisation 6). La recherche des chaînes démarre. Cette opération peut prendre jusqu'à 6 minutes. L'écran affiche l'état d'avancement de la recherche et le nombre de chaînes trouvées. 7).Si vous voulez ignorer la recherche ATV, appuyez sur la touche MENU pour l'interrompre. Un écran s'affiche, appuyez sur la touche ◀ pour sélectionner YES (OUI) pour confirmer. Vous serez redirigez directement à la recherche DTV. Vous pouvez répéter l'étape ci-dessus si vous voulez ignorer recherche DTV.
Utilisation 3) Recherche manuelle de programmes analogiques (ATV) : Vous pouvez changer le système audio pour rechercher les chaînes de télévision analogiques puis affiner les canaux sélectionnés Recherche analogique manuelle Enregistrer sous 1 5). Informations sur la CI : (en option) Ce menu peut afficher des informations sur la carte CI. 2. Menu Image Le second élément du Menu principal est le Menu Image. Ce menu permet de régler les paramètres de l'image tels que contraste, luminosité, etc.
Utilisation Chaîne Remarque: Horloge Minuterie IMAGE La restauration des paramètres par défaut, efface tous les programmes et mot de passe. OK Mise En Marche Programmation d'arrêt Veille automatique Fuseau horaire SON Heure 6. Menu Verrouillage Le sixième élément du Menu principal est le Menu verrouillage.
Utilisation 3. Record (Enregistrer) Appuyez sur la touche rouge pour choisir le programme à enregistrer. Reminder (Rappel) 4. Appuyez sur la touche bleue pour choisir un programme et mettre en place une heure de rappel, le téléviseur passe automatiquement au programme choisi à l'heure de rappel.
Utilisation (Suggestions du format de formatage du dispositif en "FS grande vitesse ..." ce qui peut accélérer l'enregistrement.) Formater le disque Formater le disque Attention! Toute les données seront perdues Demarrer Sortir OK Formater le disque Ne pas débrancher l'USB. Formattage, attendez SVP...
Utilisation 9.Fonction Timeshift (lecture décalée) Préparer l'enregistrement d'un programme REMARQUE: Ce téléviseur vous permet de faire une pause et d'enregistrer le programme numérique en cours dans un dispositif de stockage USB, et de reprendre au point où il s'était arrêté. Ne débranchez pas le dispositif de stockage USB lorsque la fonction TimeShift est en cours. REMARQUE: Environ 4 Go de mémoire tampon offre 140 minutes d'enregistrement. FR Le formatage d'un dispositif de stockage USB 2.
Utilisation Limites du TimeShift : 1. Lorsque la fonction TimeShift est activée, seules les touches PLAY/PAUSE/STOP/FWD/REV/ VOL+/VOL-/MUTE et quelques touches de fonctionnement de base (ENTRER / EXIT / navigation) sont disponibles. 2. La lecture vidéo peut ne pas être continue et peut présenter des sauts si la vitesse d'enregistrement USB ne répond pas aux exigences minimales. 3. Ne retirez pas le dispositif USB et n'éteignez pas l'appareil pendant l'opération TimeShift.
Utilisation 10. Lecteur USB Cliquez sur l'icone de la source, et sélectionnez l'USB dans la liste, pressez le bouton OK pour entrer dans le menu USB. Haier Innovation Life PHOTO Musique Texte Film play 00:04:22 Pause 00:04:22 FB FF Prec. Suiv. Stop Repeat ALL AB Config A Appuyez sur◀▶pour sélectionner l'icône de la fonction, appuyez sur la touche OK pour valider la fonction. Appuyer sur▼ou sur le bouton Exit pour quitter la barre de contrôle excepter pour la musique. REMARQUE: USB2.
Dépannage 05 Dépannage Symptôme du problème Vérification Inspection Audio Image Neige fantôme Interférence Image normale Pas d'image Bruit Audio normal Bruit position de l'antenne, direction ou connexion position de l'antenne, direction ou connexion équipements électroniques, voiture / moto, lumière fluorescente Son coupé Volume (vérifiez si muet est activé ou si les connexions du système audio ne sont pas corrects) Son coupé Le cordon d'alimentation n'est pas inséré.
Dépannage Dépannage Ma télé n'affiche pas l'image sur mon ordinateur portable/PC lorsqu’il est connecté. J'ai connecté mon PC/ordinateur portable au téléviseur et j'obtiens une image mais pas de son. Pourquoi ? L'image n'est pas redimensionnée automatiquement lors de changement de chaînes. Dès que je connecte un lecteur DVD ou un autre appareil à ma télévision, ce dernier ne fonctionne plus.
Dépannage Dépannage des problèmes de télévision numérique et solutions possibles Décomposition de l'image en pixels Un exemple typique de problème de réception comprend la décomposition de l'image en pixels (pixilation) ou blocage d'image, parfois il y a des grincements ou crissements ou baisse de son ou pas de réception du tout. Votre image peut se décomposer en pixels à cause de la dégradation du signal vidéo numérique.
Dépannage Spécification Téléviseur numérique LCD LED 39" Full HD 1080p Qualité d'image du téléviseur : FULL HD Numérique intégré. Taille d'écran : 99cm Résolution 1920x1080 pixels 50Hz. FR 2 prises HDMI. 1 prise péritel. Connectivité : Prise d'entrée PC. Prise vidéo composante. Composite. 1 port USB. Qualité sonore : Consommation en veille Caractéristiques numériques : Autres caractéristiques : NICAM stereo sound system. 2 x 8 watts RMS power output. <0.5W Interactivité numérique. Texte numérique.
Dépannage Spécification Téléviseur numérique LCD LED 42" Full HD 1080p Qualité d'image du téléviseur : FULL HD Numérique intégré. Taille d'écran : 106.7cm Résolution 1920x1080 pixels 50Hz. 2 prises HDMI. 1 prise péritel. Connectivité : Prise d'entrée PC. Prise vidéo composante. Composite. 1 port USB. Qualité sonore : Consommation en veille Caractéristiques numériques : Autres caractéristiques : NICAM stereo sound system. 2 x 8 watts RMS power output. <0.5W Interactivité numérique. Texte numérique.
LED-achtergrondverlichte platte TV GEBRUIKSAANWIJZING Lees deze handleiding zorgvuldig door alvorens het toestel te gebruiken en bewaar het voor latere naslag.
Inhoud Inhoud 01 Veiligheid en waarschuwingen Welkom 2 BEELD MENU GELUID MENU 18 18 18 Belangrijke informatie 2 TIJD MENU Mededeling over de veiligheid 3 INSTEL MENU 19 Waarschuwingen en voorzichtigheid 4 KINDERSLOT MENU 19 EPG-MENU (electronische programmagids) 19 02 Introductie PVR-FUNCTIE Belangrijkste kenmerken 5 Voorbereiding om een programma op te nemen Montagewijze van het voetstuk 7 Het programma opnemen Richtlijnen voor monteren aan een muur 8 Een nummer afspelen Functi
Veiligheid en waarschuwingen 01 Veiligheid en waarschuwingen WELKOM Hartelijk dank voor de aanschaf van deze 39"/42” LED/LCD-tv. Deze handleiding zal u helpen bij het opzetten en het gebruik van uw tv.
Veiligheid en waarschuwingen KENNISGEVING OVER DE VEILIGHEID Waarschuwing: Verwijder de afdekplaat of achterkant niet om het risico van een elektrische schok te voorkomen. Er bevinden zich geen gebruikersonderdelen binnen in het apparaat. Laat onderhoud over aan gekwalificeerd personeel. Waarschuwing: Het apparaat mag niet blootgesteld staan aan regen of vocht om brand of een elektrische schok te voorkomen.
Veiligheid en waarschuwingen WAARSCHUWINGEN EN VOORZICHTIGHEID Voorzorgsmaatregelen Waarschuwing Deze televisie-ontvanger gebruikt hoge spanningen tijdens de werking. Verwijder de afdekplaat of achterkant van dit apparaat niet. Laat onderhoud aan gekwalificeerd personeel over. Zorg ervoor dat het snoer zich nooit onder de televisie-ontvanger bevindt. Voorzorgsmaatregelen Leun of sta nooit op de televisie of standaard, of druk er niet plotseling tegenaan. Besteed speciale aandacht aan kinderen.
Introductie 02 Introductie OPGELET INSTALLATIE Knoei nooit met onderdelen binnenin de TV of andere instelknoppen die niet in deze handleiding beschreven zijn.Alle LED-TV's zijn hoogspanning elektrische apparatuur. Wanneer u afstoft of er water aan het scherm, de kast, rond de knoppen of aansluitingen komt, moet het netsnoer uit het stopcontact worden verwijderd. Veeg de TV af met een zachte, droge, stofvrije doek.
Introductie PC VOORAF INGESTELD DU RESOLUTIE V.Freq. (KHz) H. Freq. (KHz) 1 640x480 60 31.47 2 800x600 60 37.88 3 1024x768 60 48.36 4 1360x768 60 47.7 5 1280x1024 60 63.98 6 1920x1080 60 66.
Introductie Montagewijze van het voetstuk 1. Plaats de tv, met het scherm naar beneden, op een vlakke ondergrond. Gebruik een doek om het scherm te beschermen. Zoek het schroefgat aan de onderkant. 2. Bevestig de onderkant door de schroef stevig op de voet aan te draaien. INSTALLATIE-OPMERKINGEN Zoek een plek voor de tv in een kamer waar er geen rechtstreeks licht op het scherm valt. Totale duisternis of een reflectie op het scherm kan leiden tot vermoeidheid van de ogen.
Introductie RICHTLIJNEN VOOR MONTEREN AAN EEN MUUR Deze televisie kan als volgt aan de muur gemonteerd worden: 1. Plaats de LED-LCD-televisie op een stevige ondergrond. Plaats een zachte doek over de voorkant van het scherm om het tegen eventuele schade te beschermen. 2. Verwijder de schroeven uit het onderste deel van de tv, daar waar de voet de televisie verbindt en haal de voet weg (zet de voet op een veilige plaats voor toekomstig gebruik). 3.
Introductie Het voorpaneel SOURCE 3 2 3 CH+ CH- VOL- 1 2 3 BRON MENU CH+/CH- 4 VOL+/VOL- 5 STANDBY VIDEO L Y R Pb Pr HDMI2 AC-INPUT 100-240V~50/60Hz 6 1 2 3 4 5 6 AV L/R AUDIO DC-vermogen YPbPr HDMI2 HDMI1 1 7 8 Ingang Ingang Ingang Ingang Ingang Ingang VOL+ STANDBY Laat het broningangsmenu zien. Laat het hoofdmenu zien. In de TV-instelling, druk op CH+ of CH- om naar een hoger of lager kanaal te veranderen. In MENU, druk op CH+ of CH- om uit geselecteerde onderdelen te kiezen.
Introductie Aansluiten op uw Haier TV Een DVD-speler/set-top box satelliet- of kabelontvanger/spelconsole/PC of Laptop aansluiten. Er zijn verschillende opties om een DVD-speler/set-top box satelliet- of kabelontvanger/spelconsole/PC of Laptop op uw TV aan te sluiten. Optie1 SCART Sluit een SCART-kabel (niet meegeleverd) aan vanaf de SCART-aansluiting op de TV naar de DVD-speler/settop box satelliet- of kabelontvanger of spelconsole.
Introductie GEMEENSCHAPPELIJKE INTERFACE De gemeenschappelijke interface-gleuf (common interface of CI) is ontworpen om de conditionele toegang-module (CA) en smartkaart te aanvaarden, dit om het mogelijk te maken om naar betaal-tv en aanvullende diensten te kijken. Neemt u contact op met de installateur van de Common interface voor meer informatie betreffende modules en abonnementen. Let op, CA-modules en smartkaarten zijn geen optionele accessoires van ons.
Afstandsbediening 03 Afstandsbediening Plaats de batterijen in de afstandsbediening 1. Verwijder het batterijklepje. 2. Plaats 2 AAA 1,5V batterijen in het compartiment en let erop dat de polariteit (+ of -) van de batterijen overeenkomt met de polariteitsmerken op de afstandsbediening. 3. Monteer het batterijklepje. Vervang de batterijen wanneer uw tv de volgende symptomen begint te vertonen: bediening is instabiel of onregelmatig, soms werkt de tv niet met de afstandsbediening.
Afstandsbediening TELETEKST Druk op: TEKST E Teletekst is een informatiesysteem dat door bepaalde zenders uitgezonden wordt en geraadpleegd kan worden zoals een krant. Het biedt ook toegang tot ondertiteling voor kijkers met gehoorsproblemen of die niet vertrouwd zijn met de taal van een uitzending (kabelnetwerken, satellietkanalen enz.). U verkrijgt: Dit wordt gebruikt om de teletekst-optie op te openen of te verlaten. De inhoud wordt weergegeven in een lijst van pagina's die geraadpleegd kan worden.
DE WERKING 04 DE WERKING WONING- of WINKEL- modus Installatiegids ① De woningmodus is een energiebesparende De installatiegids verschijnt enkel wanneer de TV voor de eerste keer gebruikt wordt of terug is ingesteld op fabrieksinstellingen. Kies een OSD taal Czech Spanish Italiano Polski Deutsch Greek Magyar Russian English French Nederlands Romanian Arabic Lithuania OK modus.De woningmodus wordt aanbevolen voor normale weergave-instelling en is door de fabrikant als standaard ingesteld.
DE WERKING 6) DVB-C Scan Menu Scan type Frequentie 610000 Network ID Auto Symbol(ks/s) Auto 3). Het kanaalafstemmen zal beginnen. Deze bewerking kan tot 6 minuten duren. De display zal de voortgang van het afstemmen en het aantal gevonden kanalen weergeven. 4).Als u het ATV-afstemmen wilt overslaan, druk op de “MENU”-knop om het afstemmen te onderbreken. Een pop-up-scherm zal worden weergegeven, druk op de”◀”-knop om “YES” te selecteren om te bevestigen.
DE WERKING Auto afstelling Kanaal Tune Type BEELD OK GELUID Germany Italy Norway Greece Luxembourg Poland Hungary Nederlands Portugal CADTV Manual Tuning Manueel analoog afstemmen Programme Edit Signaalinformatie CI Informatie Software update(USB) Tijd OPTIES DU Vergrendeling OK 5). Het kanaalafstemmen zal beginnen. Deze bewerking kan tot 6 minuten duren. De display zal de voortgang van het afstemmen en het aantal gevonden kanalen MENU TERUG Verplaatsen OK OK 3).
DE WERKING 6). Het kanaalafstemmen zal beginnen. Deze bewerking kan tot 6 minuten duren. De display zal de voortgang van het afstemmen en het aantal gevonden kanalen weergeven. 7). Als u het ATV-afstemmen wilt overslaan, druk op de “MENU”-knop om het afstemmen te onderbreken. Een pop-up-scherm zal worden weergegeven, druk op de” ◀”-knop om “YES” te selecteren om te bevestigen. Vervolgens gaat u rechtstreeks naar DTV-afstemmen. U kunt de bovenstaande stap herhalen als u ook de DTVafstemmen wilt overslaan.
DE WERKING 3) ATV handmatig afstemmen: U kunt het geluidsysteem veranderen om naar analoge tvkanalen te zoeken en fijn af te stellen, sla hierna de kanalen op die u geselecteerd heeft. Manueel analoog afstemmen Opslaan als 1 Systeem BG 5).CI-informatie: (optioneel) Dit menu kan de informatie over de gemeenschappelijke interface kaart (CI-kaart) weergeven. 2. BEELDMENU Het tweede deel van het MENU is het BEELDMENU. U kunt hier effect geven aan het beeld zoals contrast, helderheid enz.
DE WERKING Kanaal 6. KINDERSLOT MENU Klok Timer Uit BEELD GELUID Tijd Het zesde onderdeel van het MENU is het KINDERSLOTMENU. U kunt het systeem op slot zetten, een wachtwoord aanbrengen, programma's blokkeren en ouderlijke begeleiding instellen. Zodra u het kinderslotsysteem heeft ingeschakeld, kunt u geen kanalen meer zoeken of programma's wijzigen.
DE WERKING 3. Opnemen Druk op de rode toets. Dit kan ingesteld worden om het programma te laten opnemen.. Herinneren 4. Druk op de blauwe toets om één programma te kiezen en om één herinnertijd in te stellen. Het tv-scherm zal op de gekozen tijd automatisch naar het gekozen programma verspringen. Herinnering Taalinstellingen Audiotaal Taal Ondertiteling Land PVR File System Kanaal BEELD GELUID OK Tijd Standaard opnieuw Autom. uitschak.
DE WERKING (Suggestie voor het formatteren van het formaat van het apparaat door “High Speed Fs…”, dat versneld kan opnemen). Format disk Format disk Let op! Alle gegevens zullen verloren gaan Start Beëindigen OK Format disk Do not unplug USB device. Formatteren,Even Geduld Het onderstaande menu verschijnt nadat het formatteren beeïndigd is: Select Disk C: Check PVR File System Controleren USB Disk Pass Format Pass Time Shift Size Snelheid All Controleren Free Record Limit 6 Hr.
DE WERKING 9.Functie om de tijd te verschuiven Voorbereiding om een programma op te nemen Met deze tv kunt u het programma dat u aan het kijken bent laten pauzeren en laten opnemen naar een USBopslagapparaat, en dit hervatten op het punt waar er gepauzeerd werd. OPMERKING: OPMERKING: Verwijder het USB-opslagapparaat niet wanneer de TIJDVERPLAATS-functie geactiveerd is. 4GB aan geheugen biedt ongeveer 140 minuten aan opneemtijd. DU Het formatteren van een USB 2.0 opslagapparaat is nodig.
DE WERKING TIJDVERPLAATS-beperkingen: 1.Wanneer de TIJDVERPLAATS-functie geactiveerd is, werken alleen de bassistoetsen zoals AFSPELEN/PAUSE/STOP/FWD/REV/VOL+/ VOL-/MUTE en sommige basishandelingtoetsen (ENTER/EXIT/pijltoetsen). 2.Het terugspelen van een video kan haperen en overslaan als de USB-opnamesnelheid niet aan de minimum eisen voldoet. 3.Verwijder de USB-schijf niet, schakel ook de stroom niet uit tijdens een TIJDVERPLAATS-operatie. Het zal afbreken zodra het signaal verdwenen is. 4.
DE WERKING 10. USB-speler Druk op de brontoets, en selecteer USB in de bronlijst. Druk op de OK-toets om het USB-menu te openen. play 00:04:22 Pause FB 00:04:22 FF Vorige Volgende Stop Repeat ALL AB Set A Haier Innovation Life Foto Muziek USB2.0 EXIT Tekst TERUG Film Verplaatsen OK Select Zorg ervoor dat het USB-apparaat aangesloten is in de sleuf. Er zijn vier types media-onderdelen die geselecteerd kunnen worden, dit zijn foto, muziek, film en tekst.
Probleemoplossing 05 Probleemoplossing Probleemsymtoom Beeld Inspecteer of: Audio Sneeuw Ruis Antennepositie, richting of aansluiting Antennepositie, richting of aansluiting Wazig Normale audio Interferentie Lawaai Normaal beeld Dempen (mute) Volume (controleer of “gedempt” (mute) geactiveerd is of dat de aansluitingen van het audiosysteem correct zijn) Dempen (mute) Netsnoer zit niet in stopcontact. Aan/ uit-schakelaar staat niet aan. Contrast en helderheid/volume- instellingen zijn geopend.
Probleemoplossing Problemen oplossen Mijn TV geeft niet het beeld op mijn laptop/PC weer wanneer aangesloten. Ik heb mijn PC/Laptop op de TV aangesloten en krijg beeld, maar geen geluid. Waarom? Het beeld past niet automatisch het formaat aan wanneer het kanaal wordt gewijzigd. Ik heb net een DVD-speler of een ander apparaat op mijn TV aangesloten en het werkt niet.
Probleemoplossing Problemen oplossen digitale TV - Problemen en mogelijke oplossingen Het beeld breekt in pixels op Typische voorbeelden van ontvangstproblemen zijn het opbreken van beelden (pixilation), het bevriezen van het beeld, soms zijn er klikkende of piepende geluiden te horen of het geluid valt weg of er is helemaal GEEN ontvangst. Uw beeld kan in pixels opbreken doordat het digitale video-signaal wegvalt.
Probleemoplossing Specificatie 39” volledige HD 1080P LED/LCD-tv Beeldkwaliteit van de TV: FULL HD Geïntegreerde digitaal. Schermgrootte: 99cm Resolutie 1920x1080 pixels 50 Hz. Connectiviteit: 2 HDMI-aansluitingen 1 SCART-aansluiting. PC-ingangsaansluiting. Component Video-aansluiting Compositie. 1 USB-poort. Geluidskwaliteit: NICAM stereo geluidsysteem. 2 x 8 watt RMS uitgangsvermogen. Standby-energieverbruik: Digitale functies: Extra functies: <0.5W Digitaal interactief. Digitale tekst.
Probleemoplossing Specificatie 42” volledige HD 1080P LED/LCD-tv Beeldkwaliteit van de TV: FULL HD Geïntegreerde digitaal. Schermgrootte: 106.7cm Resolutie 1920x1080 pixels 50 Hz. Connectiviteit: 2 HDMI-aansluitingen 1 SCART-aansluiting. PC-ingangsaansluiting. Component Video-aansluiting Compositie. 1 USB-poort. Geluidskwaliteit: NICAM stereo geluidsysteem. 2 x 8 watt RMS uitgangsvermogen. Standby-energieverbruik: Digitale functies: Extra functies: <0.5W Digitaal interactief. Digitale tekst.
TV LED plano con luz de fondo MANUAL DE INSTRUCCIONES Lea este manual con atención antes de operar la unidad, y consérvelo para referencia futura.
Contenido Contenido 01 Seguridad y advertencias MENÚ DE IMAGEN 18 18 18 Bienvenidos 2 Información importante 2 MENÚ DE SONIDO MENÚ DE HORA Aviso de seguridad 3 MENÚ DE OPCIONES 19 Advertencias y precauciones 4 MENÚ DE BLOQUEO 19 MENÚ EPG (Guía electrónica de programación) 19 02 Introducción Características principales Función PVR 5 Preparativos para la grabación de un programa 20 20 21 21 Instrucciones sobre el montaje del soporte base 7 Grabación de un programa Pautas de instalaci
SEGURIDAD Y PRECAUCIONES 01 SEGURIDAD Y PRECAUCIONES BIENVENIDO Gracias por comprar este TV LED LCD de 39"/42". Esta guía le ayudará a instalar y a comenzar a usar su TV. En principio, verifique los contenidos de su caja con la siguiente lista .
SEGURIDAD Y PRECAUCIONES AVISO DE SEGURIDAD Precaución: Para reducir el riesgo de descarga eléctrica, no retire la cubierta ni la parte trasera. No hay partes utilizables por el usuario en el interior. Para el servicio técnico, consulte al personal cualificado. Precaución: Para evitar peligro de incendios o descargas eléctricas, no exponga el aparato a la lluvia o la humedad. No exponga el producto al agua (goteo o salpicaduras), ni coloque objetos llenos de líquido, tales como jarrones, sobre el aparato.
SEGURIDAD Y PRECAUCIONES ADVERTENCIAS Y CUIDADOS Cuidado Advertencia Para el funcionamiento de este televisor se utiliza alto voltaje. No retire la cubierta posterior de su aparato. Para servicio técnico, consulte al personal cualificado. Evite que el cable de alimentación quede atrapado bajo el televisor. Cuidado Nunca se suba, ni se apoye, ni empuje bruscamente el televisor o su soporte. Debe prestar especial atención a los niños. Si cayera, podría causar serias lesiones.
INTRODUCCIÓN 02 INTRODUCCIÓN PRECAUCIÓN INSTALACIÓN Nunca manipule ningún componente interno del TV ni cualquier otro control de ajuste que no se mencione en este manual. Todos los TV LED son equipos eléctricos de alta tensión. Cuando limpie el polvo o cualquier gota de agua en la PANTALLA o carcasa, o alrededor de los botones o conectores, debe desconectar el cable de alimentación del conector de alimentación. Limpie el TV con un paño suave y seco, libre de polvo.
INTRODUCCIÓN PC MODOS PREESTABLECIDOS ES RESOLUCIÓN Frecuencia V.(KHz) Frecuencia H.(KHz) 1 640x480 60 31.47 2 800x600 60 37.88 3 1024x768 60 48.36 4 1360x768 60 47.7 5 1280x1024 60 63.98 6 1920x1080 60 66.
INTRODUCCIÓN Instrucción sobre el montaje del soporte base 1. Coloque el TV con la pantalla hacia abajo sobre una superficie plana. Utilice una tela para protegerlo. Ubique la parte inferior en el soporte. 2. Fije el fondo girando el tornillo fuertemente sobre el soporte. NOTAS DE INSTALACIÓN Ubique el TV en una habitación en donde la luz no le refleje directamente sobre la pantalla. La oscuridad total o un reflejo en la pantalla pueden provocar cansancio en la vista.
INTRODUCCIÓN INSTRUCCIONES DE INSTALACIÓN PARA EL MONTAJE EN PARED Este televisor puede montarse en pared de la siguiente manera: 1. Coloque el Televisor LED LCD sobre una superficie sólida. Por favor, coloque algún material suave sobre el frente de la pantalla para protegerla de cualquier daño. 2. Retire los tornillos de la parte baja del televisor, donde la base se une con el TV, y retire el soporte de la base (guárdelo en un lugar seguro para su uso en el futuro). 3.
INTRODUCCIÓN Panel frontal de control 1 SOURCE 3 2 3 CH+ CH- VOL- 1 2 3 BRON MENU CH+/CH- 4 VOL+/VOL- 5 STANDBY VIDEO L Y R Pb Pr HDMI2 AC-INPUT 100-240V~50/60Hz 6 1 2 3 4 5 6 1 7 AV L/R AUDIO Fuente de alimentación CA YPbPr HDMI2 HDMI1 8 entrada entrada entrada entrada entrada entrada VOL+ STANDBY Muestra el menú fuente de entrada. Muestra el MENÚ principal. En el modo TV, pulse CH+ o CH- para cambiar el canal de arriba abajo.
INTRODUCCIÓN Conexión con su TV Haier Conexión de un reproductor de DVD/receptor decodificador de cable o satelital/consola de juegos/PC u ordenador portátil. Hay varias opciones para conectar un reproductor de DVD/receptor decodificador de cable o satelital/consola de juegos/PC u ordenador portátil a su TV. Opción 1 SCART Conecte un cable SCART (no incluido) de la conexión SCART en el TV al reproductor de DVD/receptor de decodificador de cable o satelital, o consola de juegos.
INTRODUCCIÓN INTERFAZ COMÚN La ranura de la interfaz común (IC) está diseñada para admitir el módulo de acceso condicional (AC) y la tarjeta Inteligente a fin de ver los programas de televisión de pago y los servicios adicionales. Comuníquese con su proveedor de servicio de Interfaz Común para obtener más información acerca de los módulos y de la suscripción. Tenga en cuenta que no se proporcionan los módulos AC ni las tarjetas inteligentes, ni los ofrecemos como accesorios opcionales.
Mando a distancia 03 Mando a distancia Inserte las baterías en el mando a distancia 1. Retire la tapa de las baterías. 2. Inserte las 2 pilas AAA 1.5v asegurándose de que la polaridad (+ o -) coincida con la polaridad marcada dentro de la unidad. 3. Coloque de nuevo la tapa de las baterías. Sustituya las baterías por otras nuevas, cuando el televisor comience a mostrar los síntomas siguientes: El funcionamiento es inestable o errático. A veces, el televisor no funciona con el mando a distancia.
Mando a distancia TELETEXTO Pulse: TEXTO SELECCIONAR UNA TECLAS DE ACCESO DIRECTO ÍNDICE SUB PÁGINA ESPERA REVELAR LISTA E El Teletexto es un sistema de información emitido por algunos canales que puede ser consultado como un periódico. También ofrece acceso a los subtítulos para los telespectadores con problemas de audición o que no estén familiarizados con el idioma de transmisión (redes por cable, canales por satélite, etc.) U verkrijgt: Se usa para entrar o salir de los modos de teletexto.
FUNCIONAMIENTO 04 FUNCIONAMIENTO Guía de Instalación Modos CASA o TIENDA ①El modo Casa es un modo de ahorro de energía. El modo La guía de instalación solo aparece la primera vez que se enciende el televisor o después de resetearlo. Por favor seleccione un idioma OSD Česky Español Deutsch English Italiano Polski Magyar Franςais Arabic Lithuania Nederlands Româneşte OK Casa se recomienda para los ajustes de visualización normal y es el predeterminado por el fabricante.
FUNCIONAMIENTO Menú Explorar DVB-C Tipo exploracion Completo Frecuencia 610000 Id. de red Automático Símbolos(kS/s) Automático 1.MENÚ CHANNEL 1. 1 ) Sintonía automática (DVB-T) 1). Presione el botón MENU y a continuación presione los botones ▲▼ para seleccionar el menú CHANNEL y presione el botón OK. 2). Presione los botones ▲▼ para seleccionar Auto Tuning y a continuación presione el botón OK. CANAL 3). Comenzará la sintonización de canales. Esta operación puede tomar hasta 6 minutos.
FUNCIONAMIENTO 5) Comenzará la sintonía de canales. Esta operación puede tomar hasta 6 minutos. La pantalla mostrará el progreso de la sintonía y la cantidad de canales encontrados. 6). Si desea saltar la sintonización ATV, presione el botón 3). Presione los botones ▲▼ para seleccionar DVBT/DVB-C y a continuación presione el botón OK para confirmar. SELECCIÓN TIPO DVB MENU para interrumpir el proceso de sintonización.
FUNCIONAMIENTO 6). Comenzará la sintonización de canales. Esta operación puede tomar hasta 6 minutos. La pantalla mostrará el progreso de la sintonía y la cantidad de canales encontrados. 7). Si desea saltar la sintonización ATV (analógica), presione el botón MENU para interrumpir el proceso de sintonización. Se mostrará una pantalla emergente, presione el botón◀ y seleccione YES para confirmar. Entonces irá directamente a la sintonía de DTV.
FUNCIONAMIENTO 3) Sintonización manual de ATV: Usted puede cambiar el sistema de sonido para buscar los canales analógicos y para una sintonización fina de los canales, luego almacenar los canales que haya seleccionado. Sintonización manual ATV Almacenar en 1 Sistema BG 5). Información sobre IC: (opcional) Este menú puede mostrar la información sobre la tarjeta IC. 2. MENÚ DE IMAGEN El segundo elemento del MENÚ es MENÚ DE IMAGEN.
FUNCIONAMIENTO CANAL SONIDO HORA Restaurar a los valores por defecto de fábrica, eliminará todos los programas y contraseñas. Reloj Hora de apagado IMAGEN OK 6. MENÚ DE BLOQUEO Hora de encendido Temporizador apagado Suspender automáticamente Huso horario El sexto elemento del menú es el MENÚ DE BLOQUEO. Puede bloquear su sistema, establecer una contraseña, bloquear un programa, y establecer control parental.
FUNCIONAMIENTO 3. Grabar Pulse la tecla roja. Establece el programa que se va a grabar. CANAL IMAGEN Recordatorio 4. Pulse la tecla azul para escoger un programa y establecer una hora de recordatorio. La pantalla de TV pasará al programa escogido a la hora del recordatorio automáticamente.
FUNCIONAMIENTO (Se sugiere formatear el dispositivo con “High Speed Fs...” Alta Velocidad SA que puede acelerar la grabación). Formatear disco Formatear disco ¡Advertencia! Se perderán todos los datos Iniciar SALIDA OK Formatear disco No desconecte dispositivo USB.
FUNCIONAMIENTO 9.Función Timeshift (desplazamiento temporal) Seleccione el programa que desea grabar NOTA: Este TV le permite grabar o poner en pausa el programa TDT que este visionando actualmente en un dispositivo de almacenamiento USB, y continuar desde el punto en el que se pausó. No desconecte el dispositivo de almacenamiento USB cuando la función Timeshift esté activada. NOTA: Con un dispositivo de 4 gb, se puede almacenar temporalmente hasta 140 minutos de emisión.
FUNCIONAMIENTO Limitaciones de la función Timeshift: 1. Cuando la función Timeshift está activada, sólo las teclas PLAY/PAUSE/STOP/FWD/REV/ VOL+/VOL-/MUTE y algunas teclas de funcionamiento básico (ENTER/EXIT/teclas de navegación) están disponibles. 2. La reproducción del video puede que no sea fluida y se produzcan saltos en la imagen si la velocidad de grabación del USB no cumple con los requisitos mínimos. 3. No retire el disco USB ni desconecte la alimentación mientras la función Timeshift está en uso.
FUNCIONAMIENTO 10. Reproductor USB Pulse la tecla fuente y seleccione el USB en la lista fuente; pulse el botón OK para acceder al menú USB. play 00:04:22 Pausa FB 00:04:22 FF Anterior Siguiente Detener Repeat ALL AB Set A Haier Innovation Life FOTO MUSICA TEXTO PELÍCULA Pulse◀▶ para seleccionar el ícono de función, pulse el botón OK para confirmar la función. Pulse ▼o "EXIT" para salir de la barra de control, salvo para música. NOTA: USB2.
SOLUCIÓN DE PROBLEMAS 05 SOLUCIÓN DE PROBLEMAS Síntoma del problema Comprobar Sonido Imagen Nieve Ruido Borroso Sonido normal Interferencias Ruido Imagen normal Sin imagen Sin color Imagen partida Silencio Silencio Posición, dirección o conexión de la antena Equipos electrónicos, coche/moto, luz fluorescente Volumen(comprobar si está activado el Silencio o si las conexiones de audio son incorrectas) Cable de alimentación no conectado. Interruptor de alimentación apagado.
SOLUCIÓN DE PROBLEMAS Resolución de problemas Mi TV no muestra la imagen en mi ordenador portátil/PC cuando se conecta. He conectado mi PC/ordenador portátil al TV y obtengo una imagen, pero sin sonido. ¿Por qué? La imagen no cambia su medida automáticamente al cambiar de canal. Recién he conectado un reproductor de DVD u otro equipo en mi TV y no funciona.
SOLUCIÓN DE PROBLEMAS Resolución de problemas de TV digital y posibles soluciones La imagen se ve pixelada Un ejemplo típico de un problema de recepción incluye el desgarro de imagen (pixelado) o el congelamiento de imagen. Algunas veces hay sonidos de chasquidos o de chillidos, se silencia o NO hay recepción por completo. Su imagen puede verse pixelada debido a la pérdida de señal de vídeo digital.
SOLUCIÓN DE PROBLEMAS Especificación TV LED LCD Digital de 39" Full HD 1080P Calidad de imagen de TV: FULL HD D i gi t a l i nte gra d a Ta m a ñ o d e p a n t a l l a : 9 9 c m R e s o l u c i ó n 1 9 2 0 x 1 0 8 0 p í xe l e s, 5 0 H z . Conectividad: 2 co n e x i o n e s H D M I 1 co n e x i ó n S C A R T Co n ex i ó n d e e n t r a d a p a r a P C Co n ex i ó n d e v í d e o p a r a co m p o n e n te s Co m p u e s to.
SOLUCIÓN DE PROBLEMAS Especificación TV LED LCD Digital de 42" Full HD 1080P Calidad de imagen de TV: FULL HD D i gi t a l i nte gra d a Ta m a ñ o d e p a n t a l l a : 1 0 6 . 7 c m R e s o l u c i ó n 1 9 2 0 x 1 0 8 0 p í xe l e s, 5 0 H z . Conectividad: 2 co n e x i o n e s H D M I 1 co n e x i ó n S C A R T Co n ex i ó n d e e n t r a d a p a r a P C Co n ex i ó n d e v í d e o p a r a co m p o n e n te s Co m p u e s to.
TV a schermo piatto con retroilluminazione a LED MANUALE DI ISTRUZIONI Leggere questo manuale con attenzione prima di utilizzare l'unità e conservarlo per futuro riferimento.
Contenuti Contenuti 01 Sicurezza ed avvisi Benvenuti 2 Menù immagini Menù audio 18 18 18 Informazioni Importanti 2 Menù orario Avvisi di sicurezza 3 Menù opzioni 19 Avvisi e cautela 4 Menù blocco 19 EPG (Guida Elettronica alla programmazione) 19 Funzione PVR 20 02 Introduzione Parametri principali 5 Preparazione per registrare il programma Istruzioni di assemblaggio della base di sostegno 7 Registrare il programma Linee guida per l'installazione a muro 8 Riprodurre la registrazio
SICUREZZA ED AVVISI 01 SICUREZZA ED AVVISI BENVENUTI Grazie per aver acquistato questo televisore LED LCD 39”/42". Questa guida vi aiuterà ad impostare e ad iniziare ad utilizzare il vostro televisore. Per prima cosa, controllate il contenuto della confezione con la lista di controllo delle parti sottostante.
SICUREZZA ED AVVISI NOTIFICHE DI SICUREZZA Avviso: Per ridurre il rischio di shock elettrici, non rimuovete il coperchio (o il retro). Non vi sono parti a cui l'utente possa fare manutenzione da solo all'interno. Per tutta la manutenzione fate riferimento a personale di servizio qualificato. Avviso: per ridurre il rischio di shock elettrico, non esponete quest'unità a pioggia o umidità.
SICUREZZA ED AVVISI AVVISI E CAUTELA Avviso: Sono utilizzati alti voltaggi nell'operatività del televisore. Non rimuovete il retro del cabinet dal teleuisore. Per la manutenzione fate riferimento solo a personale di servizio qualificato. Avviso: Per prevenire il rischio di shock elettrico, non esponete il televisore a pioggia o umidità. Cautela: Non bloccate il cavo di alimentazione sotto il televisore.
INTRODUZIONE 02 INTRODUZIONE ATTENZIONE INSTALLAZIONE Non alterare mai alcun componente all'interno della TV o nessun altro controllo di regolazione non descritto in questo manuale. Tutte le TV LED sono apparecchiature elettroniche ad alta tensione. Quando si toglie la polvere o qualsiasi goccia d'acqua dallo SCHERMO o dalla STRUTTURA o intorno a pulsanti o connettori, il cavo di alimentazione deve essere rimosso dalla presa di alimentazione. Pulire la TV con un panno morbido, asciutto e senza polvere.
INTRODUZIONE PC MODALITA' PRECONFIGURAZIONE IT RISOLUZIONE V. Freq. (KHz) H. Freq. (KHz) 1 640x480 60 31.47 2 800x600 60 37.88 3 1024x768 60 48.36 4 1360x768 60 47.7 5 1280x1024 60 63.98 6 1920x1080 60 66.
INTRODUZIONE Istruzioni di assemblaggio della base di sostegno 1. Posizionate il televisore con lo schermo rivolto verso il basso su una superficie piana. Utilizzate un panno per proteggere lo schermo Posizionate il fondo sul sostegno. 2. Fissate il fondo stringendo saldamente le viti sul sostegno. NOTE DI INSTALLAZIONE Posizionate il televisore in una stanza dove la luce non colpisca direttamente lo schermo. L'oscurità totale o i riflessi sullo schermo possono causare affaticamento oculare.
INTRODUZIONE LINEE GUIDA PER L'INSTALLAZIONE A MURO Questo televisore può essere montato a muro come segue: 1.Posizionate il televisore LED LCD su una superficie stabile. Posizionate un panno morbido sulla parte anteriore dello schermo per proteggerlo da qualunque danno. 2. Rimuovete le viti dalla parte inferiore del televisore, dove la base si collega al televisore, e rimuovete il sostegno (Conservatelo per un uso futuro). 3.
INTRODUZIONE Controlli del pannello anteriore 1 MENU SOURCE 3 2 3 CH- VOL- 1 2 3 SORGENTE MENU CH+/CH- 4 VOL+/VOL- 5 STANDBY STANDBY VIDEO L Y R Pb Pr HDMI2 AC-INPUT 100-240V~50/60Hz 6 1 2 3 4 5 6 AV AUDIO L/R Alimentazione DC YPbPr HDMI2 HDMI1 1 7 8 Ingresso Ingresso Ingresso Ingresso Ingresso Ingresso VOL+ STANDBY Visualizza il menù delle sorgenti in ingresso.
INTRODUZIONE Collegamento alla propria TV Haier Collegamento di lettore DVD / ricevitore satellitare / ricevitore set top box cavo / console giochi / PC o laptop Ci sono molte opzioni di collegamento di un lettore DVD / ricevitore satellitare / ricevitore set top box cavo / console giochi / PC o laptop alla propria TV. Per selezionare il dispositivo collegato con il cavo COMPONENT premere il pulsante SOURCE sul telecomando e usare i tasti ▲▼per selezionare COMPONENT e premere il pulsante OK.
INTRODUZIONE COMMON INTERFACE Lo slot Common Interface è progettato per accettare i moduli di Accesso Condizionale (CA) e le smart card per vedere i programmi della televisione a pagamenti e servizi aggiuntivi. Contattate il fornitore del servizio di Common Interface per avere più informazioni sui moduli e sulle sottoscrizioni. Notate che i moduli CA e le smart card non sono né forniti né accessori optional acquistabili da noi.
Telecomando 03 Telecomando Installate le batterie nel telecomando 1. Rimuovete il coperchio delle batterie. 2. Inserite le 2 AAA da 1.5V assicurandovi che la polarità (+ o -) delle batterie corrisponda alla polarità segnata all'interno dell'unità. 3. Riposizionate il coperchio delle batterie. Sostituite le batterie quando il televisore mostra i seguenti sintomi: L'operatività è instabile o casuale. A volte il televisore non funziona con il telecomando. Nota: 1) Sono raccomandate le batterie alcaline.
Telecomando TELETEXT (televideo) Premendo: TEXT (televideo): SELEZIONARE UNA PAGINA ACCESSO DIRETTO AGLI OGGETTI. E Il Televideo è un sistema di informazioni trasmesso da certi canali che può essere consultato come un quotidiano. Offre anche l'accesso ai sottotitoli per gli spettatori con problemi di udito o che non hanno familiarità con il linguaggio della trasmissione (reti via cavo, canali via satellite etc.
OPERATIVITÀ 04 OPERATIVITÀ Modalità CASA o NEGOZIO Guida all'installazione ①La modalità Casa è una modalità di risparmio La guida installazione compare solamente alla prima accensione o dopo il reset generale. Seleziona una lingua OSD Spanish Italiano Polski Deutsch Greek Magyar Russian English French Nederlands Czech Arabic Lithuania Romanian energetico. La modalità Casa è raccomandata per impostazioni di visualizzazione normali ed è impostata come predefinita dal produttore.
OPERATIVITÀ DVB-C Menu scansione Scansione tipo Completo Frequenza 610000 ID rete Auto Simbolo(ks/s) Auto 1.MENU CANALI 1. 1 ) Sintonizzazione automatica (DVB-T) 1). Premere il pulsante MENU e premere i pulsanti ▲▼ per selezionare il menu CHANNEL e quindi premere il pulsante OK. 2). Premere il pulsanti ▲▼ per selezionare Auto Tuning e quindi premere il pulsante OK. CANALE Sintonizzazione automatica IMMAGINE 3). La sintonizzazione dei canali inizia.
OPERATIVITÀ 5). La sintonizzazione dei canali inizia. Questa operazione può richiedere fino a 6 minuti. Il display mostrerà il progresso della sintonizzazione e il numero di canali 3). Premere i pulsanti ▲▼ per selezionare DVBT/DVB-C e quindi premere il pulsante OK per confermare. trovati. DVB SELEZIONA TIPO 6). Se si vuole saltare la sintonizzazione ATV, premere il pulsante MENU per interrompere la sintonizzazione in IT corso.
OPERATIVITÀ 7). Se si vuole saltare la sintonizzazione ATV, premere il pulsante MENU per interrompere la sintonizzazione in corso. Apparirà una finestra a comparsa, premere il pulsante◀ per selezionare YES per confermare. Si passerà direttamente alla sintonizzazione DTV. È possibile ripetere il passo precedente se si desidera saltare la sintonizzazione DTV. Un promemoria di installazione apparirà alla successiva accensione della TV. 8).
OPERATIVITÀ 2. Menù immagini 3) Sintonizzazione manuale ATV: Potete cambiare il sistema sonoro per ricercare nei canali analogici e affinare la sintonizzazione dei canali, quindi archiviare i canali selezionati. Sintonizzazione manuale ATV Il secondo elemento del MENU è il PICTURE MENU (menù immagine). Potete regolare qui l'effetto delle immagini, come contrasto, luminosità, etc. Premete il tasto "OK" per spostarvi, premete il tasto "OK" per regolare.
OPERATIVITÀ CANALE AUDIO ORARIO NOTA: Orologio Orario Off IMMAGINE Ripristinare le impostazioni di fabbrica cancellerà tutti i programmi e le password. OK 6. Menù blocco Orario On Timer autospegnimento Spegnimento automatico Fuso orario Il sesto oggetto sul menù è il LOCK MENU (menù blocco). Potrete bloccare il sistema, impostare password, bloccare programmi ed impostare il parental control. Una volta che avrete attivato i blocchi, non potrete ricercare i canali o modificarli.
OPERATIVITÀ 3. Registrare Premete il tasto rosso. Esso configura il programma da registrare. Promemoria 4. Premete il tasto blu per scegliere un programma ed impostare l'orario di promemoria. Lo schermo televisivo salterà automaticamente al canale scelto all'orario del promemoria.
OPERATIVITÀ (Suggerisce di formattare il dispositivo con "High Speed Fs..." che può velocizzare la registrazione). Formatta disco Formatta disco Attenzione! Tutti i dati andranno persi. Avvia ESCI OK Formatta disco Non scollegare il dispositivo USB. Formattazione in corso, attendere Il menù sottostante appare dopo la fine della Formattazione: Seleziona disco Controlla File system PVR C: Controllo in corso Disco USB Passa Formato Passa 2.
OPERATIVITÀ 9.Funzione differita Preparazione per registrare il programma Questo televisore vi permette di mettere in pausa e registrare i programmi digitali in visione in un dispositivo di archiviazione USB, e di riprendere la visione nel punto in cui è stata interrotta. NOTA: NOTA: Siete pregati di non scollegare il dispositivo di archiviazione USB quando la funzione Time Shift (differita) è attivata. 4GB di memoria archiviano circa 140 minuti.
OPERATIVITÀ Limitazioni della differita: 1. Quando la funzione Differita è attiva, sono disponibili solo i tasti PLAY/PAUSE/STOP/FWD/REV/ VOL+/VOL/MUTE e alcuni tasti operativi di base (ENTER/EXIT/tasti di navigazione). 2. La riproduzione video potrebbe non essere lineare e saltare se la velocità di registrazione USB non corrisponde ai requisiti minimi. 3. Non rimuovete il disco USB o spegnete l'alimentazione durante le operazioni in differita. Sarà annullata una volta che il segnale è perso. 4.
OPERATIVITÀ 10. Lettore USB Premete il tasto Sorgente, e selezionate USB nella lista sorgente, quindi premete OK per accedere al menù USB. play 00:04:22 Interrompi FB 00:04:22 FF Prec. AB Succ. Interrompi Repeat ALL Impostazione A Haier Innovation Life Utilizzate il tasto◀▶ per selezionare l'icona funzione, quindi premete OK per confermare la funzione.Premere Exit per nascondere la barra informazioni - eccetto per la musica. FOTO MUSICA TESTO FILM NOTA: USB2.
RISOLUZIONE DEI PROBLEMI 05 RISOLUZIONE DEI PROBLEMI Sintomo del problema Video Comprobar Audio Effetto neve Effetto fantasma Interferenze Immagine normale Nessuna immagine.
RISOLUZIONE DEI PROBLEMI Risoluzione dei problemi La mia TV non visualizza l'immagine sul laptop / PC quando collegato. Ho collegato il mio PC/Laptop alla TV e ho l'immagine ma non l'audio. Perché? La maggior parte dei PC e laptop quando collegati con uno spinotto VGA (lo spinotto blu a 15 pin sul proprio PC o laptop) richiede la pressione di alcuni pulsanti sulla propria tastiera per ottenere l'immagine su un TV o altro display esterno.
RISOLUZIONE DEI PROBLEMI Individuazione dei problemi della TV digitale e possibili soluzioni Immagine sgranata Im esempio tipico di problema di ricezione include l'immagine sgranata (pixilation) o immagine congelata, a volte si presenta anche tintinnio o stridio o abbassamento di suono o NESSUNA ricezione. L'immagine può sgranarsi a causa di riduzione del segnale video digitale.
RISOLUZIONE DEI PROBLEMI Specifiche TV LED LCD 39" Full HD 1080P Digital Qualità immagine televisione: FULL HD Digitale integrato. Dimensioni schermo: 99cm Risoluzione 1920X1080 pixel 50Hz. Connettività: 2 prese HDMI. 1 presa SCART. Presa ingresso PC. Presa video component. Composite. 1 porta USB. Qualità audio: Sistema audio stereo NICAM. 2 x uscite RMS 8 watt. Potenza assorbita in standby <0.5W Funzioni digitali: Funzioni supplementari: Digitalmente interattivo. Testo digitale.
RISOLUZIONE DEI PROBLEMI Specifiche TV LED LCD 42" Full HD 1080P Digital Qualità immagine televisione: FULL HD Digitale integrato. Dimensioni schermo: 106.7cm Risoluzione 1920X1080 pixel 50Hz. Connettività: 2 prese HDMI. 1 presa SCART. Presa ingresso PC. Presa video component. Composite. 1 porta USB. Qualità audio: Sistema audio stereo NICAM. 2 x uscite RMS 8 watt. Potenza assorbita in standby <0.5W Funzioni digitali: Funzioni supplementari: Digitalmente interattivo. Testo digitale.
SchematicsƑ BlockdiagramƑ SCH BLOCK FOR MSD309PT EARPHONE output TUNER OPTION MSD309PT AIF for analog TV TDA1517 2X3W output DIF for DTV DMB-T/H TS Stream to 309 OPTION DVB-S2 module socket OPTION CI CARD OPTION TS1 TS Stream to 309 TS1 Encrypt TS Stream to CI TS1 TS0 TS Stream to 309 LINEOUT3(AA6\Y5) AUDIO DF3544 TPA3110 2X6W output or 15W subwoofer output OFF HDMI1 Input HDMI2 Input HDMI3 Input OPTION YPbPr input Rear CVBS input Rear audio input PC RGB input PC audio input SCART RG
Power Input 5VA CON1 DCJACK CN1 DCJACK NC 2 20K 4 2 C24 0.1uF Vpp=21mV + 1E56 BIT3 ON Q3 AO3407 3 2 2 ON_PANEL R29 1K Q4 3904 1 R27 10K R27Ϟᢝᬍϟᢝ ᬍᓔᴎⶀ䯈ᇪዄ 5VA 1.8VA R158 82K OUT/FB 5 R39 100K C39 C40 C41 C42 C43 C44 C45 0.1uF(X7R) 0.1uF(X7R) 0.1uF(X7R) 0.1uF(X7R) 0.1uF(X7R) 0.1uF(X7R) 0.1uF(X7R) 2 ON_PBACK 3 0.1uF(X7R) 0.1uF(X7R) 10uF(X7R) 10uF(X7R) 10uF(X7R) 10uF(X7R) 10uF(X7R) TAB 220uF/16V EC1 C80.1uF EC4 220uF/16V 100R BL_ON R35 1K 1 R30 4.
MSD309PX CI_IRQA_N CI_OE_N CI_IORD_N CI_CE_N CI_WE_N CD_N CI_WAIT_N CI_IOWR_N CI_REG_N L2 60 -0603 I2S_OUT_BCK AD16 Y13 Y14 AA13 AC14 AB23 AB20 AB14 AA21 SPDIF P5 Y25 SPDIFO 7 PAD_TS0_D[0] PAD_TS0_D[1] PAD_TS0_D[2] PAD_TS0_D[3] PAD_TS0_D[4] PAD_TS0_D[5] PAD_TS0_D[6] PAD_TS0_D[7] PAD_TS0_CLK PAD_TS0_VLD PAD_TS0_SYNC PAD_PCM_IRQA_N PAD_PCM_OE_N PAD_PCM_IORD_N PAD_PCM_CE_N PAD_PCM_WE_N PAD_PCM_CD_N PAD_PCM_WAIT_N PAD_PCM_IOWR_ N PAD-PCM_REG_N M2 M3 L2 L3 K1 K3 K2 N4 N5 PADA_RIN0M PADA_RIN0P PADA_GIN
2 MIUA_WEZ 2 MIUA_MCKE 2 MIUA_BA1 2 MIUA_BA0 MIUA_WEZ RP23 MIUA_MCKE MIUA_BA1 MIUA_BA0 MA_WEZ MA_CKE MA_BA1 MA_BA0 8 6 4 2 MA_DQM1 MA_DQM0 7 5 3 1 1 3 5 7 2 MIUA_DQM1 2 MIUA_DQM0 22RX4 2 4 6 8 RP22 Close to MSD306 MIUA_A4 MIUA_A6 MIUA_A8 MIUA_A11 RP28 22RX4 2 4 6 8 1 3 5 7 MIUA_DQ7 MIUA_DQ0 MIUA_DQ2 MIUA_DQ5 MA_DQ7 MA_DQ0 MA_DQ2 MA_DQ5 2 4 6 8 RP30 22RX4 1 3 5 7 2 MIUA_BA2 MA_DQ15 MA_DQ8 MA_DQ10 MA_DQ13 2 MIUA_CASZ 2 MIUA_RASZ 1 3 5 7 1 3 5 7 2 4 6 8 MIUA_DQ15 MIUA_DQ8 MIUA_DQ10 MIUA
TUNER 5V_TUNER 5V_T1 EC14 220uF/16V Body Body B1 NC 2 1 1 5V_T2 157mA + R126 10K Q11 3904 5V_T1 RF_AGC 2 3.3VA R125 100K R129 10K 5V_TUNER FB2 60 -0603 RF_AGC 2 Q10 3906 3 T_RF_AGC NC/0R T_RF_AGC3 C118 0.1uF(X7R) closed to tuner 14 13 SDA SCL RF_AGC 5 4 3 AS VTU_TP B2 R131 8 7 6 AIF DF1 DF2 IF_AGC R130 10K 1 ON RF_AGC_SEL 2 OFF C123 0.1uF(X7R) SDA_TU 10R-0402 R141 SCL_TU 10R-0402 R142 DTMB 2 SDA_TU 2 SCL_TU 2 2 T_SDA T_SCL IF_AGC_T 2 2 IF_AGC EC13+ 220uF/16V C125 0.
FOR EUROPE VCC-PCMCIA VCC-PCMCIA CN10 PCMCIA_CNT 2,4 TSSTART TS_MDI0 TS_MDI1 TS_MDI2 TS_MDI3 TS_MDI4 TS_MDI5 TS_MDI6 TS_MDI7 TS_MOCLK PCM_RESET PCM_WAIT_N PCM_REG_N TS_MOVAL TS_MOSTART TS_MDO0 TS_MDO1 TS_MDO2 PCM_CD2_N 1 2 3 4 5 6 7 8 9 10 11 12 13 14 15 16 17 18 19 20 21 22 23 24 25 26 27 28 29 30 31 32 33 34 PCM_D3 PCM_D4 PCM_D5 PCM_D6 PCM_D7 PCM_CE_N PCM_A10 PCM_OE_N PCM_A11 PCM_A9 PCM_A8 PCM_A13 PCM_A14 PCM_WE_N PCM_IRQA_N PCM_A12 PCM_A7 PCM_A6 PCM_A5 PCM_A4 PCM_A3 PCM_A2 PCM_A1 PCM_A0 PCM_D0 PC
SIDE HDMI CN11 HDMI19-2 43 44 45 46 47 1 2 3 4 5 6 7 8 9 10 11 12 13 14 15 16 17 18 19 1 DATA2+ NC 2 DATA2 SHIELD NC 3 DATA2NC 4 DATA1+ 5 DATA1 SHIELD GND 6 DAT1AGND 7 DATA0+ 8 DATA0 SHIELD 9 DATA010 CLK+ 11 CLK SHIELD 12 CLK13 CEC 14 NC 15 SCL 16 SDA 17 DDC/CEC GND 18 +5V POWER 19 HOT PLUG 20 21 22 23 24 25 26 27 28 29 30 31 32 33 34 35 36 37 38 R611 10R RX2B2P R600 R601 10R 10R RX2B2N RX2B1P R602 R603 10R 10R RX2B1N RX2B0P R604 R605 10R 10R RX2B0N RX2BCLKP R606 10R RX2BCLKN RX2B2P RX2
VGA INPUT CN16 NC/AV-JACK-3 J2 NC/AV-JACK-3 1 1 R206 0R-0402 C165 1n VGA-HS R211 33R C171 47n RGB0_RIN+ 2 R219 68R C175 47n RGB0_BIN- 2 R220 68R C176 47n RGB0_GIN- 2 R221 68R C177 47n RGB0_RIN- 2 2 3 3 4 4 5 5 6 6 YIN AV1 8 8 CN14 HD1RIN R212 10K C168 1u R213 75R 1 2 1 2 9 9 3 4 3 4 C172 10P C170 1u R214 12K C173 10P R215 12K AV4-Vin+ 2 AV2-Lin 2 Keep AGND trace with signal Keep spacing for L/R HD1LIN HD1RIN R222 0R-0402 C178 1n YIN PBIN 5 6 7 7 PRIN AV1 R
5 FOR LED USB C227 10P NC/V800AA NC/V800AA 6 1 2 3 4 RX12 USB_DM0 USB_DP0 47K R298 5VUSB1 4 3 2 1 RX11 FOR LCD USB 5VUSB1 USB Interface USB_DM0 2 USB_DP0 2 3.3VA + EC21 R299 10K 220uF/16V RP45 10KX4 C228 10P RP45/5-8Ϟᢝᬍϟᢝ ᬍᓔᴎⶀ䯈ᇪዄ C226 10P 100K R300 CN26 4pin-2.0mm 7 5 3 1 8 6 4 2 USB1IN CN27 GND GND PO FLAG1 EN1 OUT1 EN2 OUT2 FLAG2 9 8 7 6 5 5VUSB2 USB1_DETE USB2_DETE C230 0.1uF(X7R) U16 MP6231(MSOP8E) CN28 4pin-2.
DC5V 4 2 4 H3 4 3 R335 22K C⠜կ⬉8VᬍЎ5Vৢ খ᭄⬅15KᬍЎ22K VCC_AMP FB4 56-4A-1206 FOR 2X3W U18 EC28 220uF/16V AMP_LIN R338 10R-0603 PH_L + 10uF + C252 200p R343 100K R340 5V_3544 8 VDD 6 5 IN2 BIAS OUTB 7 10R-0603 C256 + 0.
MPEG_D3 MPEG_D2 MPEG_D1 MPEG_D0 TO THE MPEG DECODER VDD2.5 3.3VA R802 4.7K R804 4.7K R805 4.7K R803 4.7K 1M FB800 144 Pin BGA SDA_TU SCL_TU 2 2 2 60 -0603 T_SDA 3 Bypassing for 8G75 / 8G85 R806 4.7K T_SDA VDD1.2 VDD2.5 R807 0R-0402 Q801 APM2322A 2 8G75_SDA 8G75_SCL 10uF Caps for VDD1.2 Power Plane to Dig GND T_SCL 3 T_SCL AGC 1 C816 10uF(X7R) R808 9.1K C802 1uF R809 0R-0402 VDD2.5 Cap placed at each VDD1.2 pin of U1C823 C824 C825 C831 C828 C829 C830 C827 C826 R812 49.
R1 RC1206 22R C1 102/400V T2 TRANS PFC_OUT 1 1 + + 2 EC1 47uF 450V EC2 47uF 450V + 472/400V - 4 D6 UF4007 CX1 0.22uF/250VAC CY2 CY3 471/250VAC 471/250VAC 5 6 C13 105 R31A Vaux R80 NC RC1206 1 2 3 L4 10mH 4 R44 1M RC1206 R34 1M 1 R40 R41 1M RC1206 1M RC1206 CX2 R43 470K R26 1K J2 0R RC1206 4 R30 1K 1 3 C11 104 R24 5.1K R27 1K R47 2.2K 104 1 3 2 R28 10K C12 103 ZD2 Q6 2N3906 7.5V Q8 U6 EL817 4 Q5 2N3904 +5V R36 9.1KF U3 EL817 Vcc D18 1N4148 R32 5.
U1 R1 1 2 LED2 CON1 VIN 6 5 4 3 2 1 ON/BK 20 VCC 19 18 CH2 CH3 AGND 4 CH4 SDBX 17 5 PGND1 SDB 16 PGND2 FB 15 7 CH5 ISET 14 8 CH6 FBX 13 NC 12 HEADER 6 LED4 AP3608E EN 3 6 Adj CH1 9 10 CH7 CH8 ON/BK 10K/0603 R2 SDBX C1 104/25V U2 R7 SHD R3 FB 20K FBX R5 8.