
Instructions / Assembly

®
IMPORTANT
READ CAREFULLY BEFORE INSTALLING FIXTURE. RETAIN THESE INSTRUCTIONS FOR FUTURE REFERENCE.
Fixtures must be wired in accordance with the National Electrical Code and all applicable local codes. Proper grounding is required
for safety. THIS PRODUCT MUST BE INSTALLED IN ACCORDANCE WITH THE APPLICABLE INSTALLATION CODE BY A PERSON
FAMILIAR WITH THE CONSTRUCTION AND OPERATION OF THE PRODUCT AND THE HAZARDS INVOLVED.
WARNING: Make certain power is OFF before installing or maintaining xture. No user serviceable parts inside.
SURFACE MOUNTING
The xture is suitable for outdoor applications in wet
locations either ceiling or wall mounted.
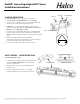
1. Use appropriate mounting hardware (not supplied) to
secure the Snap On Brackets to mounting surface. Refer
to recommended Snap On Bracket in Fig. 1 for HLVT 2ft
and Fig 2
for HLVT 4FT&8FT.
WARNING: Mount Snap On Brackets symmetrical about
the center as shown in Fig. 1 and Fig. 2. Snap On
Brackets must be aligned with each other to secure
Housing.
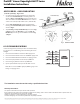
2. In order to use an alternate entry point for HLVT 4FT &
2FT & 8FT, follow below steps 3-7.
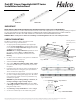
3. Unlatch the Lens from Housing.
4. Snap out the LED & Heat Sink Assembly. Tether Cables
(2 for HLVT 2ft & 4ft and 4 pc on HLVT 8ft ) are provided,
if required.
5.
Feed supply wires through one of the Conduit Plugs (5) to
make electrical splices. Cord-grips (2) are provided and
can be used based on application
6.
7.
Use appropriate UL approved wire connectors as required
by code to complete wiring with supply wires. Be careful
not to pinch wires. Quick connector is provided for easy
installation, if required.
WARNING: To prevent wiring damage or abrasion, do
not expose wiring to edges of sharp objects.
Snap in LED and Heat Sink Assembly and secure Lens
to Housing by Latch. Be careful not to pinch wires. Check
that gasket is fully sealed.
Snap Housing on Snap On Brackets as shown in Fig. 3.
8.
Use silicone or teon tape on all conduit entry points.
Latch
Snap On Bracket
Lens
Fig. 1 - HLVT 2ft
Fig. 3
HLVT- 4FT
Mounting Hardware
(provided by others)
Latch
Housing
LED & Heat Sink
Assembly
Lens
Fig. 2 - HLVT 4FT & 8FT
HLVT-2FT
369mm
ProLED® Linear Vaportight-HLVT Series
Installation Instructions
HLVT- 8FT
SURFACE MOUNTING
9.
Halco Lighting Technologies | 2940 Pacic Drive | Norcross, GA 30071 | Toll Free 800.677.3334 | Phone 770.242.3612 | Fax 800.880.0822 | halcolighting.com | Atlanta | Chicago | Cleveland | Houston | Los Angeles | Phoenix
© 2019 Halco Lighting Technologies, LLC. All rights reserved. Halco is a registered trademark of Halco Lighting Technologies. All sizes and specications are subject to change.