
Instructions / Assembly

®
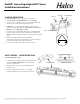
Fig. 4
V-Hook (2)
Snap On Bracket
Housing
V-HOOK MOUNTING
Suspend Housing to sturdy ceiling structure as follows:
1. Snap Housing on Snap On Brackets as shown in Fig. 3.
2. In order to use an alternate entry point for HLVT 2ft
& 4ft & 8ft,
follow steps 3-7 under Surface Mounting section.
3. V Hooks (2 pc on HLVT 2ft & 4ft and 4 pc on HLVT 8ft) are
provided for chain mounting. Loop V-Hooks through Snap On
Bracket at back of Housing as in Fig. 4.
4. Connect to two (for HLVT 2ft & 4ft and 4 pc on HLVT 8ft)equal
lengths of chain (by others) and/or appropriate hardware (by
others) suitable for mounting surface, to suspend Housing from V
Hooks.
5. Fixture mounting height and spacing should be
determined by application requirements. Use chain suitable to
support four (4) times the weight of the fixture.
6. Use silicone or teflon tape on all conduit entry points.
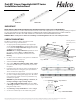
ProLED® Linear Vaportight-HLVT Series
Installation Instructions
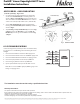
Fig. 6
ACCESSORIES - J-BOX MOUNTING
(ordered separately) - Fig.6
1.
2.
Use appropriate mounting hardware (not supplied) to
secure the Junction Box Plate(Fig. 5 )to mounting
surface or junction box.
3.
Check that gasket is fully sealed. Use Cord Grip
provided with fixture to feed supply wires in fixture.
Snap Housing on Snap On Junction Box Bracket as
shown in Fig. 6.
Junction Box Plate
Fig. 5
SURFACE MOUNTING
V-HOOK MOUNTING
Halco Lighting Technologies | 2940 Pacic Drive | Norcross, GA 30071 | Toll Free 800.677.3334 | Phone 770.242.3612 | Fax 800.880.0822 | halcolighting.com | Atlanta | Chicago | Cleveland | Houston | Los Angeles | Phoenix
© 2019 Halco Lighting Technologies, LLC. All rights reserved. Halco is a registered trademark of Halco Lighting Technologies. All sizes and specications are subject to change.