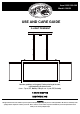
Item #1000 000 000 Model #16659 USE AND CARE GUIDE 3-LIGHT PENDANT Questions, problems, missing parts? Before returning to the store, call Hampton Bay Customer Service 8 a.m. - 7 p.m., EST, Monday- Friday, 9 a.m. - 6 p.m., EST, Saturday 1-855-HD-HAMPTON HAMPTONBAY.COM THANK YOU We appreciate the trust and confidence you have placed in Hampton Bay through the purchase of this light fixture. We strive to continually create quality products designed to enhance your home.
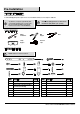
Table of Contents Tools Required .........................................................................3 Hardware Included ...................................................................3 Package Contents ....................................................................4 Installation ..................................................................... 5 Care and Cleaning ........................................................ 8 Troubleshooting ....................................................
Pre-Installation PLANNING INSTALLATION Read all instructions before installation. To avoid damaging this product, place it on a soft, non-abrasive surface, such as carpet or cardboard. IMPORTANT: Inspect the wire insulation for any cuts, abrasions, or exposed copper that may have occurred during shipping. If there is a defect in the wire, do not attempt installation. Please call the Customer Service Team at 1-855-HD-HAMPTON.
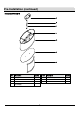
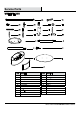
Pre-Installation (continued) PACKAGE CONTENTS A B C D E F G Part A B C D Description Canopy Tube 1 Tube 2 Knob nut (Preassembled to shade assembly(E)) Quantity Part 1 2 4 E F G 4 4 Description Shade assembly Glass diffuser Metal frame Quantity 1 1 2
Installation 1 Preparing the mounting bracket □ □ 2 Installing the light bulbs □ Fasten the mounting bracket (AA) onto the outlet box using two outlet box screws (BB). Screw the threaded tube (GG) into the mounting bracket (AA), and secure it using the lock washer (FF) and hex nut (DD). NOTE: You can also use three 13W maximum medium base (E26) SBCFLs (sold separately). Do not exceed the recommended wattage.
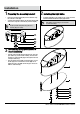
Installation (continued) 4 □ Assembling the metal frames to shade assembly □ Turn over the shade assembly (E) so that the correct side is facing up. Unscrew the knob nuts (D) from the shade assembly (E), then align the two holes of one of the metal frames (G) to the holes of the shade assembly (E) as shown and then secure with two knob nuts (D). Repeat the same steps for the second metal frame (G).
Installation (continued) 6 Making the electrical connections □ □ □ □ 7 □ Strip 3/4 in. of insulation from wire ends. Connect the black wire from the canopy (A) to the black wire from the outlet box and the white wire from the canopy (A) to the white wire from the outlet box. Twist the stripped ends together with pliers.
Care and Cleaning □ Do not use any cleaners with chemicals, solvents, or harsh abrasives. Use only a dry, soft cloth to dust or wipe carefully. □ To clean the fixture, disconnect the power by turning off the circuit breaker or by removing the fuse at the fuse box, and use a dry or slightly dampened, clean cloth to wipe the exterior surface of the fixture. Troubleshooting Problem Possible Cause Solution The lights will not turn on. The bulb is burned out. Replace the light bulb. The power is off.
Service Parts MODEL TYPE: 16659 AA BB CC DD EE FF GG HH II JJ KK LL MM NN A B C D E F G Part Description Part Description AA BB CC DD EE FF GG HH II JJ KK Mounting bracket Outlet box screw Green ground screw Hex nut Wire connector Lock washer Threaded tube Big nial Small ial Metal washer Plastic washer LL MM NN A B C D E F G Star washer Butter nut Cap Canopy Tube 1 Tube 2 Knob nut Shade assembly Glass diffuser Metal frame 9 HAMPTONBAY.
Questions, problems, missing parts? Before returning to the store, call Hampton Bay Customer Service 8 a.m. - 7 p.m., EST, Monday- Friday, 9 a.m. - 6 p.m., EST, Saturday 1-855-HD-HAMPTON HAMPTONBAY.COM Retain this manual for future use.
Artículo #1000 000 000 Modelo #16659 GUÍA DE USO Y MANTENIMIENTO LAMPARA COLGANTE DE 3 LUCES ¿Preguntas, problemas o piezas faltantes? Antes de regresar a la tienda, llama al Servicio al Cliente de Hampton Bay, de 8 a.m. - 7 p.m., hora estándar del Este, de Lunes - Viernes, 9 a.m. - 6 p.m., hora estándar del Este, Sábado 1-855-HD-HAMPTON HAMPTONBAY.COM GRACIAS POR TU COMPRA Apreciamos la confianza que has depositado en Hampton Bay al comprar esta lampara de araña.
Índice Herramientas Necesarias.........................................................3 Aparillage Incluido ...................................................................3 Contenido del Paquete .............................................................4 Instalación ..................................................................... 5 Cuidado y Limpieza ...................................................... 7 Solucion de Problemas ................................................
Pre-Instalación PLANIFICION DE LA INSTALACIÓN Lea todas las instrucciones antes de comenzar la instalación. Para evitar dañar el producto, colócalo sobre una super cie suave, no abrasiva, como por ejemplo una alfombra o cartón IMPORTANTE: Revisa que el aislamiento de los NOTA: Este producto requiere tres bombillas de 60W de base mediana (E26) de tipo A o tres bombillas CFL equivalentes de 13W de base mediana (E26). (se venden por separado).
Pre-Instalación (continuación) CONTENIDO DEL PAQUETE A B C D E F G Part A B C D Description Dosel Tubo 1 Tubo 2 Tuerca decorativa (Pre-ensamblada a la pantalla (E))) Quantity Part 1 2 4 E F G 4 4 Description Ensamblaje de la pantalla Difusor de vidrio Marco de metal Quantity 1 1 2
Instalación 1 Preparando el soporte de montaje 2 Instalando las bombillas Fije el soporte de montaje (AA) a la caja eléctrica usando los dos tornillos de la caja eléctrica (BB). Enrosque el tubo roscado (GG) en el soporte de montaje (AA), y asegúrelo usando la arandela de presión (FF) y la tuerca hexagonal (DD). NOTA: También puede utilizar tres bombillas fluorescente compactas de 13 W máximo de base mediana (E26) (no incluidas). No sobrepasar la potencia eléctrica recomendada.
Instalación (continuación) Instalando los marcos de metal a la pantalla 4 5 Gire el ensamblaje de la pantalla (E) para que este en la posicion correcta boca arriba. Desenrosque las tuercas decorativas (D), luego alinee los dos o de uno de los marcos de metal (G) con los samblaje de la pantalla (E) como se muestra or y luego asegúrelos con las dos tuercas decorativas (D). Repita el mismo paso para el segundo marco de metal (G).
Instalación (continuación) 6 7 Haciendo las conecciones electricas Pele 3/4 de pulgadas de la insulacion del extremo de los cables. Conecte el cable negro del dosel (A) al cable negro de la caja de salida y el cable blanco del dosel (A) al cable blanco de la caja de salida. Tuerza y junte los extremos de los cables con el alicate.
Mantenimiento y Limpieza No use limpiadores con químicos, solventes ni productos abrasivos. Use sólo un paño suave y seco para desempolvar o limpiar con cuidado Para limpiar la lámpara, primero corta el suministro de electricidad, apagando el interruptor automatico o retirando el fusible correspondiente en la caja de fusibles.
Piezas de remplazo MODELO: 16659 BB AA CC DD EE FF GG HH II JJ KK LL MM NN A B C D E F G Part Description Part Description AA BB LL MM Arandela estrellada Tuerca de mariposa NN Cubierta DD EE FF Soporte de montaje Tornillo de la caja eléctrica Tornillo verde a tierra (Preinstalado al soporte de montaje (AA)) Tuerca hexagonal Conector de cable Arandela de presión A B C GG Tubo roscado D HH II JJ KK Remate grande Remate pequeno Arandela de metal Arandela plastica E F G D
¿Preguntas, problemas o piezas faltantes? Antes de regresar a la tienda, llama al Servicio al Cliente de Hampton Bay, de 8 a.m. - 7 p.m., hora estándar del Este, de Lunes - Viernes, 9 a.m. - 6 p.m., hora estándar del Este, Sábado 1-855-HD-HAMPTON HAMPTONBAY.COM Conserva este manual para referencias futuras.