
Installation Guide


6
4
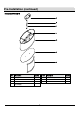
A
ssembling the metal frames to
shade assembly
□ Turn over the shade assembly (E) so that the correct side is
facing up.
□ Unscrew the knob nuts (D) from the shade assembly (E),
then align the two holes of one of the metal frames (G) to
the holes of the shade assembly (E) as shown and then
secure with two knob nuts (D).
□ Repeat the same steps for the second metal frame (G).
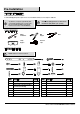
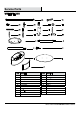
5
Attaching the canopy and the tubes
to the shade assembly
□ Put the fixture wires through each tube as shown, and then
tighten the tubes until secured as shown.
□ Put the fixture wires through the canopy (A). Place the
canopy (A), metal washer (JJ) and star washer (LL) over
tube 1 (B), and secure with the butterfly nuts (MM) as
shown.
□ There are three height options for you to choose from:
Option 1: Tube 1 (B) 21.5 inches;
Option 2. Tube 1 (B) + one piece of Tube 2 (C) 33.5 inches;
Option 3. Tube 1 (B) + two pieces of Tube 2 (B) 45.5 inches.
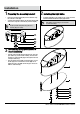
Installation (continued)
Option 1 Option 2 Option 3