
Installation Guide


10
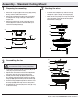
Mounting the fan-motor assembly
(standard mount)
□ Align the locking slots of the ceiling canopy (C) with the two
screws in the mounting bracket (A). Push up to engage the
slots and turn clockwise to lock in place.
□ Firmly tighten the two mounting screws.
□ Install the two mounting screws (FF) and lock washers (GG)
(saved from Assembly Step 1 “Prepairing for mounting”) into
the holes in the canopy (C) and tighten rmly.
5
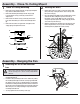
WARNING: When using the standard ball/downrod mounting, the
tab in the ring at the bottom of the mounting bracket must rest in
the groove of the hanger ball. Failure to properly seat the tab in
the groove could cause damage to the wiring.
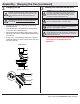
Assembly - Hanging the Fan (continued)
Wrapping the extra wire
□ Gently wrap the excess wire around the mounting bracket.
□ Secure with electrical tape.
4
NOTE: Follow this step ONLY if you did not cut the extra length off
from the wires coming from the ceiling fan.
WARNING: The locking slots of ceiling canopy are provided only
as an aid to mounting. Do not leave the fan assembly unattended
until all four canopy screws are engaged and rmly tightened.
F
E
D
B
C
A
GG
FF