
Installation Guide


10
Assembly - Hanging the Fan (continued)
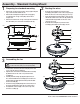
Making the electrical connections
3
IMPORTANT: Use the plastic wire connectors (BB) supplied with
your fan. Secure the connectors with electrical tape and ensure
there are no loose strands or connections.
WARNING: Each wire nut supplied with this fan is designed to
accept up to one 12-gauge house wire and two wires from the
fan. If you have larger than 12-gauge house wiring or more
than one house wire to connect to the fan wiring, consult an
electrician for the proper size wire nuts to use.
□ Please refer to remote installation
instructions at the beginning of this
document.
NOTE: The fan comes with 54 in. lead wires for use with an
extended ball/downrod assembly. If using the 4.5 in. ball/downrod
assembly (B) provided, you can cut the lead wires to your desired
length (no shorter than 12 in.).
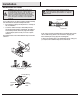
WARNING: Remove the rubber motor stops on the bottom of
the fan before installing the blades or testing the motor.
4
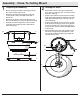
Wrapping the extra wire
NOTE: Follow this step ONLY if you
did not cut the extra length from the
wires coming from the ceiling fan.
□ Gently wrap the excess wire around
the mounting bracket (A).
□ Secure the wires with electrical tape.