
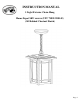
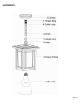
Installation Guide
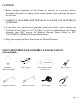
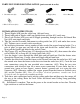
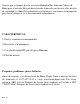

PARTS INCLUDED FOR INSTALLATION (parts are not to scale):
1 Ground Screw (#8) 2 Outlet Box Screws (#9) 1 Nipple (#10) 1 Cross Bar (#11)
3 Wire Connectors (#12) 1 Hex nut (#15) 1 Lock Washer (#16)
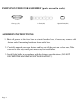
INSTALLATION INSTRUCTIONS:
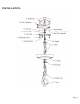
1. Thread Nipple (#10) into the collar loop (#6) until snug.
2. Thread other end of Nipple with Loop attached into crossbar (#11) until snug.
3. Place Lock Washer (#16) over end of Nipple protruding through crossbar and thread Hex
Nut (#15) onto nipple until tight.
4. Take the crossbar assembly and mount to ceiling outlet box (#13) with outlet box screws
(#9). Tighten screws securely with screwdriver.
5. By measuring determine correct number of links needed for proper hanging height. Use a
pair of pliers to open one end link of the chain and discard un- wanted chain. (Don’t
disregard the Quick Link linked at the end of Chain.)
6. Slip Canopy (#3) and Thread ring (#7) through over the Chain (#2), then connect the other
end of Chain (#2) to Loop (#5) by using Quick Link (#14).
7. Lace the fixture’s wires through the chain links and pull until taut. Feed the fixture wires
through the Thread ring, Canopy, chain and Nipple and pull until taut.
8. Connect the ribbed wire from the fixture to the Neutral wire from the outlet box (#13) and
the smooth wire from the fixture to the hot wire from the outlet box (#13). Cover the two
wire connections using the two provided wire connectors (#12). Wrap the two wire
connections with electrical tape for a more secure connection. If your outlet box has a
ground wire (green or bare copper), connect fixture’s ground wire to it using the wire
connector (#12). Otherwise connect the copper ground from the fixture to Ground screw
(#8) on the Crossbar (#11). Note: If you have electrical questions, consult your local
electrical code for approved grounding methods.
9. Tuck these wire connections neatly into the ceiling outlet box and then raise the canopy all
the way to the ceiling. Raise the Lock Collar and thread onto Ceiling Loop protruding
through Canopy.
10. Installation is complete. Turn on the power at the circuit breaker or fuse box. Turn the
light switch on to activate the fixture.
Page 6