
Installation Guide


STEP 3
Using the laminate flooring tapping block included in
the kit, gently tap second plank against the short side,
joining plank A and plank B.
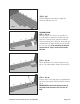
STEP 4 - fig. 4
Begin installing the second row by angling the plank
(plank C) to allow the tongue to slip into the groove of
the plank in row 1. Push the plank down flat to the floor
until it clicks into place. Do not force the plank closed
as doing so can damage the joint.
IMPORTANT: never tap the long end of the plank
as doing so can damage the joint.
STEP 5 - fig. 5
The next plank(plank D) should be installed in the same
way but with the tongue on the left side of the plank
falling just next to the previous plank. Push plank down
flat to the floor as in step 4.
STEP 6 - fig. 6
Once plank is flat, gently tap in the second plank
against the short side of plank C, joining plank B and C
(Fig. 5b)
A
B
Fig. 3
C
Fig. 4
D
Fig. 5
Fig. 6
Questions? Call Customer Service: 1-919-653-6392 Page 4 of 6