
Installation Guide


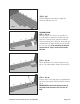


STEP 7 -fig. 7
Continue laying the floor from left to right in the
manner described in steps 2-5.
STEP 2 - Fig. 8B
Flip the plank back over so that the tongue faces the
groove of the adjacent plank; install as shown in Fig. 5.
STEP 3 - Fig. 8C
Because there is not enough space for a tapping block,
tap the two sides together using a pull bar as shown in
Fig. 9.
IMPORTANT: Do not use the leftover portion of
this plank in the next row if it is less than 16”
long.
Fig. 7
Fig. 8a
Fig.8b
FINISHING A ROW
STEP 1 - Fig. 8a
When you come to the end of a row, you will need
to cut the plank to complete the row. Flip a full sized
plank over so that the tongue end points toward the
wall, preserving the joint so that it can be inserted once
cut. Mark where the plank should be cut, and cut with
the décor side down. If the remaining cut board is
greater than 16” long, it can be used start the
next row.
Fig.8c
Questions? Call Customer Service: 1-919-653-6392
Page 5 of 6