
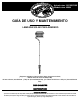
Installation Guide


4
Installation
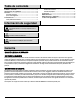
IMPORTANT: Prior to use, remove the battery isolator tag (G)
inserted in the battery compartment and allow to charge a full
sunny day.
NOTE: Do not use a hammer. If the ground is hard, use water to
soften.
□ Rotate counterclockwise and remove the lamp housing (C) and the glass shade (B) from the top cap (A) respectively.
□ Remove the battery isolator tag (G) inserted in the battery compartment.
□ Replace the glass shade (B) and the lamp housing (C) to the top cap (A) respectively.
□ Insert the ground stake (E) firmly into the ground at the installation location. If the ground is too hard, soak the ground with water to soften
the ground or drive a metal rod or screwdriver into the ground to create a hole for the ground stake assembly.
□ Screw the upper straight pole (D) to the pole end of the lamp housing assembly (C).
□ Screw the lower straight pole (D) to the upper straight pole (D).
□ Insert the pole assembly (C & D) into the ground stake (E).