
Installation Guide


6
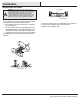
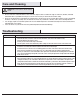
Assembly - Hanging the Fan
Hanging the fan-motor assembly
Setting the remote control codesAttaching the fan to the electrical
box
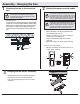
□ Turn the power off.
□ Securely attach the mounting plate (A) to the outlet box (DD)
using the two screws (FF) supplied with the outlet box (DD).
Pull the 120-volt supply wires (the black, the white, and the
ground wires) out of the outlet box (DD) and through the
center hole in the mounting plate (A), and push them to the
side.
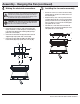
□ Carefully lift the fan-motor assembly (B) and engage
the hole of the fan-motor assembly (B) with the
hook on the mounting plate (A) so that it is securely
suspended.
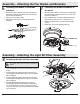
To set the code on the remote control:
□ Remove the battery cover by pressing rmly on the
arrow and sliding the cover off.
□ Slide the code switches to your choice of either up
or down. The factory setting is up.
□ Install a 9-V battery (included) into the remote
control (H).
□ Replace the battery cover on the remote control (H).
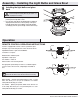
To set the code on the receiver:
□ Slide the code switches to the same position as set
on your remote control (H).
3
21
DD
EE
A
FF
B
A
1 2 3 4
ON DIP
H
NOTE: For better fan performance, make sure the
mounting plate is level. Additional washers (EE) (not
included) may be needed to insert between the outlet
box and the mounting plate.
NOTE: The frequencies on your receiver and remote
control have been preset at the factory. The receiver is
pre-installed in the fan-motor assembly, make sure the
dip switches on the receiver and remote control are set
to the same frequency. The dip switches on the remote
control are located inside the battery compartment.
NOTE: This remote is equipped with a 16-code
combination. To prevent possible interference from or
to other remote units, such as garage door openers, car
alarms, or security systems, change the combination
code, but be sure that the code on both the hand held
transmitter and receiver in the fan are the same.