
Installation Guide


7
HAMPTONBAY.COM
Please contact 1-877-527-0313 for further assistance.
Assembly - Hanging the Fan (continued)
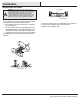
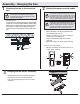
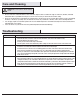
Installing the fan-motor assemblyMaking the electrical connections
□ Remove two of the four screws from the mounting
plate (A) that are opposite one another, and loosen
the remaining two.
□ Align the two key slots on the top of the fan-motor
assembly (B) with the two screws on the mounting
plate (A). Push the fan-motor assembly (B) up and
turn it clockwise to lock it onto the mounting plate
(A). Tighten the two screws.
□ Install the two screws that were removed at the
beginning of this step into the remaining two holes
and tighten the four screws rmly.
54
DD
GG
II
GG
II
HH
B
A
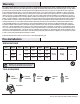
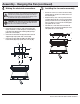
□ Connect the ground conductor of the 120-Volt supply (this
may be a bare wire or a wire with green colored insulation)
to the green wire (HH) from the mounting plate (A) using a
plastic wire connector (BB).
□ Connect the receiver black wire (II) to the black household
supply wire (II) using a plastic wire connector (BB).
□ Connect the receiver white wire (GG) to the white neutral
household wire (GG) using a plastic wire connector (BB).
IMPORTANT: Use the plastic wire connectors (BB) supplied with
your fan. Secure the connectors with electrical tape and ensure
there are no loose strands or connections.
WARNING: Each wire connector (BB) supplied with this fan is
designed to accept up to one 12-gauge house wire and two wires
from the fan. If you have larger than 12-gauge house wiring or
more than one house wire to connect to the fan wiring, consult
an electrician for the proper size wire nuts to use.