
Installation Guide


9
HAMPTONBAY.COM
Please contact 1-877-527-0313 for further assistance.
Operation
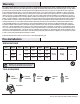
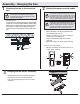
Your fan is equipped with a remote control to operate the speed
and lights of your new ceiling fan, and controls the fan as follows:
Light/Dimmer button = Light on/off and Dimmer
Low button = Low speed
Medium button = Medium speed
High button = High speed
Fan off button = Power off
Reverse button = Fan reversing function
The appropriate speed settings for warm or cool weather depend
on factors such as the room size, ceiling height, and number of
fans.
Warm weather - (Forward) A downward airow creates a cooling
effect. This allows you to set your air conditioner on a warmer
setting without affecting your comfort.
Cool weather - (Reverse) An upward airow moves warm air off
of the ceiling. This allows you to set your heating unit on a cooler
setting without affecting your comfort.
NOTE: Do not wait for the fan to stop before pressing the reverse
button. The fan will not reverse direction if the fan is not moving.
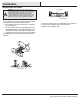
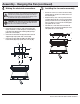
Assembly - Installing the Light Bulbs and Glass Bowl
Installing the light bulbs and glass
bowl
□ With the power off, install the light bulbs (G) (Max. 40W,
provided) into the light bulb sockets.
□ Place the glass bowl (D) into the light kit tter assembly (C),
aligning the three at areas on the top ange of the glass
bowl (D) with the three raised dimples in the light kit tter
assembly (C). Turn the glass bowl (D) clockwise until it stops.
9
WARNING: Do not overtighten when installing the glass
bowl into the light kit assembly. Allow the glass bowl to cool
completely before removing.
D
G
C
REMOTE CONTROL OPERATING INSTRUCTIONS