
Instructions / Assembly


Page 8
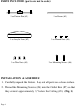
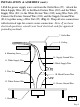
Fig. 4
1. Fixture Pan
3. Frame
2. Acrylic Lens
4. Thumb Nuts
INSTALLATION & ASSEMBLY (cont.):
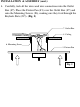
6. Secure the Acrylic Lens (#2) and Frame (#3) to the Fixture Pan (#1)
using the Thumb Nuts (#4), as shown. (Fig. 4)
7. Installation is complete. Turn on power at the circuit breaker or fuse
box. Turn the light switch on to activate the fixture.