Item #1001411347 1001411349 1001411353 1001411355 Model #HB-7611-02 HB-7613-02 HB-7619-02 HB-7620-02 USE AND CARE GUIDE WIRELESS OR WIRED DOORBELL Questions, problems, missing parts? Before returning to the store, call Hampton Bay Customer Service 8 a.m. - 5 p.m., CST, Monday - Friday 1-844-760-3644 HAMPTONBAY.COM Illustrations may vary from actual unit. THANK YOU We appreciate the trust and confidence you have placed in Hampton Bay through the purchase of this doorbell.
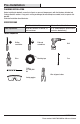
Table of Contents Table of Contents .......................................2 Safety Information .....................................2 Warranty ....................................................2 3-Year Limited Warranty ........................2 Pre-Installation ..........................................3 Planning Installation ..............................3 Specifications ........................................3 Tools Required .......................................3 Hardware Included...................
Pre-Installation PLANNING INSTALLATION Before installing the doorbell, ensure that all parts are present. Compare parts with the Hardware Included and Package Contents sections. If any part is missing or damaged, do not attempt to assemble, install, or operate this doorbell.
Pre-Installation (continued) HARDWARE INCLUDED NOTE: Hardware shown to actual size. AA BB CC Part Description AA Screw Quantity 4 BB Wall anchor 4 CC Diode 2 PACKAGE CONTENTS ME VO HI ME LU UP C SYNC – PRESS AND RELEASE. RESET – HOLD 10 SECONDS. TUNE – HOLD 1 SECOND.
Installation - Wired Doorbell the transformer 1 Verifying power rating Power must be supplied from a 16 volt AC, 10 or 15 watt transformer. WARNING: This doorbell requires a low voltage electrical connection. Do not connect directly to 120V AC. NOTE: DO NOT install batteries if connecting doorbell to transformer wires.
Installation - Wired Doorbell (continued) 5 Wiring the doorbell Connect the doorbell wires to the doorbell base (A): Wire “F” to screw terminal “FRONT” Wire “T” to screw terminal “TRANS” Wire “R” to screw terminal “REAR” FRONT TRANS REAR F B T R Hang the doorbell cover (A) on the cover pin on the doorbell base (B). 6 Installing the diode CC NOTE: The doorbell will not play the entire musical tune and the “TUNE” button will not work if a diode is not installed on the main push button.
Installation - Wireless Doorbell (continued) the doorbell and push 3 Testing button placement ME VO HI UP TUNE – HOLD 1 SECOND. FRONT TRANS REAR TYPE “C” TYPE “C” B SYNC – PRESS AND RELEASE. RESET – HOLD 10 SECONDS. TYPE “C” ME LU Temporarily position the doorbell base (B) and push button where they will be mounted. Press the push button and listen for the doorbell to ring. If the doorbell does not sound, move the doorbell closer to the push button and test again.
Operation 1 Adjusting the doorbell volume ME VO HI ME LU The doorbell base (B) has an adjustable volume control. Rotate the volume control to adjust the volume. C 2 Selecting a musical tune wired doorbell SYNC – PRESS AND RELEASE. RESET – HOLD 10 SECONDS. The doorbell has different selectable tunes. The push button connected to the “REAR” terminal will only play Ding-Dong (two note tune).The push button connected to the “FRONT” terminal will play any of the musical tunes.
Tunes Westminster Relax Beethoven's Fifth Short Westminster Birthday Celebration Lincoln's Park Piano Westminster Auld Lang Syne Sundance Rockin' Westminster Star Spangled Banner Jazzy Sax Whittington We Wish You a Merry Christmas Ding Dong Short End Care and Cleaning Use a dry cloth to clean the doorbell cover and base. Do not use cleaners or polishes. Do not use any fluids on the doorbell base. 9 HAMPTONBAY.com Please contact 1-844-760-3644 for further assistance.
Troubleshooting - Wired Doorbell Problem Possible Cause Solution The doorbell does not sound. The transformer may not be working properly. Test transformer voltage output with a volt meter. Set the volt meter to read A/C voltage. Voltage should read between 18 - 22 volts A/C on the low voltage side of the transformer when the doorbell is NOT playing. If the volt meter reads below 18 volts, replace the transformer. The push button may not be working properly.
Troubleshooting - Wireless Doorbell Problem Possible Cause Solution The doorbell does not sound. The push button and doorbell are not synced. Follow step 2 under Installation - Wireless Doorbell to sync. The batteries are not installed correctly. Make sure the batteries are installed according to the diagram inside the push button and doorbell (if applicable). The batteries are dead.
Questions, problems, missing parts? Before returning to the store, call Hampton Bay Customer Service 8 a.m. - 5 p.m., CST, Monday - Friday 1-844-760-3644 HAMPTONBAY.COM Retain this manual for future use.
Articulo #1001411347 1001411349 1001411353 1001411355 Modelo #HB-7611-02 HB-7613-02 HB-7619-02 HB-7620-02 GUÍA PARA EL USO Y CUIDADO TIMBRE INALÁMBRICO O TIMBRE CABLEADO ¿Tiene preguntas, problemas o piezas faltantes? Antes de la devolución al almacén llame al Servicio al Cliente de Hampton Bay de 8 a.m.-5 p.m., Hora del Central, de lunes a viernes. 1-844-760-3644 HAMPTONBAY.COM Las ilustraciones pueden ser diferentes de la unidad comprada.
Contenido Contenido ................................................14 Información de seguridad........................14 Garantía ...................................................14 3 años de garantía limitada .................14 Antes de la instalación ............................15 Planificación de la Instalación .............15 Especificaciones ..................................15 Herramientas Requeridas ....................15 Ferretería Incluida................................
Antes de la instalación PLANIFICACIÓN DE LA INSTALACIÓN Antes de instalar el timbre, asegúrese de tener todas las piezas. Compare las piezas con las indicadas en las secciones ferretería incluida y contenidos del paquete. Si alguna pieza falta o está dañada, no trate de ensamblar, instalar u operar este timbre.
Antes de la instalación (continuación) FERRETERÍA INCLUIDA NOTA: La ferretería se muestra en su tamaño real AA BB CC Pieza Descripción Cantidad AA Tornillo 4 BB Ancla de expansión de pared 4 CC Diodo 2 CONTENIDO DEL PAQUETE ME VO HI ME LU UP C SYNC – PRESS AND RELEASE. RESET – HOLD 10 SECONDS. TUNE – HOLD 1 SECOND.
Instalación - Timbre cableado de la potencia 1 Verificación nominal del transformador NOTA: NO instale las pilas si conecta el timbre a los cables del transformador. La energía debe ser provista por un transformador de 16 voltios CA, de 10 o 15 vatios. ADVERTENCIA: Este timbre requiere una conexión eléctrica de bajo voltaje. No lo conecte directamente a 120 VCA.
Instalación - Timbre cableado (continuación) 5 Cableado del timbre Conecte los cables del timbre a la base (A) del timbre: El cable “F” al terminal de tornillo “FRONT” El cable “T” al terminal de tornillo “TRANS” El cable “R” al terminal de tornillo “REAR” FRONT TRANS REAR F B T R Cuelgue la cubierta del timbre (A) en la clavija de la tapa en la base del timbre (B).
Instalación - Timbre inalámbrico (continuación) ME VO HI SYNC – PRESS AND RELEASE. RESET – HOLD 10 SECONDS. FRONT TRANS REAR TYPE “C” TYPE “C” TUNE – HOLD 1 SECOND. TYPE “C” B ME LU Coloque temporalmente la base (B) del timbre y el pulsador donde serán montados. Presione el pulsador y escuche al timbre sonar. Si el timbre no suena, acerque más el timbre al pulsador y pruebe de nuevo.
Operación 1 Ajuste del volumen del timbre ME VO HI ME LU La base (B) del timbre tiene un control de volumen regulable Gire el control de volumen para regular el volumen. C 2 Selección de un tono musical timbre cableado SYNC – PRESS AND RELEASE. RESET – HOLD 10 SECONDS. El timbre tiene diferentes tonos seleccionables. El pulsador conectado al terminal “REAR” (POSTERIOR) reproducirá solo un ding-dong (tono de dos notas).
Tonos Westminster Relajación 5ta Sinfonía de Beethoven Westminster corto Celebración de cumpleaños El parque Lincoln Westminster piano Tiempos pasados Danza del sol Westminster rock Himno nacional americano Saxofón jazz Whittington Le deseamos una Feliz Navidad Din Don Tono breve Cuidado y limpieza Use un paño seco para limpiar la tapa y la base del timbre. No use limpiadores ni pulidores. No use ningún líquido sobre la base del timbre. 21 HAMPTONBAY.
Análisis de averías - Timbre cableado Problema Causa Probable Solución El timbre no suena. El transformador puede no estar funcionando correctamente. Pruebe la salida de voltaje del transformador con un voltímetro. Ajuste el voltímetro para que lea el voltaje CA. La lectura del voltaje debería estar entre 18-22 voltios CA en el lado de bajo voltaje del transformador cuando el timbre NO está sonando. Si el voltímetro lee menos de 18 voltios, reemplace el transformador.
Análisis de averías - Timbre inalámbrico Problema Causa Probable Solución El timbre no suena. El pulsador y el timbre no están sincronizados. Siga el paso 2 de la sección Instalación- Timbre inalámbrico para sincronizar. Las baterías no están bien instaladas. Asegúrese que las pilas estén instaladas según el diagrama al interior del pulsador y del timbre (si es aplicable). Las baterías se acabaron.
¿Tiene preguntas, problemas o piezas faltantes? Antes de la devolución al almacén llame al Servicio al Cliente de Hampton Bay de 8 a.m.-5 p.m., Hora del Central, de lunes a viernes. 1-844-760-3644 HAMPTONBAY.COM Guarde este manual para uso futuro.