
Instructions / Assembly


3
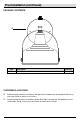
Mounting the Fixture
Place the back plate of the fixture body (A)
onto the fixture screws (EE) and secure it
into place by using the lock nuts (AA)
provided.
Caulk the upper 2/3
rds
of the back plate on
the fixture body (A).
Leave the bottom 1/3
rd
un-caulked for
drainage of any water that may leak into
the enclosure.
The manufacturer recommends a
non-drying exterior caulking material. A
good example is a clear silicone rubber
sealant for exterior use.
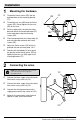
Installation (continued)
6
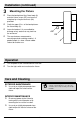
Operation
Turn on power at the circuit breaker or fuse box.
Turn the light switch on to activate the fixture.
Care and Cleaning
EXTERIOR MAINTENANCE
Use a dry or slightly dampened clean
cloth and wipe the surface of the
fixture.
INTERIOR MAINTENANCE
Disconnect power to the fixture by
turning off the circuit breaker or by
removing the fuse at the fuse box.
Use a dry or slightly dampened clean
cloth to wipe the interior surface of the
fixture.
NOTE: Do not use any cleaners with chemicals,
solvents, or harsh abrasives. Use only a dry
soft cloth to dust or wipe carefully. Do not wipe
the LEDs.
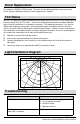
A
AA
EE