
Instructions / Assembly


Assembly ( continued )
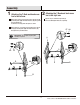
Attaching the seat and back
combination to the chair base
With the help of another person, turn over the newly
completed chair base (A, B, D, and E) and carefully align
with the seat and back combination (C). Attach in order,
using bolts (BB), metal washer (EE), small rectangular steel
plate (DD), seat and back combination (C), T-Rock (E),
small rectangular steel plate (DD), lock washer (GG),
and nuts (CC).
3
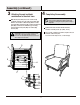
Completing the assembly
Tighten all the bolts and nuts with hex wrenches,
and then cover with plastic caps (HH, II, and JJ).
Turn over the completed chair frame, and place the seat
and back cushions into place.
Your chair is now ready for use, so relax & enjoy!
4
6
D
B
A
II
BB
EE
DD
DD
GG
CC
JJ
C
E
IMPORTANT: Bolts are inserted from underneath the
seat (closest to slat seat) through the crossbar into
the T-rock. Two rectangular steel plates are used for each
side in sequence as noted above.
NOTE:
If the chair frame does not align between the
arms, unscrew all bolts and re-adjust the chair frame
accordingly. Do not tighten completely until assembly is
completed.
C
E