
Instructions / Assembly


1
Use and Care Guide
LED LOW VOLTAGE
SURFACE MOUNT LIGHT
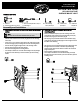
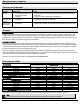
PACKAGE CONTENTS
A – Fixture x1 C – Wire Connector (with 36 in. wire) x1 AA – Self-Threading BB – Plastic Anchor CC – Cardboard
B – Female Plug (with 12 in. wire) x1 D – Male Plug x1 Screw (30 mm) x2 (25 mm) x2 Template x1
Assembly and Installation
1
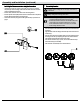
Installing the fixture with the wire routed behind the mounting
surface
1
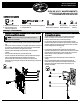
Installing the fixture with the wire in front of the
mounting surface
NOTE: This document provides two different methods for routing the
lead wire. You can chose which method best fits your needs.
□ Place the cardboard template (CC) on the mounting surface and mark
where the holes should be for the female plug (B) and the self-threading
screws (AA).
□ Use at least a 7/16 in. drill bit to drill a hole on the surface large enough
for the female plug (B) to pass through the hole on the mounting surface.
□ Insert the female plug (B) through the hole on the mounting surface.
□ Insert the male plug (D) into the female plug (B).
□ Place the fixture (A) against the mounting surface.
□ Use a Phillips screwdriver to screw the self-threading screws (AA) through
the two holes on the fixture (A) to secure the fixture (A) to the mounting
surface.
□ Place the cardboard template (CC) on the mounting surface and
mark where the holes should be for the self-threading screws (AA).
□ Insert the male plug (D) into the female plug (B).
□ The wire plugs may be retained inside the back of the fixture (A) by
coiling the wire and plugs and dropping the wire through the notch in
the bottom of the fixture (A).
Or
□ The wire plugs may be left outside the fixture (A) by dropping the wire
through the notch in the bottom of the fixture (A) with the plugs
outside the back plate when the fixture is mounted. The connected
plugs are waterproof.
□ Place the fixture (A) against the mounting surface.
□ Use a Phillips screwdriver to screw the self-threading screws (AA)
through the two holes on the fixture (A) to secure the fixture (A) to the
mounting surface.
Item #1002 669 587
Model #JAO2601LM-2