
Instructions / Assembly
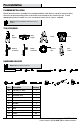
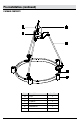

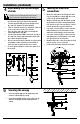
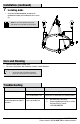
Table Of Contents
- CONTENIDO DEL
- WHAT IS COVERED
- WHAT IS NOT COVERED
- Pre-Installation
- Planning Installation
- Tools Required
- Hardware included
- Pre-Installation (continued)
- Package Contents
- LO QUE ESTA CUBIERTO
- LO QUE (NO) ESTA CUBIERTO
- Pre-Instalatión
- PLANIFICACIÓN DE LA INSTALACIÓN
- HERRAMIENTAS NECESARIAS
- REQUIERE DE HARDWARE
- Pre-Instalación (continuación)
- CONTENIDO DEL PAQUETE
- CE QUI EST COUVERT
- CE QUI EST COUVERT (ET PAS)
- Pré-Installation
- PLANIFICATION DE L'INSTALLATION
- OUTILS REQUIS
- MATERIEL inclus
- Pré-Installation (suite)
- CONTENU DE L'EMBALLAG

5 HAMPTONBAY.COM
Please contact 1-855-HD-HAMPTON for further assistance.
Installation
1
Attaching the mounting strap to
the outlet box
2
Attaching the loop
□ Screw the nipple (GG) about 1/2 in. into the screw
collar loop (II).
□ Screw the other side of the nipple (GG) about 3/8 in.
into the mounting strap (CC).
□ Tighten the hex nut (FF) against the mounting strap
(CC) to secure the nipple (GG).
□ Attach the mounting strap (CC) to the outlet box (not
included) using the outlet box screws (EE).
□ Screw the loop (A) onto the bushing (B).
3
Attaching the columns
□ Hook the top of the columns (D) onto the
top hooks (C).
□ Hook the bottom of the columns (D) into
the bottom hooks (E).