
Instructions / Assembly
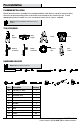
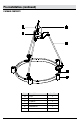

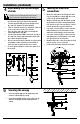
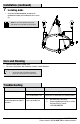
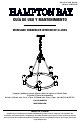
Table Of Contents
- CONTENIDO DEL
- WHAT IS COVERED
- WHAT IS NOT COVERED
- Pre-Installation
- Planning Installation
- Tools Required
- Hardware included
- Pre-Installation (continued)
- Package Contents
- LO QUE ESTA CUBIERTO
- LO QUE (NO) ESTA CUBIERTO
- Pre-Instalatión
- PLANIFICACIÓN DE LA INSTALACIÓN
- HERRAMIENTAS NECESARIAS
- REQUIERE DE HARDWARE
- Pre-Instalación (continuación)
- CONTENIDO DEL PAQUETE
- CE QUI EST COUVERT
- CE QUI EST COUVERT (ET PAS)
- Pré-Installation
- PLANIFICATION DE L'INSTALLATION
- OUTILS REQUIS
- MATERIEL inclus
- Pré-Installation (suite)
- CONTENU DE L'EMBALLAG

6
Installation (continued)
4
Determining the correct length
of chain
5
Making the electrical
connections
CAUTION: To avoid damage to the links, only open a link
enough to hook onto
another link (about 5 mm). Cover the
chain (JJ) with cloth to prevent damage to the link finish.
□ Use pliers and a screwdriver to twist open the link at
the end of the chain (JJ). Remove the open link.
□ Turn the quick link (KK) open at the bottom end of
the chain (JJ). Remove the quick link (KK).
□ Take one open link and use it to attach the chain (JJ)
to the screw collar loop (II). Close the link.
□ Place the other end of the chain (JJ) through the
canopy (AA) and the ring (HH).
□ Use the open quick link (KK) to attach the loop (A) to
the chain (JJ), raising and lowering the fixture until
you achieve the desired height.
□ Once the desired height is achieved, use pliers and a
screwdriver to twist open the last unused link of
chain (JJ). Remove and save the excess chain.
□ Close the quick link (KK) to connect the chain (JJ) to
the loop (A).
□ Weave the fixture wires up through the chain
(JJ), the ring (HH), the canopy (AA), the screw
collar loop (II), and the nipple (GG).
□ Wrap the ground wire from the fixture around
the ground screw (DD) on the mounting strap
(CC), and use a wire connector (BB) to connect
it to the ground wire from the outlet box.
□ Use a wire connector (BB) to connect the wire
without writing on it from the fixture to the
white wire (neutral wire) from the outlet box.
□ Use a wire connector (BB) to connect the wire
with writing on it from the fixture to the black
wire (live wire) from the outlet box.
□ Wrap the three wire connections with electrical
tape for a more secure connection.
□ Position the wires back inside the outlet box.
6
Securing the canopy
□ Place the canopy (AA) over the nipple (GG), and
ensure it is flush with the ceiling.
□ Screw the ring (HH) onto the screw collar loop (II)
until the canopy (AA) is held firmly against the
ceiling.