
Instructions / Assembly

6
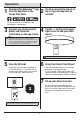
Operation
1
Download the Hubspace™ app
from the App Store or the
Google Play Store.
3
Connect your flush mount to
power and follow the
instructions on the app screen.
2
Create an account to sign in or
log in if you already have an
account.
4
Tap the ‘+’ button in the upper
right corner to add your flush
mount.
5
Scan the QR Code
6
Using Your Smart Flush Mount
NOTE:
□ This Hubspace device requires a 2.4GHz Wi-Fi channel.
Hubspace only shows Wi-Fi networks that your device can use.
□ If you do not see your Wi-Fi network name when you attempt
to connect your devices, please check your router settings or
move your product closer to your Wi-Fi router.
My Home
NOTE:
Bluetooth access is required for device setup.
NOTE:
If the QR code cannot be scanned, you can enter the
HUBSPACE APP QUICK START GUIDE
code manually. Tap Enter Code and follow the instructions.
Turn your smart ush mount on or off from the
Home page on the Hubspace app.
To set a schedule or timer, tap the name of the
smart ush mount on the Home page. You will see
options for setting Schedules and Auto-Off Timers.
7
Set up your Voice Assistant
You can connect your smart ush mount to
Google Home and Alexa from the Hubspace app.
Or, you can sign in to Alexa app or Google Home
and connect to your Hubspace devices from
there.
□
Scan the QR code in the quick start guide or
on the ush mount. To scan the QR code on
the ush mount, diffuser needs to be removed.
Please follow step 1 in the instructions.
OR
□
□
□
For more information on the Hubspace app,
visit hubspace.com/Hubspace.
XXXX-XXXX
XXXX-XXXX
XXXX-XXXX
XXXX-XXXX
XXXX-XXXX
XXXX-XXXX