Free Standing Track Owner’s Manual Use and Care Trouble Shooting
Table of Contents Free Standing Track Introduction ........................................................................................................... 3 Overview................................................................................................................. 3 Placement of the Free Standing Track ................................................................ 4 Components of system...........................................................................................
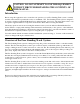
CAUTION: DO NOT ATTEMPT TO USE THIS EQUIPMENT WITHOUT FIRST UNDERSTANDING THE CONTENTS OF THIS MANUAL. Introduction Before using this equipment, and to ensure the safe operation of your Free Standing Track system , carefully read this entire manual, especially the section on “Cautions”. The Free Standing Track system is designed to be used in conjunction with Prism Medical Ltd. portable lift units, accessories and slings.
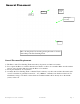
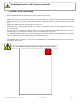
General Placement Trolley Portable Lift Track Side Support Assembly Foot Photo showing Side View and the general placement of a bed in relationship to the Free Standing Track. General Placement Requirements 1) The Bases of the Free Standing Track must always be placed on a hard level surface. 2) Do not place the Bases on surfaces that will cause them to wobble or be unstable. Make sure the surfaces are free of any obstacles that may cause the Bases to be unstable.
Components of the Free Standing Track Track Assembly 433200 Locking Handle Post Assembly -Right hand 433201 Leg Assemblies 433203 Post AssemblyLeft hand 433202 Clamp Ratchet Figure 1A - Disassembled Free Standing Track. Minimum - Maximum Dimensions 3’ Wide (W) x 5-7.
Component List The following components are included with your Free Standing Track: Description Part Number Quantity Post Assembly-RH 433201 1 Post Assembly-LH 433202 1 Track Assembly 433200 1 Leg Assembly 433203 2 Owners Manual 633282 1 CAUTION: DO NOT EXCEED THE CAPACITY OF THE FREE STANDING TRACK (Maximum Safe Working Load of 300 LBS) Specifications of the Free Standing Track • • • • • • • High-strength lightweight Aluminum ° Track weight is 15 lbs ° Post and leg assembly weight 12 l
Before you start: Check Requirements and Cautions Cautions: Failure to observe cautions listed below could result in serious injury or death. • • • • • • • • • • • • • • The Free Standing Track system must be assembled prior to use. Should you have any questions during assembly contact your local authorised dealer. The Free Standing Track system parts should not be loose, broken or bent. If any part is missing or damaged do not install. Contact your local authorised dealer immediately.
Check Requirements and Cautions-continued Cautions: After Installation • Ensure that the Handle lock are fully in locked position as per labels. • • Make sure track is sitting properly on the posts. There should be no gap between Track and Track Holders. Make sure all four foot pads are sitting flat on the floor. There should be no gap between the foot pads and floor. Make sure clamp levers are locked always when in use. During the use of Free Standing Track, do not bump or lean against the posts.
Assembly Caution: Before using the Free Standing Track,- the Post assembly and track must be visually checked to ensure that they are not damaged. Should anything look unusual contact your local dealer prior to use. Failure to comply with this caution could result in serious injury to the operator, the individual being lifted and/or damage to the Free Standing Track and/or portable lift unit. Cleaning Rubber Feet : Prior to each installation, clean the rubber feet with wet cloth soaked with water.
Assembly of the supporting Post Step 1 - Place the Post in Standing Position. Step 2 - Grab the Side leg to open the foot. Always support the post with one hand and open the leg with the other hand. Step 3 - Open the other leg of the post. Make sure that the both hinges are flat and they can not go further down. Step 4 - Completed Post assembly . Free Standing Track - User Guide Part#633282 Note—Follow Steps 1–4 to finish 2nd post assembly.
Completed Post Assembly of Free Standing Track Track Holders Must face each other Distance the 2 posts at 8 Feet apart from each other and completely parallel Track Holder Must face each other as shown in above Figure Free Standing Track - User Guide Part#633282 Rev: 05/01/2012 Page: 11
Trolley Installation C-300 Trolley P-300 Trolley Step 1– Detach the hook/eyelet of trolleys as per step 1 in trolley disassembly (page 27) by removing the split ring and pin. Step 2– Fold and place the track on a secure place. Insert the trolley into the middle of the track. Step 3– Using a screw driver push the trolley lock button down to be able to fit the trolley into the track opening. Step 4– Attach the hook/eyelet of the trolley to the trolley using the pin and split ring.
Assembly of the Track “ Click” Step 1 - Place the track on the floor. Unfold the track as shown in figure until it is fully straight. Note: If you do not hear the “click” sound, press the lock with hand until it is in locking position. Free Standing Track - User Guide Part#633282 Step 2 - Track should automatically locks itself in place with a “ click” sound. Note: Ensure Track is locked and fully straight. Step 3— Lay Track Flat on the floor.
Assembly—Mounting the Track Step 1 - Place the Track against the floor. Step 2- Grab the handle and pull the hook inside the track slightly out using a finger and Twist the handle towards the unlock direction until the lock is fully opened. Step 3– Repeat the same step for other side handle.
Assembly—Mounting the Track Step 4 - lift the track with both hands and Place one end of the track on the Post Assembly as shown in figure. Step 5 - Track should fall into place and sit flat on the track holder of the Post as you see in next figure. Note: always make sure that handles are in open position before placing the track on the post. No Gap Step 6: Place the other end of the track on the other Post. Step 7— Both ends should lay completely Flat on the top of post assemblies.
Assembly—Mounting the Track Continued... Step 8 - Grab Track Lock handle Step 9 - Twist the handle downwards in the lock direction A big gap should be visible after locking handle Spring should be visible after locking handle Step 10 - Twist until you hear a click indicating that track is locked in position and the Safety lock pops out. Note: Big gap between the Track and the safety lock indicates that track is locked as shown above. Note: Above picture shows that the track is not completely locked.
Mounting the C-300 Lift Caution: Prior to mounting the C-300 lift onto the C-300 trolley , read the owners manual of the C300 lift. Be sure that the instructions on the use of the lift and any accessories, such a slings are thoroughly understood before attempting to use them with the Free Standing Track. Free Standing Track is rated only for 300lbs. Do not exceed the limit of the Free Standing Track.
Mounting the P-300 Lift Caution: Prior to mounting the P-300 lift onto the P-300 trolley , read the owners manual of the P300 lift. Be sure that the instructions on the use of the lift and any accessories, such a slings are thoroughly understood before attempting to use them with the Free Standing Track. Free Standing Track is rated only for 300lbs. Do not exceed the limit of the Free Standing Track.
Raising up the Free Standing Track Step 1 - Grab The Post Centre to open the post clamp Step 3 - Grab The Inner Post with one hand and grab the Outer Post section with the other hand. Step 2 - Fully Open The clamp Step 4: Raise the Post Up using the height indicators. Note: When Raising the Post from Lowest setting, it is recommended to raise in 1 Foot increments. Step 5 - Repeating steps 1-5, raise the other Post.
Raising up the Free Standing Track Continued... Note: Free Standing Track will be in a slanting position as shown in figure. Set up the Free Standing Track by raising the post assemblies one by one. Note: a caution sign at the 7 feet indicates that you are approaching the end of the post. Carefully extend the post until you approach the stop sign or 7.5 feet if desired or applicable. Max Height of Free Standing Track Do not extend post after 7.5 Feet height mark.
Raising up the Free Standing Track Continued... Step 6 - Close the post clamp as shown in figure. Step 7 - Make sure the clamp is fully closed on both posts. Completely Installed Free Standing Track Always Before Use check the following steps: Make sure the height indicator shows the same number on both posts. 2) No Gap between Track and track Holder. 3) No Gap Between Foot Pads and Floor.
Attaching the Skirt– Optional Accessory Step 1 - Rap the skirt around the legs and close it using the Velcro hooks. Free Standing Track - User Guide Part#633282 Step 2 - Use the pocket as a storage for the sling or as you require.
Disassembly of Free Standing Track Step 1 - Before disassembly , make sure the lift and /or Trolley is in parking spot. Step 2 - Grab The Post Centre to open the post clamp and fully open the clamp. Step 3 - Grab The Post and press the Ratchet with thumb. Step 4 - Bring down the Free Standing Track by sliding down the inner Post while keep pressing down the Ratchet Lock. Note: When Lowering down the Post from highest setting, it is recommended to lower in 1 Foot increments.
Disassembly of Free Standing Track Note: Free Standing Track will be in a slanting position as shown in figure. Bring down the other side of the Free Standing Track following steps 25. Note: Make sure the posts are parallel and not twisted inside each other. Failing to do that , user might experience resistance in lowering down the posts. Safety lock Button Step 5 - Bring the Free Standing Track to the shoulder height and dismantle the lift from the trolley following the user manual of the lift.
Disassembly of Free Standing Track Step 9 - Lift The track up from post assembly and place it on the floor. Step 10 - Press the Track lock hook as shown in figure to fold the track. While holding the lock , slightly fold the track . Step 11 - Let go of the lock and fold the track. Step 16 - Close the track fully.
Disassembly of Legs Step 1 - Pull the hinge slightly upwards as shown in figure. Step 2 - Grab The side leg and press in as shown in figure. Repeat the step 1 and 2 for the other side Free Standing Track - User Guide Part#633282 Caution: Do not place your finger underneath the hinge it might get Step 3 - Fully closed legs. Repeat the steps 1 to 3 for the other leg and post assembly.
Trolley Disassembly Removing Trolley C-300 (Prism part number 330051) Step 1– Remove the split ring as shown in figure . Step 2– Detach the hook of the C-300 by taking the pin out as shown in figure . Step 3– Make sure not to loose any part. Step 4– Fold and place the track on the floor or on a secure table. Bring the trolley to the opening of the track.
Trolley Disassembly Continued... Step 5– Use a screw driver and push the trolley lock button down to allow the trolley to come out. Step 6– Remove the trolley. Removing Trolley P-300 (Prism part number 330052) Step 1– Follow the step 1 to 6 from the removing trolley C-300. Free Standing Track - User Guide Part#633282 Note: Make sure not to loose any part.
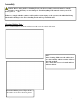
Trouble Shooting Should problems arise with the use of the Free Standing Track review the following chart. Find the fault and complete the recommended solution. If the fault is not found and/or the solution does not correct the problem contact your local authorized dealer for service immediately. Fault Reason Recommended Solution Visually the system is not aligned straight. 1. 2. Post is not set straight. Floor is not leveled. 1) Set up the post following Post Assembly instructions.
Ratchet sticks out when lowering or raising and dose not lock 1. Ratchet spring is damaged 1) Do not use the system. Contact your local authorized dealer immediately. Track Lock Not working. 1. Physical damage to track lock assembly. Track Lock Spring breaks or damaged. 1) Unfold the Track and the fold it together to see if the track lock set it self in locking position or not. If not then contact local authorized dealer immediately. 2) Do track assembly steps and see the if the track locks or not.
General Inspection and Maintenance Failure to follow inspection and maintenance instructions below may result in serious injury or death. Periodic general inspection and maintenance should be performed by a person who is properly qualified and trained with the use and care of The Free Standing Track System. Any defects and damage to the Free Standing Track that have lead to corrective actions should be noted and dated by the inspector.
Service Record History - Initial Information • • • • Complete the following section- Purchase and Service Information as soon as this equipment is installed. Use the service record history to record any completed service and repairs. Ensure that the service record is signed and dated each time it is used.
Service Record History Date: _______________________ Service Type: □ Periodic Inspection □ Monthly Inspection Completed By: _________________________ Complete this section after each service, repair inspection and/ or maintenance. Photocopy additional pages as required.
Service Record History Date: _______________________ Service Type: □ Periodic Inspection □ Monthly Inspection Completed By: _________________________ Complete this section after each service, repair inspection and/ or maintenance. Photocopy additional pages as required.
Service Record History Date: _______________________ Service Type: □ Periodic Inspection □ Monthly Inspection Completed By: _________________________ Complete this section after each service, repair inspection and/ or maintenance. Photocopy additional pages as required.
Warranty This Warranty does not affect or in any way limit your Statutory Rights 1) Subject to the exclusions set out in Clause 2, the conditions set out in Clause 3 and the limitations set out in Clause 4, Prism Medical Ltd., as sole licensed representative of Corven Healthcare Inc., guarantees all equipment supplied as new against failure within the period of 1 year from date of purchase by virtue of defects in material or workmanship.