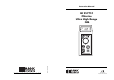
Instruction Manual HI 95771C Chlorine Ultra High Range ISM w w . h a n n a i n s t . c o m MAN95771CR3 06/06 w www.hannainst.
Dear Customer, Thank you for choosing a Hanna product. This manual will provide you with the necessary information for the correct use of the instrument. Please read it carefully before using the meter. If you need additional technical information, do not hesitate to e-mail us at tech@hannainst.com. This instrument is in compliance with directives.
CE DECLARATION OF CONFORMITY PRELIMINARY EXAMINATION Please examine this product carefully. Make sure that the instrument is not damaged. If any damage occured during shipment, please notify your Dealer.
GENERAL DESCRIPTION The HI 95771 is an auto diagnostic portable microprocessor meter that benefits from Hanna’s years of experience as a manufacturer of analytical instruments. It has the advanced optical system based on a special tungsten lamp and a narrow band interference filter that allows most accurate and repeatable readings. All instruments are factory calibrated and the electronic and optical design minimizes the need of frequent calibration.
• Press READ/TIMER and “SIP” will blink during measurement. SPECIFICATIONS • The instrument will show for three seconds the CAL CHECK™ standard value, i.e. 100 for “771” chlorine ULTRA HIGH RANGE or 1.00 for “701” chlorine LOW RANGE. Then the date of last calibration (e.g.: “01.08”) appears on the display, or “01.01” if the factory calibration was selected. In both cases the number of the month is blinking, ready for date input. Note: if the display shows “ERR” the calibration procedure failed.
PRECISION AND ACCURACY CALIBRATION PROCEDURE Note: It is possible to interrupt calibration procedure at any time by pressing ON/OFF. Warning: do not validate or calibrate the instrument with standard solutions other than the Hanna CAL CHECK™ Standards, otherwise erroneous results will be obtained. For accurate Validation and Calibration results, please perform test at room temperature: 18 to 25°C (64.5 to 77.0°F).
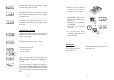
• Select the parameter code “771” for chlorine ULTRA HIGH RANGE or “701” for chlorine LOW RANGE by holding ZERO/SET (see page 13). • Place the CAL CHECK™ Standard Cuvet A into the holder and ensure that the notch on the cap is positioned securely into the groove. • Press ZERO/SET and “SIP” will blink on the display. Photometric chemical analysis is based on the possibility to develop an absorbing compound from a specific chemical reaction between sample and reagents.
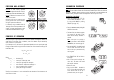
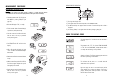
FUNCTIONAL DESCRIPTION 1) 2) 3) 4) 5) 6) 7) Liquid Crystal Display Cuvet Holder Cuvet alignment indicator ON/OFF key ZERO/SET key READ/TIMER key CAL CHECK key • Hold READ/TIMER for three seconds. The display will show the countdown prior to measurement. Alternatively, wait for 1 minute and just press READ/TIMER. In both cases “SIP” will blink during measurement. • The instrument directly displays concentration in mg/L of free chlorine on the Liquid Crystal Display.
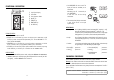
MEASUREMENT PROCEDURE DISPLAY ELEMENTS DESCRIPTION MEASUREMENT PROCEDURE FOR 701 Warning Warning: if the Chlorine Low Range reagent is added to a sample with high chlorine concentration, the color formed can be rapidly bleached, resulting erroneous low readings. • Select the parameter code “701” for Chlorine LOW RANGE by holding ZERO/SET (see page 13). 1) four digit main display area. 2) CAL: appears when the instrument operates in the calibration mode.
The blinking "BAT" indicates that the battery voltage is getting low and the battery needs to be replaced. This indicates that the battery is dead and must be replaced. Once this indication is displayed, the meter will lock up. Change the battery and restart. “Configuration”: this indicates that the meter has lost its configuration. Contact your dealer or the nearest Hanna Customer Service Center.
MEASUREMENT PROCEDURE ERROR MESSAGES MEASUREMENT PROCEDURE FOR 771 • Select the parameter code “771” for Chlorine ULTRA HIGH RANGE by holding ZERO/SET (see page 13). a) on zero reading This indicates that the zeroing procedure failed due to a low signalto-noise ratio. In this case press ZERO again. “No Light”: the instrument cannot adjust the light level. Please check that the sample does not contain any debris. • When the LCD displays “771”, it is ready.
GENERAL TIPS FOR AN ACCURATE MEASUREMENT • Do not let the reacted sample stand too long after reagent is added, or accuracy will be lost. The instructions listed below should be carefully followed during testing to ensure best accuracy. • It is possible to take multiple readings in a row, but it is recommended to take a new zero reading for each sample and to use the same cuvet for zeroing and measurement.