
Installation Guide
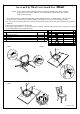
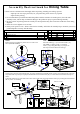
Table Of Contents

staple tips can cause injury, therefore, for your protection, please remove any exposed
staples used in packing.
1. We recommend that you should assemble this product with the assistance of another person ; this will make
assembly easier, and will help to eliminate damage to the product or injury to persons during assembly.
2. Be sure to check all packing materials carefully for small parts that may have come loose inside the carton during
shipment.
3. Please do not over tighten screws or bolts.
4. Please put all parts on a non - abrasive floor before assembly. and follow the assembly step to assemble your newly
purchased product correctly and efficiently .
PART LIST
NO PART DESCRIPTION CODE
QTY
A TABLE HALF TOP
2
B EXTENSION LEAF
1
C LEG DTLEG
4
NO. HARDWARE LIST QTY
1 M8 x 70mm
8
2 5/16"
8
3
5/16"IDx22mm
8
4 M5 x 65mm
1
HARDWARE LOCATED IN TABLE BOX
Assembly Instructions for Dining Table
Caution : Please read instructions thoroughly before unpacking assembly parts. Sharp, exposed
STEP 1
Remove discard wood block by lossen the screw with screw
driver.(NOT PROVIDED)
STEP 2
Attach the table leg ( C ) to corner block table ( A )
with JCBB ( 1 ),Spring washer ( 2 ) and Flat
washer ( 3 ) by using Allen Key ( 4 ). Repeat the
same steps to fix the other three table legs.
STEP 3
1) Unlock the cam lock underneath the table top (A) by rotating the lock handle all the way the "off" marking on the cam locks
and pull the table top wide open equally from both ends. Insert extension leaf ( B ) to center table and attach to location pin as
shown.
2) Push the Table Top (A) from both ends to close and lock the cam lock underneath the table top by rotating the lock handle all
the way to the "on" marking.
3.1
3.1
3.2
A
DISCARD
PROTECTER
BLOCK
LOCATION PIN
HOLE
LOCATION PIN
UNLOCK CAMLOCK
LOCK POSITION
COMPLETE ASSEMBLY
C
C
A
B
A B A
4
3
2
1
TURN CLOCKWISE