EN Installation / User Instructions / Warranty FR Instructions de montage / Mode d'emploi / Garantie ES Instrucciones de montaje / Manejo / Garantía Montreux 16860xx1 Starck 10860xx1 Citterio 39838xx1
English Technical Information Recommended water pressure Max. water pressure Flow rate Hole size in mounting surface Max. depth of mounting surface 15 - 75 PSI 145 PSI 2.2 GPM 1⅛"‒1⅜" 2¾" Installation Considerations 10860xx1 • For best results, Hansgrohe recommends that this unit be installed by a licensed, professional plumber. • Please read over these instructions thoroughly before beginning installation. Make sure that you have all tools and supplies needed to complete the installation.
Français Español Données techniques Datos tecnicos Pression d’eau recommandée 15 - 75 PSI Pression d’eau maximum 145 PSI Capacité nominale 2.2 GPM Dimension du trou dans la surface 1⅛ po ‒1⅜ po de montage Profondeur maximale de la surface 2¾ po de montage Presión recomendada en servicio Presión en servicio max.
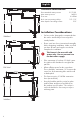
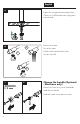
English Roughing in If the countertop is less than ¾” thick, it must be reinforced to distribute the weight of the pot filler. Allow sufficient space for the escutcheon. There should be a minimum 1½" between the center line of the mounting hole and the wall or backsplash. Installation 1 silicone ok! Optional Optionnelle Opcional 2 4 Verify that the o-ring is installed on the underside of the escutcheon. Push the escutcheon onto the faucet shank.
Français Español Pièce intérieure Piezas interiores Si le comptoir mesure moins de ¾ po d’épaisseur, vous devrez le renforcer pour répartir le poids du robinet remplisseur. Si la mesada tiene un espesor inferior a ¾”, debe reforzarse para distribuir el peso del grifo para cacerolas. Laissez suffisamment d’espace pour l’écusson. Vous devez laisser un espace minimum de 1 ½ po entre la ligne centrale du trou de montage et le mur ou dosseret. Deje suficiente espacio para el escudo.
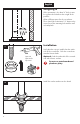
English Orient the faucet as desired. 3 Tighten the nut against the mounting surface. Connect a ½" NPSM cold water supply hose (not included). Remove the aerator. 4 2. Turn on the water. Flush the faucet and check for leaks. 1. Turn the water off. 3. 1 2 3 mm Change the handle (Optional - Montreux only) Remove the screw cover, screw, and handle. Install the new handle. Install the handle screw and screw cover.
Français Español Orientez le robinet dans la direction souhaitée. Oriente el grifo según lo desee. Serrez l’écrou contre la surface de montage. Apriete la tuerca contra la superficie de montaje. Raccordez le tuyau d’alimentation ½ po NPSM d’eau froide (non compris). Conecte la manguera de suministro de ½" NPSM de agua fría (no incluida). Retirez l’aérateur. Retire el aireador. Ouvrez l’eau. Abra el suministro de agua. Rincez le robinet et vérifiez s’il y a des fuites.
User Instructions / Instructions de service / Manejo Caution: Risk of Injury The pot filler may become hot when the arm is positioned above a hot stove burner. Always push the pot filler away from the burner after use. Attention : Risque de blessure Le robinet remplisseur peut devenir chaud lorsque le bras est placé au-dessus d’un brûleur de cuisinière activé. Éloignez toujours le robinet remplisseur du brûleur après l’utilisation.
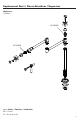
Replacement Parts / Pièces détachées / Repuestos Montreux 16860xx1 88790000 88789000 xx = Colors / Couleurs / Acabados 00 = Chrome 82 = Brushed Nickel 9
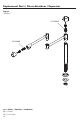
Replacement Parts / Pièces détachées / Repuestos Starck 10860xx1 88790000 88789000 xx = Colors / Couleurs / Acabados 00 = Chrome 80 = Steel Optik 10
Replacement Parts / Pièces détachées / Repuestos Citterio 39838xx1 88790000 88789000 xx = Colors / Couleurs / Acabados 00 = Chrome 82 = Brushed Nickel 11
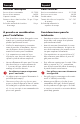
Cleaning Recommendation for Hansgrohe Products Modern bathroom faucets, kitchen faucets and shower products are made from different materials to comply with the needs of the market with regard to design and functionality. To avoid damage to the product, it is necessary to take proper care of it. For best results: • Prevent the buildup of mineral scale and /or soap residue by cleaning your Hansgrohe product(s) when needed. • • Select a cleaning agent specifically intended for the type of product.
• Après le nettoyage rincez avec suffisamment d’eau claire pour éliminer les restes de produits attachés. • L’utilisation d’appareil de nettoyage à vapeur n’est pas autorisée, car les températures importantes peuvent détériorer les produits. Indications importantes • • Les produits pour le corps comme les savons liquides, les shampooings ou les gels de douche peuvent causer des détériorations. Ici aussi on doit: Après l’utilisation rincer soigneusement les restes avec de l’eau.
Limited Consumer Warranty This product has been manufactured and tested to the highest quality standards by Hansgrohe, Inc. (“Hansgrohe”). This warranty is limited to Hansgrohe products that are purchased by a consumer in the United States or Canada after March 1, 1996, and installed in either in the United States or in Canada. WHO IS COVERED BY THE WARRANTY This warranty extends to the original purchaser only. This warranty is non-transferable.
EXCLUSIONS AND LIMITATIONS REPAIR OR REPLACEMENT (OR, IN LIMITED CIRCUMSTANCES, REFUND OF THE PURCHASE PRICE) AS PROVIDED UNDER THIS WARRANTY IS THE EXCLUSIVE REMEDY OF THE PURCHASER. HANSGROHE NEITHER ASSUMES NOR AUTHORIZES ANY PERSON TO CREATE FOR IT ANY OTHER OBLIGATION OR LIABILITY IN CONNECTION WITH THIS PRODUCT.
www.hansgrohe-usa.com US - Installation Instructions • Revised 06/2013 Hansgrohe, Inc. • 1490 Bluegrass Lakes Parkway • Alpharetta, GA 30004 Tel.