
Product manual


Page 11For technical questions, please call 1-888-866-5797.Item 61256
SAFETYOPERATIONMAINTENANCE SETUP
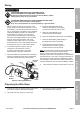
10. Place a heavy rag or carpet (sold separately) over
the wire rope span, 6 feet from the hook to help
absorb the force released if the wire rope breaks.
FIGURE A: WHIPLASH DAMPENING
BLANKET OR RUG
11. Re-engage the clutch by moving the Clutch Handle
to the Engaged position, shown in Figure I.
Figure I: Clutch Engaged
WARNING! Do not allow anyone to stand near
the wire rope, or in line with the wire rope behind
the winch while it is under power. If the wire rope
should slip or break, it can suddenly whip back
towards the winch, causing a hazard for anyone in
the area. Stand well to the side while winching.
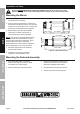
Double Line Rigging
a. A double line system should be used whenever
possible. It reduces the load on the winch,
allowing it to work longer with less heat buildup.
It reduces load on the winch in two ways:
• It utilizes the lower layers of wire rope
that have higher capacity, and
• It halves the load on the winch
through pulley action.
b. Connect the wire rope for a double line
system as shown in Figure J below.
Use a pulley block (sold separately) properly
rated for the load to be pulled and designed
to be operated with this winch’s wire rope.
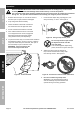
Stationary
Winching Vehicle
(Chock tires,
set parking brake,
and leave in neutral)
Load
Carpet
Figure J: Double Line setup
c. Loop the wire rope around the pulley and connect
to another part of the vehicle’s chassis or to
a separate anchor point. Do not anchor the
Wire Rope back to the winch or winch mount.
Note: If anchoring the winching vehicle, only attach
the anchor line to the front of the vehicle.
If the anchor line is attached to the rear of the vehicle,
the vehicle's frame may be damaged by
the forces exerted by winching.
12. Attach the Pendant Controller to the Socket
on the Solenoid Assembly, see Figure K.
Figure K: Pendant connection