
Owner's Manual


Page 9SKU 97360 For technical questions, please call 1-800-444-3353.
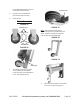
2.
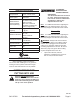
FIGURE 3
STAND II
(64)
STAND I
(57)
SUPPORT
BRACKET
(58)
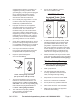
Pull out the Stand I (57) and Stand
II (64), fully extending the Support
Brackets (58). (See Figure 3.)
3.
FIGURE 4
STAND II
(64)
ADJUSTING KNOB (59)
ADJUSTING
KNOB (59)
With assistance, set the Tile Saw
upright. (See Figure 4.)
4. The Adjusting Knob (59) is located at the
bottom of Stand II (64). Turn the Adjusting
Knob clockwise or counterclockwise
to keep the Tile Saw stand balanced
evenly on the oor. (See Figure 4.)
5.
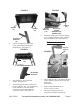
MOTOR
SUPPORT
(111)
FIGURE 5
HANDLE
(38)
BOLTS (98),
SPRING
WASHERS (95),
WASHERS (94)
Attach the Handle (38) to the Motor Support
(111), using the Bolts (98), Spring Washers
(95), and Washers (94). (See Figure 5.)
To Attach the Knobs:
1.
Knob
(22)
slot
Right Rail
Stand (41)
FIGURE 6
Place a Washer (102), Lock Washer (95) and
another Washer (102) onto each of the two
Knobs (22).
(See Figure 6.)
2. Align the Right Rail Stand (41) as
shown in Figure 6, above.
3. Remove the shipping screw and
attach the Knob (22) through the slot