Multi-purpose electric sharpener Model 99823 Set up and Operating Instructions Visit our website at: http://www.harborfreight.com Read this material before using this product. Failure to do so can result in serious injury. Save this manual. Copyright© 2008 by Harbor Freight Tools®. All rights reserved. No portion of this manual or any artwork contained herein may be reproduced in any shape or form without the express written consent of Harbor Freight Tools.
Save This Manual CAUTION, used with the safety alert symbol, indicates a hazardous situation which, if not avoided, could result in minor or moderate injury. Keep this manual for the safety warnings and precautions, assembly, operating, inspection, maintenance and cleaning procedures. Write the product’s serial number in the back of the manual near the assembly diagram (or month and year of purchase if product has no number). Keep this manual and the receipt in a safe and dry place for future reference.
tripping over a longer cord. Electrical Safety 1. To protect against electrical shock do not immerse cord, plugs, or the main unit in water or other liquid. Only the non-electrical parts of the unit may be immersed for cleaning. Thoroughly clean and dry these parts prior to first use and before every subsequent use. 2. Unplug from outlet when not in use and before maintenance or cleaning. 3.
6. This product is not a toy. Keep it out of reach of children when children are not being closely supervised. 3. Knives with serrated edges are a good example of blades that may not be suited for this Electric Sharpener. 7. People with pacemakers should consult their physician(s) before use. Electromagnetic fields in close proximity to heart pacemaker could cause pacemaker interference or pacemaker failure. 4.
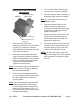
Assembly Figure 2 Read the entire Important Safeguards section at the beginning of this manual including all text under subheadings therein before set up or use of this product. To prevent serious injury from accidental operation or electric shock: Before tool assembly or adjustment, make sure the tool’s switch is turned off, and the cord is unplugged. b. High speed Drill Bit Attachment.
the bit so that all four corners of the bit would touch the walls of the “V” Guide. (Only sharpen Right Hand twist drill bits) Operation Read the entire Important Safeguards section at the beginning of this manual including all text under subheadings therein before set up or use of this product. 1. 4. Using the High Speed Drill Bit Attachment Ease back the “V” Guide until the bit rests against the stopper at the center of the “V”.
10. Disconnect from the electrical outlet, wipe the unit to remove dust, metal shavings and debris. Return the Clamp Assembly (17,18,19) into the Clamp Holder (15,16). Cover and store in a safe location. 5. Tighten the Top Lock Nut for Clamp Holder (19) clockwise; 6. Insert Clamp Assembly (17,18,19) into Clamp Holder (15,16); 7. Then the attachment can be for the drill bit diameter smaller than 9/64”. For the drill bit diameter smaller than 9/64” 1.
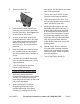
2. Switch the Motor on. latch snaps into the catch at the lower side of the attachment. Figure 5 Guide Slots 3. Hold the knife handle towards you and insert the heel end of the blade into the Guide Slot. See Figure 5 for all directions in this section. 4. As soon as the blade touches the Grinding Wheel (6), slide it with light, even pressure across the Grinding Wheel (6) surface to the knife tip, then remove it. Do not use excess pressure. 5.
Using the Chisel and Plane Attachment Figure 6 Support Plate with Magnets (29) 4. Turn on the Power Switch (3) and allow the motor speed to stabilize. 5. Slide the Support Plate, making sure that blade edge touches the wheel. Note: Do not force the blade onto the Grinding Wheel. Motor Housing (1) 6. Stop the motor and remove the blade to inspect for proper and uniform bevel angle and sharp edge. If necessary, bevel angle may be slightly re-adjusted. 7.
To prevent serious injury from failure: Do not use if damaged. If abnormal noise or vibration occurs, have the problem corrected before further use. INSPECTION and MAINTENANCE To prevent serious injury from accidental operation or electric shock: Before inspection or maintenance, make sure the switch is turned off, and the cord is unplugged. BEFORE EACH USE, inspect the general condition of the Electric Sharpener.
PARTS LIST Part 1 2 3 4 5 6 7 8 9 10 11 12 13 14 15 16 17 18 Description Motor Housing Base (with mounting holes) Switch (Rocker type ON/OFF) Motor Wheel Valve Grinding Wheel Sign for Rotational Direction Nut Power Cord Cable Jacket Screw PCB Rubber Foot Screw Clamp Holder Clamp Turn Nut for Clamp Holder Locking Nut for Clamp Holder PARTS LIST Q’ty 1 1 1 1 1 1 1 1 1 1 2 1 4 4 1 1 1 1 Part 19 21 22 23 24 25 26 27 28 29 30 31 32 33 34 Description Top Lock Nut for Clamp Holder Located Block Screw Back Pl
LIMITED 90 DAY WARRANTY Harbor Freight Tools Co. makes every effort to assure that its products meet high quality and durability standards, and warrants to the original purchaser that this product is free from defects in materials and workmanship for the period of 90 days from the date of purchase.