
Product manual


SKU 99823 For technical questions, please call 1-800-444-3353. Page 6
OPERATION
Read the ENTIRE IMPORTANT
SAFEGUARDS section at
the beginning of this manual
including all text under
subheadings therein before set
up or use of this product.
Using the High Speed Drill Bit
Attachment
Slide the High Speed Drill Bit 1.
Attachment onto the Motor Housing
until it snaps at the bottom.
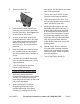
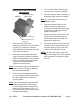
Figure 4
Grinding
Wheel (6)
Clamp
Assembly
(17, 18,
19)
Clamp
Holder
(15,16)
“V” Guide
Setting Slot
2. Remove Clamp Assembly (17,18,19)
from Clamp Holder (15,16) and insert
it in the Setting Slot at the left hand
side of the module by aligning the
slots at the sides of Clamp Holder
(15,16) with the tabs of the Setting
Slot. Clamping nut should be on the
top side.
Slide the “V” Guide all the way down 3.
and hold in place with one hand.
Insert the bit into the Clamp and
while pushing it into the “V”, rotate
the bit so that all four corners of the
bit would touch the walls of the “V”
Guide. (Only sharpen Right Hand
twist drill bits)
Ease back the “V” Guide until the 4.
bit rests against the stopper at the
center of the “V”. Turn the Clamping
Nut clockwise to securely hold the bit
(Do Not Over-tighten).
Pull back on the “V” Guide and 5.
remove the Clamp Assembly
(17,18,19).
Push top of the sharpener assembly 6.
forward (away from the sharpening
stone), and insert the Clamp into the
Clamp Holder (15,16).
Start the motor by pushing the “I” on 7.
the switch. Wait until the grinding-
wheel picks up speed. In a uniform,
slow and steady motion swing the
Clamp Assembly back and forth until
grinding noise subsides.
Turn the switch to its off position. Lift 8.
the Clamp Assembly (17,18,19) and
ip it upside down. Repeat steps 6
through 8 to sharpen the other face of
the bit.
Note: SHARPEN BOTH FACES OF THE
BIT EQUALLY.
Stop the motor, remove the bit with 9.
the Clamp Assembly (17,18,19)
and inspect both faces of the bit. If
further grinding is necessary, repeat
steps 3 to 8. However, if the result is
satisfactory, back off the clamping nut
and remove the bit.
CAUTION: The bit may be hot. Handle
with care.