
Product manual


SKU 99823 For technical questions, please call 1-800-444-3353. Page 7
Disconnect from the electrical outlet, 10.
wipe the unit to remove dust, metal
shavings and debris. Return the
Clamp Assembly (17,18,19) into the
Clamp Holder (15,16). Cover and
store in a safe location.
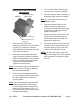
For the drill bit diameter smaller than 9/64”
Take out Clamp Assembly (17,18,19) 1.
from Clamp Holder (15,16);
2. Loosen the Clamp Assembly;
3. Turn the Locking Nut for Clamp
Holder (18) in 180°;
4. Insert the Locking Nut for Clamp
Holder (18) with Top Lock Nut for
Clamp Holder (19) into the slot of the
Turn Nut for Clamp Holder (17);
Tighten the Top Lock Nut for Clamp 5.
Holder (19) clockwise;
6. Insert Clamp Assembly (17,18,19)
into Clamp Holder (15,16);
Then the attachment can be for the 7.
drill bit diameter smaller than 9/64”.
NOTE: Mastering the setup and grinding
the bit will require practice.
The module may be pulled back •
towards the grinding wheel for
faster material removal,
Clamp assembly may need to be •
inserted partially and as the faces
are sharpened, it may need to
be pushed down until the Clamp
Holder rests at the bottom of its
cavity.
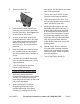
Knives
Slide the Scissors and Knife-1.
Sharpening attachment into the Motor
Housing (1), making sure that the
latch snaps into the catch at the lower
side of the attachment.