
Product manual

Page 3For technical questions, please call 1-888-866-5797.Item 90476
Mounting Instructions
Read the ENTIRE IMPORTANT SAFETY INFORMATION section at the
beginning of this document including all text under subheadings therein
before set up or use of this product.
1. Avoid accidental damage to Channel
and/or vehicle to which Channel
will be installed. Prior to installing
the Channel on vehicle, read and
understand instructions and safety
precautions as outlined in vehicle
manufacturer’s service manual.
2. CAUTION! Prior to attaching
the Channel to vehicle, make
sure vehicle’s engine is off and
emergency brake is set.
3. With assistance, position Channel
between front frame rails of vehicle.
4. Align mounting holes in Channel with
the factory bolt holes in the frame rails of
vehicle. Then, securely attach Channel
to vehicle’s frame rails with at least
4 sets of ASTM Grade 5 Bolts, Washers,
Lock Washers, and Nuts (not included)
the largest diameter that will fit.
5. With assistance, and use of proper
lifting device, position Winch
(not included) over Channel.
6. Using the appropriate size ASTM Grade
5 Bolts, Washers, Lock Washers, and
Nuts, attach Winch’s Fairlead (roller or
hawse) onto front of Channel. Then run
the Winch’s Hook through the Fairlead.
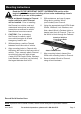
Attach to Vehicle’s
Front Frame Rails
Attach Fairlead Here
7. Align mounting holes in base of the
Winch with mounting holes in Channel.
8. Securely attach Winch to Channel,
using correct hardware.
Record Serial Number Here:
Note: If product has no serial number, record month and year of purchase instead.