
Installation & Assembly


PREPARE
THE
FIXTURE
NOTE:
FIRST
TURN
OFF
ELECTRICITY
1. If you are replacing an existing fixture, disconnect and remove the old fixture.
Expose
the supply
wiring
from
the outlet box.
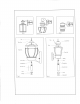
2.
If
your
fixture is supplied
with
a threaded stem for mounting, refer to figure
1
and
follow
step
3
.If
your
fixture is supplied
with
2 machine screws. Refer to figure 2
or
3
and
follow
step
4.
3.
If
your
fixture is supplied
with
a threaded stem screw the stem 3 complete
turns
into
the mounting bracket and
lock
into place
with
a hexagon
locknut.
4. If your fixture is supplied
with
two machine screws, thread the machine screws
into
the opposite side
of
the mounting bracket
from
the green grounding screw.
5. Fasten the mounting bracket to the outlet box using the two screws provided. The
machine screws or threaded nipple should be
facing
the outward direction.
6.
While
supporting the fixture, connect the grounding wire (green or
bare
copper)
from
the
fixture
to the grounding conductors
of
the supply
circuit.
Attach
all
of
the
grounding conductors to the mounting bracket
with
the green grounding
attachment
screw.
7.
Make
electrical
connections, see below:
ELECTRICAL
CONNECTIONS.
To
make electrical connections
Connect
the white wire(s)
from
the
fixture
to the white wire
of
the supply
circuit.
Connect
the black wire(s)
from
the
fixture
to the black
wire
of
the supply
circuit,
Use
U.L.
Listed,
wire
connectors suitable
for
the
size,
type and number
of
conductors. No
loose
strands
of
loose
connections should be
present.
Secure wire connectors
with
U.L.
Listed
electrical
tape.
FINAL
ASSEMBLY
1.
Spread the electrical splices so
that
the black wires are on the other side.
2.
Place the fixture against the mounting surface
allowing
the machine screws or
threaded stem to
pass
through the fixture cover plate. Secure
with
the acorn
nuts
or
mounting nut provided.
3.
Install the light bulb(s) (not provided)
CAUTION:
Refer
to the
relamping
label located
near
the lamp holder
for
the
recommended maximum wattage-do not exceed recommended wattage.
4.
If
applicable.
Secure the glass to the
fixture
with
the screws provided.
5.
Outdoor
wall
fixtures must be caulked
with
suitable
RTV
or silicone compound
around the top and sides, keep bottom
clear
to
allow
moisture to escape.
6. Restore electricity and check
the
operation
of
lighting
fixtures.