Drive+Play OM revB.
Drive+Play OM revB.qxd 9/14/05 7:20 PM Page 2 INTRODUCTION Drive + Play Warnings Thank you for purchasing Harman Kardon’s Drive + Play™, an elegant mobile audio solution that provides the driver with total iPod® control, including full music browsing capability. We’ve organized this manual to make installation and operation as simple and trouble-free as possible. Please read it thoroughly before you begin installing Drive + Play.
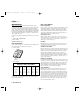
Drive+Play OM revB.qxd 9/14/05 7:20 PM Page 3 INSTALLATION INSTALLATION Choosing Installation Locations Parts List IMPORTANT: Drive + Play should be installed according to these instructions and relevant regulations. No part of this system should obstruct the driver’s view of the road or vehicle controls or information displays necessary for safely operating the vehicle.
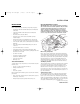
Drive+Play OM revB.qxd 9/14/05 7:20 PM Page 4 Choosing Installation Locations (continued) Wireless FM Transmission Electronics Enclosure Location This method is the most convenient and requires the least wiring. After setup, you simply tune your radio to the assigned FM frequency to listen to your iPod. Drive + Play has a built-in FM transmitter and its software provides a choice of five fixed FM frequencies or a tunable frequency for areas where none of the fixed frequency selections are available.
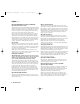
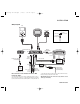
Drive+Play OM revB.qxd 9/14/05 7:20 PM Page 5 INSTALLATION Wiring Diagram iPod Text Display Control Knob Audio Input/Output Jacks Tip = LEFT RIGHT = Ring Sleeve = GROUND 3.5mm Stereo Mini-Plug Cable iPod Cable Electronics Enclosure Side Head Unit/Radio Wireless FM Transmitter Back or or 3.5mm Stereo Cable (not included) Antenna In Aux.
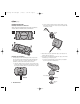
Drive+Play OM revB.qxd 9/14/05 7:20 PM Page 6 Installing Components Installing the Electronics Enclosure b. Select another viewing angle position (middle or top). Reassemble the parts in reverse order and tighten the recessed hex screw. At the selected site, install the Electronics Enclosure. Use either the enclosed cable ties or mounting screws, as shown below. 3mm Hex Key Display Base Display Assembly 2. At the base, using the 1.5mm hex key, loosen (but do not remove) the hex setscrew.
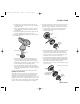
Drive+Play OM revB.qxd 9/14/05 7:20 PM Page 7 INSTALLATION b. At the proposed site, wipe the surface and exposed mounting plate with one of the enclosed alcohol pads. Allow both to dry. 1. Place the Control Knob at the site and check the operation angle with the default 30° base. If it meets your needs, then skip to step 2. Otherwise, change the base as follows: c. Remove the protective tape from one side of one of the enclosed adhesive pads, and press the pad against the mounting plate. a.
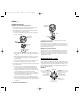
Drive+Play OM revB.qxd 9/14/05 7:20 PM Page 8 Installing Components Installing the Control Knob (continued) Control Knob With 0° Base 2. At the base (below the cable), using the 1.5mm hex key, loosen (but do not remove) the hex setscrew. 3. To install the Control Knob with adhesive tape, perform the following steps or skip to step 4: a. Insert the mounting plate, rotate it 180°, and tighten the hex setscrew. Arrow Mounting Plate Control Knob With 0° Base 5.
Drive+Play OM revB.qxd 9/14/05 7:20 PM Page 9 OPERATION Drive + Play operates much like the iPod itself. The Control Knob mimics the iPod’s Click Wheel, and its software uses a similar menu-select system. Before you use Drive + Play, you’ll need to set it up for the first time. After you perform the Initial Setup using the Settings Menu, controlling your iPod with Drive + Play will be easy and intuitive.
Drive+Play OM revB.qxd 9/14/05 7:20 PM Page 10 Initial Setup (continued) • Setting AUX Input To route an audio signal from a device (e.g., cell phone or satellite radio; see Wiring Diagram on page 5) connected to Drive + Play’s auxiliary input to your mobile audio system: • To enable or disable automatic sensing and switching of audio signals on Drive + Play’s auxiliary input: Drive + Play Menu > Settings > Display Settings > Auto Scroll > select On or Off (default). • 2.
Drive+Play OM revB.qxd 9/14/05 7:20 PM Page 11 OPERATION Setting the Sleep Timer Drive + Play is equipped with a sleep timer that delays its power off by a default of 2 seconds after the ignition is turned off. You can set a different delay time as follows: Now Playing Song Title Artist TO1 NOTE: Sleep Timer only works when the Drive + Play’s ACC wire is connected to the ignition switch’s accessory terminal (see Wiring Diagram on page 5).
Drive+Play OM revB.qxd 9/14/05 7:20 PM Page 12 TROUBLESHOOTING TECHNICAL SPECIFICATIONS Problem: Dimensions of Electronics Enclosure: 6" (152.0mm) x 1-1⁄4" (32.4mm) x 2-5⁄8" (66.4mm) (W x H x D) Message = iPod Disconnected Solution: • Check that the iPod Connection Cable is connected between the Electronics Enclosure and the iPod. Maximum Mounting Diameter of Text Display: 1-13⁄16" (46.2mm) Maximum Mounting Diameter of Control Knob: 1-13⁄16" (45.