
- Proxim_Harmony 802.11a Network Adapter User's Guide


Installation 18
Windows NT
Follow these steps to install a Harmony 802.11a network adapter in a computer
running Windows NT 4.0 (Service Pack 6 or later).
1. Turn on the computer and logon to Windows, if applicable.
2. Insert the Harmony Installation CD into the computer’s CD-ROM drive.
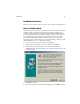
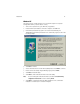
3. If the Harmony Installation program does not launch automatically, run
SETUP.EXE
from the Harmony Installation CD to launch the program, shown in the
following example.
4. Click Next to continue.
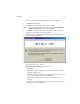
5. Select a destination folder for the Harmony Utility files and click Next to continue.
6. Enter a name for the utility’s Program Manager group and click Next.
7. Cl i ck Next to install the utility.
8. Click Finish to view additional information about the utility.
Note: To avoid viewing the additional information, uncheck the Read
Harmony
configuration instructions box before clicking Finish.
9. Click Finish to complete the Harmony Utility installation and to continue the
installation of a Harmony 802.11a network adapter.