Amber Changing Table THIS PRODUCT IS NOT INTENDED FOR INSTITUTIONAL OR COMMERCIAL USE. If you have any questions or missing parts, please contact us. DO NOT return product parts to the store where it was purchased.
WARNING: READ ALL WARNING & SAFETY INSTRUCTIONS BEFORE ASSEMBLING PRODUCT. KEEP INSTRUCTIONS FOR FUTURE USE. Storage: The product must be kept in a dry and clean area. Care and Cleaning: Do not scratch or chip the finish. Do not use abrasive chemicals for cleaning. Clean with mild soap on a soft rag. Rinse and dry thoroughly. If you choose to refinish this furniture, be sure to use only a non-toxic finish specified for children’s products.
Changer Parts Identification Sheet DO NOT assemble changer if parts and hardware are defective or missing. Contact us for exchange or keep the original box for return authorization. ~ Changer Assembly Parts A. Left Side Panel (1 pc) B. Right Side Panel (1 pc) C. Drawer Front Panels (2 pcs) D. Drawer Left Panels (2 pcs) E. Drawer Right Panels (2 pcs) F. Drawer Back Panels (2 pcs) G. Drawer Bottom Panels (2 pcs) H. Top Front Panel (1 pc) I. Top Back Panel (1 pc) J. Top Side Panels (2 pcs) K.
~ Changer Assembly Hardware Item # Fittings Qty 1. Bolt 1/4” x 2-3/4” (10 pcs) 2. Bolt 1/4” x 2-1/4” (4 pcs) 3. Bolt 1/4” x 2 (6 pcs) 4. Bolt 1/4" x 1 (4 pc) 5. Machine screw 3/16” x 1” (6 pcs) 6. Dowel 8mm x 30 mm (12 pcs) 7. Barrel Nut ¼”x13mm (20 pcs) 8. wood Screw F4 x 1” (16 pcs) 9. wood screw F4 x 5/8” (12 pcs) 10. Drawer Knob (2 pcs) (2 pcs) 11. Bolt 5/32” x 1” 12.
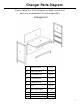
Changer Parts Diagram Please follow this Parts Diagram to make sure that all parts are assembled in the correct position. ~ Changer Drawer C. Drawer Front Panel (2 pc) D. Drawer Left Panel (2 pc) E. Drawer Right Panel (2 pc) F. Drawer Back Panel (2 pc) G. Drawer Bottom Panel (2 pc) 10. Knobs (2 pcs) ~ Changer Top H. Top Front Panel (1 pc) I. Top Back Panel (1 pc) J. Top Side Panels (2 pcs) K.
Changer Parts Diagram Please follow this Parts Diagram to make sure that all parts are assembled in the correct position. ~ Changer Unit A. Left Side Panel (1 pc) B.
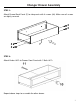
Changer Drawer Assembly STEP 1: Attach Drawer Left Side Panel (D) and Drawer Right Side Panel (E) to Drawer Front Panel (C) with 4 screws (#8). STEP 2: Slide Drawer Bottom Panel (G) into the grooves of the side panels.
Changer Drawer Assembly STEP 3: Attach Drawer Back Panel (F) to side panels with 4 screws (#8). Make sure all screws are tightly secured. 8 8 8 8 F STEP 4: Attach Knobs (#10) to Drawer Front Panel with 1 Bolts (#11). Repeat above steps to assemble the other drawer.
Changer Top Assembly STEP 1: a. Insert 8 Dowels (#6) into top and bottom holes on each end of both Top Front Panel (H) and Top Back Panel (I). b. Attach 2 Top Side Panels (J) to Top Front Panel (H) and Top Back Panel (I) by using 4 Barrel Nuts (#7) of each corner of top panels before inserting 4 Bolts (#2). Warning labels must be UPRIGHT and facing INWARD. Tighten firmly with Wrench (#12).
Changer Top Assembly STEP 3: Turn the changer top bottom side up, and then attached two Upper Front Rail(L) , top top panel with Bolts(#5). Tighten firml;y with Philps Head Screwdriver(not included).
Changer Assembly STEP 1: a. Attach Low Back Panel (O) to Right Panel (B), Insert 2 Barrel Nut (#7) and 1 dowel(#6), using 1 Bolts(#1) and tighten firmly with Wrench (#12). b. Attach Front Moddle Rail(M) and Front Base Rail(N) to Right Panel (B), using 2 Bolts(#1) and 1 dowel(#6), tighten firmly with Wrench (#12). STEP 2: a. Attach Low Back Panel (O) to Left Panel (A), Insert 2 Barrel Nut (#7) and 1 dowel(#6), using 2 Bolts(#1) and tighten firmly with Wrench (#12). b.
Changer Assembly STEP 3: Attached Middle Shelf(P), using 4 Bolts(#4), Tighten firmly with wrench (#12). STEP 4: Place Changer Top Assembly to Changer Assembly Unit.
Changer Assembly STEP 5: Secure Changer Top by using 4 Bolts (#1) and 4 Barrel Nuts(#7), Tighten firmly by uasing Wrench (#12) STEP 6: Install Upper Back Panel , using 12 wooden screw (#9), Tighten firml with Philps Head Screwdriver(not included).
Complete.
Wall Safety Strap • TOOLS NECESSARY: RUBBER MALLET, PHILLIPS SCREW DRIVER. WARNING: WHEN UPRIGHT, IT IS POSSIBLE THAT THE FURNITURE MAY TIP OVER. FOR YOUR CHILD’S SAFETY, PLEASE INSTALL THE SAFETY WALL STRAP BEHIND THE FURNITURE. PLEASE READ ALL INSTRUCTIONS CAREFULLY BEFORE USING THIS PRODUCT AND KEEP THESE INSTRUCTIONS FOR FUTURE REFERENCE. Safety Wall Strap 8” x 1.
STEP 3: Attach the wall strap to the wall stud using the long 1-1/2” screw and washer as shown. Make sure strap holds steady and complete installation. CAUTION: Do not attempt to screw into the plaster wall only. You must also screw into a wall stud. Warranty CAUTION! Safety Tips for Use of Changers Many older changers, including secondhand or second use changers, may not meet all current safety standards.