
User Guide


Form No. GRMWM-0505
5
OPERATION
1. Plug unit into a properly grounded electrical
outlet of the correct voltage, size and plug
configuration (see SPECIFICATIONS for
details).
2. To begin operation, place the ON/OFF toggle
switch in the ON position. Allow 20-30 minutes
for the unit to reach operating temperatures.
WARNING
To avoid any injury or damage to the unit do not
pull unit by power cord.
WARNING
To prevent any injury, discontinue use if power
cord is frayed or worn.
WARNING
Some exterior surfaces on the unit will get hot.
Use caution when touching these areas to avoid
injury.
NOTE: The unit comes equipped with a thermostat
that is factory preset. If an adjustment is necessary
please follow the instructions listed below.
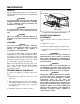
THERMOSTAT ADJUSTMENT
PROCEDURE
(GRMW-3 and GRMW-4 Only)
(See Figure 5)
WARNING
To avoid any injury or damage to the unit
thermostat adjustments must only be performed
by authorized personnel.
1. Place the power switch on the OFF position
and unplug the unit from the power source.
2. Allow unit to cool for 20-30 minutes.
3. Loosen, but do not remove, “middle” screw
for proper access to thermostat adjustment slide.
Place slide in up position.
4. Using a small, straight blade screwdriver
positioned in the access hole, turn the
adjustment screw clockwise to increase the
temperature and counterclockwise to decrease.
5. Plug unit into power supply and place the toggle
switch in the ON position. The unit will reach
operating temperature in 20-30 minutes.
DRAWER OPERATION
1. Open product holding drawer by gently pulling
drawer handle outward. As the drawer moves
out the access door automatically opens.
2. The access door stays completely open by itself
when the drawer is pulled all of the way out.
Loading and unloading of food product should
be done when the drawer is completely open.
3. To close door, gently push handle until drawer
is securely shut.
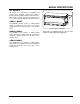
CAUTION - HOT
Figure 5. Thermostat Adjustment Procedure
(GRMW-3 and GRMW-4 only)
Front Door
“Middle” Screw/Slide
Adjustment Screw