Models WM-639SS-30 & WM-639SS-36
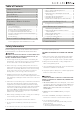
Table of Contents Safety Information.................................... 2 Warranty Information............................... 3 Specifications............................................ 4 Tools Needed........................................... 4 Parts Included........................................... 5 Satisfied With It........................................................ 2. Place Chimney Mounting Bracket......................... 3. Mount the Hood.....................................................
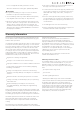
D. You can fight the fire with your back to an exit. 4. Two to three installers are recommended because of the larger size and weight of this hood. *Based on "Kitchen Fire Safety Tips" published by NFPA. CAUTION 1. For general ventilating use only. Do not use to exhaust hazardous or explosive materials and vapors. 2. To avoid damage and noisy and/or unbalanced impellers, keep drywall/construction dust, etc. off power unit. 3.
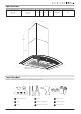
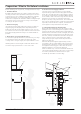
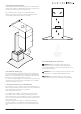
Specifications Dimentions WM-639SS-30 Dimentions WM-639SS-36 Volts Hertz Fan CFM Speeds Light Wattage Stainless Steel Grade 29.5” W 18.75” D 35.25” W 18.75” D 120 60 900 3 2W (LED) 430 11.75” 11” 30.25” 20.5” 18.75” WM-639SS-30: 29.5” WM-639SS-36: 35.
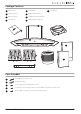
Package Contents 1 Range Hood 5 Duct Adapter 9 2 Chimney Bracket 6 Flexible Aluminum Duct 3 Bottom Chimney 7 2 x Baffle Filters (Preinstalled) 4 Top Chimney 8 Chimney Mounting Bracket User Manual 2 9 5 1 4 7 6 3 8 Parts Included 1 4 x AA Hood mounting screws 2 4 x BB Brick anchor 3 2 x CC Chimney mounting bracket screws 4 2 x DD Duct cover screws (another 2 are preinstalled on the back side of the unit) 4 4 x EE Adapter mounting screws (preinstalled on the unit) WM-639 USER MA
Preparation: What to Do Before Installation Before installing your range hood, carefully follow these steps: 1. Read This Manual Read through all the steps. If you fail to read the instructions carefully, we will not be responsible for damages incurred on your part. If you’re not confident in your abilities to install the range hood properly, we recommend hiring a certified technician to complete the installation.
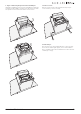
6. Figure Out Ducting Requirements & Install Adapter Install duct adapter by removing 4 screws (EE) (need image), and then put the adapter over the vent exit and secure with the 4 previous removed screws at the exact location. 7. Remove Screws Remove screws on the side and at the back. (Keep to secure chimney cover it needed) 8. Find a Helper This range hood is best installed by two or more people due to its size and weight.
How to Install Your Range Hood When you’ve completed all the preparation steps, you’re ready to install your range hood. 1. Thoroughly Inspect the Unit and Ensure You Are Satisfied With It Check your range hood for damaged or missing parts. Plug it in to an outlet to ensure the fan and lights work. If anything is damaged or missing, contact the manufacturer to get the issues solved. Don’t throw away packaging until you’re sure you are fully satisfied with the product.
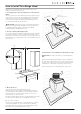
5. Assemble the Chimney Bottom Carefully slide the bottom chimney (C) down outside the top chimney (D), and then carefully place the bottom chimney (C) into the recessed area of the hood body top. If you feel that extra security is needed, fix the bottom chimney (C) with two previously removed chimney bottom screws (DD) supplied from side of hood body. C D Be Careful with Electrical Connections.
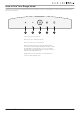
How to Use Your Range Hood Now that your range hood is installed, it’s time to learn how to use it. It is very simple to use and is operated entirely using the front control panel. 3 2 1 4 5 1- Press to power on and off. 2- Press once to reduce fan speed. 3- Press once to increase fan speed. 4- This range hood offers an upgraded illumination mechanism and has 2 light intensity levels. By touching the light button a low intensity is set. if you touch the button again, higher light intensity is set.
Basic Maintenance Instructions Your range hood requires some easy routine maintenance to keep it running efficiently. Maintaining the Baffle Filter Clean the grease filters frequently—we suggest cleaning every 2 months, or more frequently for heavy use. 1. To remove the baffle filters, push down on the latch, tilt the filter, and lift out. Replacing the LED Lamps CAUTION: Always switch off the electrical supply before replacing LED lamps. This range hood requires two LED lamps (120V, 2W) 1.
Troubleshooting Tips WARNING: Please turn off the power circuit or power breaker panel before troubleshooting this range hood. Failure to do so can cause death or serious injury. Problem My range hood won’t work. My range hood vibrates while the fan is operating. The fan is operating weakly. The fan is not working properly even though the lights are working. The vent hood is not working efficiently. The light is not working. Solution 1. Make sure the power supply and wiring are connected securely. 2.
Contact Hauslane Extended Warranties If you are interested in an extended warranty, sign up on our website at www.hauslane.com Parts and Accessories If you need replacement parts or accessories, visit www.hauslane.com Contact Us We’d be happy to answer your questions or resolve any issues you may have.