
Use and Care Manual

Before installing your range hood, carefully follow these steps:
1. Read This Manual
Read through all the steps. If you fail to read the instructions
carefully, we will not be responsible for damages incurred on
your part. If you’re not confident in your abilities to install the
range hood properly, we recommend hiring a certified
technician to complete the installation. While reading through
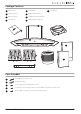
the manual, ensure you have the necessary tools and parts
according to the previous page.
2. Remove Packaging
Open the box and carefully unbox the range hood. Remove
any packaging, including the plastic wrap and protective
plastic film, from the hood and the chimney covers. You can
use stainless steel cleaner to wipe down the surface if desired.
Keep all packaging materials until you are satisfied with our
product.
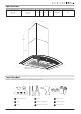
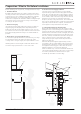
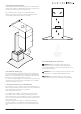
3. Ensure There is Proper Height Clearance
To ensure the highest performance, the bottom of your range
hood must be between 24” and 30” from the top of the
cooking surface. For gas ranges, the required distance is 30”.
Installing at the incorrect height could lead to drastic reduc-
tion in the range’s performance or even cause a fire.
4. Check Your Power Supply and Ducts
Check to ensure your main voltage is in line with the
required voltage outlined on the rating plate inside this
hood. Also check the domestic power supply to guaran-
tee adequate earthing before installation.When ducting
to the outside, don’t connect the range hood to exhaust
ducts that carry any type of combustion fumes like
fireplaces, boilers, or any similar items. The vents should
have a short, straight run to the outside. Avoid any elbows
if possible, and if an elbow is required, a minimum of a
12” straight run is imperative before the elbow.
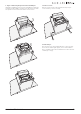
5. Complete Duct Work (for ducted mode)
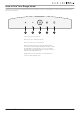
Remove the three baffle filters from the range hood by
pulling the levers out and slowly removing them. Set them
aside.Decide where the ductwork (not included) will run
between the hood and the outside. A straight, short duct
run will allow the hood to perform most efficiently. Long
duct runs, elbows, and transitions will reduce the perfor-
mance of the hood. Use as few of them as possible.
Larger ducting may be required for best performance
with longer duct runs.
Attach an adequate length of approximately 6 inches
round duct to the air outlet adapter. The air must not be
discharged into a flue that is used for exhausting fumes
from appliances burning gas or other fuels. Be sure to
fulfill all regulations concerning air discharge.
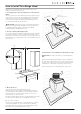
Install a roof/wall cap. Connect round metal ductwork to
cap and work back towards hood location. Use duct tape
to seal the joints between ductwork sections. (The
roof/wall cap should be sourced locally).
Preparation: What to Do Before Installation
WM-639 USER MANUAL 6
24”
minimum
Hood
Hood
Roof Cap
Wall Cap
Duct