
Instructions / Assembly

USE ONLY HAYWARD GENUINE REPLACEMENT PARTS 5
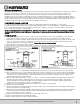
STARTING THE FILTER
Be sure filter drain plug is installed and closed. Open manual air relief
valve a few turns and open the suction and return valves (when used).
CAUTION: All suction and discharge valves must be
open when starting the system. Failure to do so could
cause severe personal injury and/or property
damage. Be sure locking knob is secure (hand tighten-only slight pressure is required).
Stand clear of the filter. Prime and start the pump, following the manufacturer's instructions. Air trapped in the system
will automatically vent to the pool and out air relief valve. Close air relief valve as soon as air is vented, as indicated by water
flow.
FILTERING
Filtration starts as soon as flow is steady through the filter. As the filter cartridge removes dirt from the pool water, the
accumulated dirt causes a resistance to flow. As a result, the gauge pressure will rise and the flow will decrease. When the
pressure rises 7-10 psi (.49-.70 Bar) above the starting pressure, or when flow decreases below desired rate, clean or replace
the filter cartridge.
CLEAN / REPLACE CARTRIDGE
REMOVING CARTRIDGE ELEMENT
1. Shut off the pump.
2. If filter is located below water level, close valves or block off suction & discharge lines to prevent backflow of water from
the pool.
3. Remove drain plug and allow water to drain from filter. Close drain plug. (To assist draining process; open air vent a few
turns.)
4. Unscrew and remove locking knob (counterclockwise direction) and carefully lift off top cover to gain access to filter
cartridge.
5. Lift out cartridge and clean. Or, replace with clean, spare cartridge. (See Cleaning Cartridge.)
REINSTALLING CARTRIDGE ELEMENT
1. Clean any collected debris from the bottom of filter body.
2. Carefully replace cartridge element over tie rod and into filter body ensuring that the cartridge sits evenly on the collector
hub in bottom of filter body.
3. Place cover on filter body (being sure filter head 0-ring is in place and clean). Fit tie rod end through center hole.
4. Tighten locking knob in clockwise direction. (Hand tight only.)
5. Proceed as in STARTING THE FILTER.
CLEANING CARTRIDGE
The cartridge filter element can be cleaned by washing inside and out with a garden hose. (The cartridge is easier to clean
when dry.) After hosing the cartridge, for best results, allow cartridge to dry and carefully brush pleated surface areas to
remove fine particles. Do not pressure wash, as it can damage the filter element.
Algae, suntan oil and body oils can form a coating on the cartridge pleats which may not be thoroughly removed by hosing. To
remove such materials, soak the cartridge in a solution of filter element cleaner (various brands available at pool dealer).
Follow manufacturer's directions for use, paying close attention to any Warnings on the package. Rinse the element
thoroughly with water from a garden hose before reinstalling in the filter.
A spare cartridge filter element is an excellent investment. It provides convenience and ensures that your filter will always
be ready to operate at peak efficiency.
1. Hayward cartridges are specially designed and engineered for use in StarClear Plus filters. For best results, use only
genuine Hayward StarClear cartridges in your filter. Order
Model No. CX760RE, CX900RE , CX1200RE, or CX1750RE,
from
your dealer. The Hayward name is your guarantee of quality.
VACUUMING
Vacuuming can be performed directly into the filter whenever needed. Clean cartridge after vacuuming, if required.
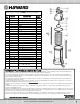
REQUIRED CLEARANCE
SIDE ABOVE
IN CM IN CM
C751 18 46 19 48
C900 18 46 19 48
C1200(2) (S) 18 46 25 64
C17502(S) 18 46 30 76