
Installation Manual


7
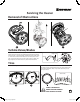
Wheel or Bearing Removal & Replacement
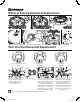
Skirt and Inlet Removal & Replacement
1
3
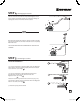
When the unit is reassembled turn the right front wheel (looking from behind) and make sure everything turns smoothly.
7
CLICK
4
3
1
Once any debris has been
removed or the skirts have been
replaced replace the inlet. Note
it can only be inserted in one
direction and once it is in it
should clip on both sides. Note:
if it does not clip in then you
have it the wrong way around (it
is marked L and R).
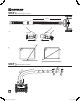
Once the inlet is removed you
can remove any debris that is
in the turbine chamber. You can
also remove and replace the
skirt/bracket assemblies. One
of the middle skirt/brackets can
be easily pulled out. Once one
assembly is out you can slide
the others out easily to replace.
Remove the inlet.
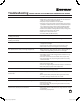
*Low flow applications may aect cleaners ability to climb walls.
Small*
small pump/variable speed
low flow
Medium
average pump
normal flow
Large
large pump
high flow
Turn the unit upside down
and press with both ngers
on both sides of the inlet.
While pushing down pull
up on the inlet.
2
L R
Inlet Sizes:
2
4
6
5
260630_Hayward_English.indd 8 12/16/14 8:51 PM