
Installation Guide


Pomona, CA Clemmons, NC Nashville, TN
Tel: 908-351-5400 www.haywardpool.com
USE ONLY HAYWARD GENUINE REPLACEMENT PARTS
9
EQUIPMENT INSPECTION:
On receipt of the heater, inspect the heater carton(s) for damage. If any carton(s) is damaged, note it when
signing for it. Remove the heater from the carton(s) inspect it and advise the carrier of any damages at once.
IMPORTANT NOTICE:
The installation instructions are intended for the use of a qualied technician, specically trained and
experienced in the installation of this type of heating equipment. Some states or provinces require that instal-
lation be licensed. If this is the case in the state or province where heater is located, the contractor must be
properly licensed.
WARNING: Failure to comply with the appliance and vent package installation instructions and service
instructions in this manual may result in equipment damage, re, asphyxiation, or carbon monoxide poi-
soning. Exposure to products of incomplete combustion (carbon monoxide) can cause cancer and birth
defects or other reproductive harm.
CONFORMANCE WITH CODES:
The heater shall be installed in accordance with all local and state codes. The heater installation must con-
form to the latest edition of the National Fuel Gas Code (ANSI Z223.1/NFPA 54) and with the requirements of
the authority having jurisdiction. Design certication of the heater is in compliance with ANSI Z21.56/CSA 4.7.
For Canadian installations, the heater is to be installed in accordance with the standards CAN/CGA B149.1
and B149.2 – Installation Codes for Gas Burning Appliances and Equipment and/or local codes and, if appli-
cable, CSA C22.1 – Canadian Electrical Code, Part I.
ALTITUDE OF INSTALLATION:
Heaters other than the H500FD may be installed at any altitude up to 10,100 ft above sea level, provided
the appropriate modication(s) are performed. The altitudes which require modication vary depending on
the model. Parts necessary to convert the heater for outdoor installation at altitudes up to 7,700 ft (minimum)
are included with the heater. Conversion is accomplished by replacement of the blower air inlet plate, and
for indoor applications, installation of a special vent pressure switch. The blower air inlet plates are clearly
marked with the compatible heater model(s), vent conguration(s), and altitude range(s). Care should be
taken to verify the correct plate (and vent pressure switch, when applicable) is being used to ensure proper
heater performance. The vent pressure switch should be provided with the indoor adapter kit, or if you have
an older indoor adapter kit, order p/n FDXLVPS1931 for the high-altitude indoor vent pressure switch.
High-Altitude Conversion Procedure:
1. Identify the altitude of the installation site. This may be done using a GPS device, or by looking up the
altitude for the geographic location. Altitudes for all locations in the United States and Canada may be
found using the zip/postal code database at www.zip-codes.com. If the altitude for the installation site
is greater than 10,100 ft, the heater may not be installed. Note that if installing outdoors, some
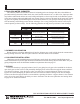
Universal H-Series heaters may be compatible with your altitude without modication. Table 1 lists the
altitude ranges for heaters without modication. All indoor heaters installed above 2,000 ft require a
special vent pressure switch.
2. Select the appropriate blower air inlet plate to use based on the heater model, vent conguration
(outdoor or indoor), and altitude needed. Extra plate(s) are included with the heater, packaged in the
plastic bag with this manual. Each plate has a label which identies which model(s), vent
conguration(s), and altitude range(s) it is designed for. Table 1 lists the maximum installation
altitudes using the included conversion plate(s). If installing above 7,700 ft, the high-altitude kit
SECTION II. INSTALLATION