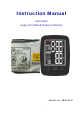
Instruction Manual Automatic Upper Arm Blood Pressure Monitor Model No.
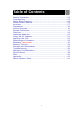
Table of Contents Medical Disclaimer……………………………………………………………………………03 Intended Use………………………………………………………………………………..…03 About Blood Pressure………………………………………………………………………04 Measurement Method…………....……………………………………………………06 Accuracy……………………….…………………………………………………………………07 Precautions………………….…………………………………………………….…………….. 08 Device Overview……………………………………………………………………………….10 Symbol Definitions………………………………………………………………………….13 Features………………………………………………………………………………………….14 Installing Batteries………………………………………………………………………….
Medical Disclaimer This manual and product are not meant as a substitute for advice provided by your doctor. You are not to use the information contained herein, or this product for diagnosing or treating a health problem or prescribing any medication. If you have or suspect that you have a medical problem, promptly consult your healthcare provider. Intended Use HL858CG automatically measures human’s Systolic, Diastolic blood pressure and heart rate by using the oscillometric method during inflation.
About Blood Pressure 1. What is blood pressure? Blood pressure is the measurement of the force of blood pushing against the walls of the arteries. Arterial blood pressure is constantly fluctuating during the course of the cardiac cycle. The highest pressure in the cycle is called the systolic blood pressure, and represents the pressure in the artery when the heart is beating. The lowest pressure is the diastolic blood pressure, and represents the pressure in the artery when the heart is at rest.
About Blood Pressure A. Standards for assessment of high or low blood pressure without regard to age, have been established by the WHO, and classifications adapted from JNC7: WHO: World Health Organization JNC 7: The Seventh Report of the Joint National Committee on Prevention, Detection, Evaluation, and Treatment of High Blood Pressure. NIH Publication No.
Measurement Method HL858CG Automatic Upper Arm Blood Pressure Monitor measures blood pressure and heart rate by oscillometric method, meaning the fluctuations in pressure are measured. Once the cuff is wrapped around your upper arm, just turn on the monitor and inflation automatically starts. The inflation of the cuff creates pressure around the arteries inside upper arm. Within the cuff is a gauge which senses the fluctuations (oscillations) in pressure.
Accuracy HL858CG Automatic Upper Arm Blood Pressure Monitor has been clinically tested against a scientific device called mercury sphygmomanometer, considered the gold standard in blood pressure measurement. All HL858CG Automatic Upper Arm Blood Pressure Monitors have performed equivalent to measurements taken with this scientific device and are within the accuracy limits prescribed by the American National Standard for Electronic or Automated Sphygmomanometers.
Precautions * Do not use this manual and product as a substitute for advice, diagnosing or treating a health problem or prescribing any medication by your doctor. If you have a medical problem, promptly consult your healthcare provider. * Read the Instruction Manual thoroughly before measuring and keep it at hand for your reference at any time. * This device uses the oscillometric method to measure systolic and diastolic blood pressure as well as your heart rate.
Precautions For those who have had mastectomy surgery (especially lymph nodes removed), it’s recommend take a measurement on the unaffected side. When used among medical electronic equipments on the same limb, pressurization of the cuff may cause temporarily malfunction to other devices.
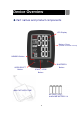
Device Overview Part names and product components LCD Display Battery Cover (located on bottom of unit) MEMORY Button USER-SELECT Button BLUETOOTH Button START / STOP Button ARM CUFF WITH TUBE AA (LR6) (1.
Device Overview TRIPLE-CHECK (MULTI-READ) FUNCTION SWITCH REST ASSURE MODE SWITCH Back view DC JACK 5.99V 2A AC Adapter SET button AM/PM button DATE/TIME button Right side view *Caution! Substitution of a component different from that supplied might result in measurement error.
Device Overview Unit display Irregular Heartbeat Detector Error Symbol Low Battery Symbol Risk Category Indicator Rest Assure Mode Symbol Bluetooth Symbol Triple-Check (Multi-Read) Function Symbol Systolic Rate Display average of last 3 readings AM/PM Average Symbol User Symbol Date: MM/DD/YY Time: hour/minute with PM icon Heart Rate Diastolic Rate Pulse Symbol 12
Symbol Definitions SYMBOLS Definitions This symbol appears when the battery power is extremely low or the polarity reverses. Low Battery Symbol We suggest you replace all batteries with new ones, and make sure the +/- polarities are properly positioned. Error Symbol: Error display. Once pulse is detected, the symbol flashes with each pulse beat. Pulse Symbol Compares readings against blood pressure guidelines. See next page for more information.
Features Risk Category Indicator This device is equipped with Risk Category Indicator which classifies your blood pressure measurements into four stages (Normal, Pre-hypertension, Stage 1 Hypertension to Stage 2 Hypertension) based on the blood pressure standards established by the U.S. Department of Health and Human Services and the National Institutes of Health.
Features For adults 18 and older who are not on medicine for high blood pressure, are not having a short-term serious illness, and do not have other conditions, such as diabetes and kidney disease. To determine category of risk when systolic and diastolic readings fall into two areas, use the higher of the two numbers for classification. There is an exception to the above definition of high blood pressure for people with diabetes and chronic kidney disease.
Features Rest Assure Function Before measurement, it is suggested that you sit quietly for 5 minutes before measurement as measurements taken in a relaxed state according to JNC7 report to have a greater accuracy. HL858CG provides users a helpful countdown function (REST ASSURE on/off switch) for 5 minutes before the measurement that helps users to get accurate results. To turn this feature OFF, slide the switch on the back to the OFF position.
Features Irregular Heartbeat Detector The symbol will appear on screen indicating a certain heartbeat irregularity was detected during measurement. The heartbeat rhythm that is more than or less than 25% from the average rhythm is usually defined as an irregular heartbeat rhythm. Talking, moving, shaking or an irregular pulse during the measurement can result in the appearance of this symbol.
Features Bluetooth Data Transmission HL858CG features a built-in “Bluetooth Data Transmission” function, which enables the device automatically transmit measuring results to paired Bluetooth-enabled device after measurement. When connection established, BPM would transmit memory data such as Measure Date, Systolic, Diastolic and Pulse to the Bluetooth enabled device.
Features Application Software for Bluetooth To fully utilize this feature, users need to ensure Bluetooth support of Wireless (usually under settings menu) on their Android or iOS device for contactless data exchange. Then, download and install “DailyChek®” application software from Google Play on the Bluetooth-enabled device which is compatible with Android 4.3 or iOS 7.0 or above. Please follow the following steps for installing: 1.
Installing Batteries When LOW BATTERY SYMBOL appears on the display, or no reaction toward operation, please change batteries. Replace all worn-out batteries with new ones and do not mix new and used batteries. Do not mix alkaline, standard (carbon-zinc) or rechargeable (cadmium) batteries either. Such action may shorten the battery life or cause the device to malfunction. Slide the battery cover and insert 4 AA (1.5V, LR6) alkaline batteries into the battery compartment as shown on the figure below.
Using the AC Adapter This monitor is designed for operation with batteries or an AC adapter. Please use only a compatible AC adapter with required voltage and current as indicated in this manual. Note: No batteries are needed when operating with an AC adapter. Please unload the batteries when operating with an AC adapter for an extended period of time. Leaving the batteries in the compartment for a long time may cause leakage, which may lead to damage of the unit.
Applying the Cuff Press your brachial artery approximately 1 inch (2 ~ 3 cm) above the elbow on the inside of your left arm to determine where your strongest pulse is. Slide the end of arm cuff furthest from the tube through the metal ring to a loop. The smooth cloth should be on the inside of the cuff. If the cuff is located correctly, the velcro will be on the outside of the cuff and metal ring will not touch your skin. Put left arm through the cuff loop.
Measurement Procedure Switch on the Monitor A. Put in 4 AA 1.5V (LR6) alkaline batteries. B. All segments appear on the screen for 3 seconds. C. The monitor will automatically turn to sleeping mode (all LCD segment cleared). Setting Year, Time and Date A. To adjust the date and time, press the Date/Time Set Button. B. Press button ("YEAR" flashes). Press button to adjust YEAR value (2016 is defined initially). Press again to confirm the entries, and the device turns to standby mode. C.
Measurement Procedure Turning Bluetooth Feature ON/OFF User can press and hold button 3 seconds to turn the Bluetooth feature ON/OFF in Sleeping Mode. Bluetooth feature ON Bluetooth feature OFF Note: The Bluetooth Feature Switch default setting is ON Taking a Measurement A. Check and select functions of Triple-Check (Multi-Read) Mode and Rest Assure Mode if needed. 1.
Measurement Procedure B. Press button to select the user (see LCD Displays below). C-1. Start a Single Measurement: (with REST ASSURE MODE on) 1. Make sure the Triple-Check (Multi-Read) function switch turned off. 2. If REST ASSURE MODE is on, with the cuff wrapped around your upper arm, press button to start a 5 minutes countdown (“REST” flash). 3. Time end, all units appear on the screen for 1.5 seconds, and start the 1st measurement. 4.
Measurement Procedure 5. After the monitor has determine your blood pressure and heart rate, the cuff automatically deflates. Your systolic rate, diastolic rate, heart rate and corresponding Risk Category Indicator and Irregular Heartbeat Detector (if any) are displayed with date and time for 1 minute and save results to memory automatically. 5 mins countdown All Segments Measurement result C-2. Start a Single Measurement: (with REST ASSURE MODE off) 1.
Measurement Procedure 4. After the monitor has determine your blood pressure and heart rate, the cuff automatically deflates. Your systolic rate, diastolic rate, pulse rate and corresponding Risk Category Indicator and Irregular Heartbeat Detector (if any) are displayed with date and time for 1 minute and save results to memory automatically. D-1. Start a Multi-Measurement: will take continuative 3 times measurements. (with REST ASSURE MODE on) 1.
Measurement Procedure 8. As the cuff inflates, the monitor automatically determines your ideal inflation level. This monitor detects your blood pressure and pulse rate during inflation. The Heartbeat Symbol ( ) flashes at every heartbeat. Remain still and do not move until the entire measurement process is completed. The device will detect your pulse and determine the measurement. 9. After the monitor has determine your blood pressure and pulse rate, the cuff automatically deflates.
Measurement Procedure 5. 6. 7. After the 2nd measurement finished, measuring result will not be showed, and display turned to 1 minute countdown directly (“REST” flash) for the 3rd measurement. Time end, starting the 3rd measurement (“MEASUREMENT 3” flash and “MEASUREMENT1 & 2” non-flash while measuring) As the cuff inflates, the monitor automatically determines your ideal inflation level. This monitor detects your blood pressure and pulse rate during inflation.
Bluetooth Transmission To activate Bluetooth function, please make sure your Bluetooth-enabled device have downloaded APP, and follow pairing instruction. There are 2 ways to process Bluetooth Transmission if Bluetooth function is ON: Measurement Completed: 1. After measurement Single Measurement Multi Measurement completed, the device Bluetooth Symbol Flash Bluetooth Symbol Flash activates Bluetooth function automatically, and the Bluetooth Symbol will begin flashing on the screen. 2.
Bluetooth Transmission A. Date/Time Synchronization 1. The BPM’s Date/Time Setting can be synchronized by Bluetooth-enabled device (e.g. smart phone) which has downloaded and installed DailyChek® application software. 2. When Bluetooth connection is established, the Bluetooth-enabled device can send commend with the date/time information to BPM and the BPM’s date/time will be updated. B.
Memory Function Storing data After each measurement, the systolic and diastolic pressure, heart rate, Risk Category Indicator and Irregular heartbeat detector (if any) with date and time will be automatically stored. The monitor can store up to 120 memory sets for per user, and automatically replace the oldest data with new one. Memory Function Press M and AM/PM Average key to activate Memory-Select Mode. 1.
Memory Function Recalling Data in Average Memory Mode A. Select User first. B. Press M key to enter Memory Mode, and LCD displays an average of the last 3 memories. (If a Triple-Check (Multi-Read) result included, the average of it will be included, but its individual measurements will be not. See the example as below.) Average of Last 3 Measurements
Memory Function Recalling Data in Average Memory Mode A. Select User first. B. Press AM/PM button to enter Memory Mode. LCD displays average of latest 3 AM measurements. C. Press AM/PM button again, LCD displays average of latest 3 PM measurements. Average of Last 3 AM Measurement D. When done, press Average of Last 3 PM Measurement M button again and return to Standby Mode. Erasing data A. Select User first. B. Press M button to enter Memory Mode. C.
Storage and Maintenance General Use Do not in any way twist the cuff. Do not press button if the cuff is not wrapped around your upper arm. Do not drop the product and avoid any strong impacts. Maintenance Use a piece of cloth with water or mild cleansing agent to wipe the device and dry it immediately with a dry cloth. Do not use detergent or any strong chemicals to clean the device. Use only a dry cloth to wipe the cuff.
Troubleshooting SYMBOLS/SYMPTOMS Unit does not turn on when pushed. CONDITIONS/CAUSES Worn-out batteries. button is Battery polarities have been positioned incorrectly. Cuff has been placed incorrectly. & Measuring Error Symbol appears when blood Did you talk or move during pressure value displayed measurement? is excessively low or high. Shaking of the arm with the cuff on. INDICATION/ CORRECTION Replace them with 4 new AA (LR6) alkaline batteries. Re-insert the batteries in the correct positions.
Warranty & Recalibration Warranty For One Year from the manufacturing date Please note that this warranty does not cover damage caused by misuse or abuse; accident; the attachment of any unauthorized accessory; alteration to the product; improper installation; unauthorized repairs or modifications; improper use of electrical/power supply; loss of power; dropped product; malfunction or damage of an operating part from failure to provide manufacturer’s recommended maintenance; transportation damage; theft
Specifications Model Number HL858CG Measurement Method Oscillometric Rated Range of Cuff Pressure 0~300 mmHg Rated Range of Determination Measurement Range of Heart Rate Accuracy Inflation Deflation Display Memory Unit Dimensions Unit Weight (Cuff & Batteries Excluded) Cuff Size Storage/ Transportation Environment Operation Environment Power Supply Battery Life Sleeping Mode Accessories 40~280 mmHg 40~199 beats/minute Pressure: ±3 mmHg Pulse: ±5% Max.
Specifications RF Type Bluetooth 4.0 BLE RF Modulation GFSK Effective Radiated Power 0dBm Data Throughput Expected Delay (Latency Range) in Wireless (RF) Communication Integrity Security Wireless Operation Distance RF Frequency / Need for Spectrum Management 0.2Mbps The latency time is less than 0.3ms from sender to receiver. Channel Quality-Driven Data Rate (CQDDR) technology increases the effective data rate and integrity in noisy environments.
Note Follow instructions for use. BF Classification: - Internally powered equipment - BF type applied part - IP22-Degrees of protection provided by enclosures - Not suitable for use in presence of flammable anesthetic mixture with air or with Oxygen or nitrous oxide - Continuous operation with short-time loading To avoid inaccurate results caused by electromagnetic interference between electrical and electronic equipments, do not use the device near a mobile phone or microwave oven.
Note *Note! This equipment has been tested and found to comply with the limits for a Class B digital device, pursuant to Part 15 of the FCC Rules. These limits are designed to provide reasonable protection against harmful interference in a residential installation. This equipment generates uses and can radiate radio frequency energy and, if not installed and used in accordance with the instructions, may cause harmful interference to radio communications.
Appendix Guidance and manufacturer’s declaration – electromagnetic emissions The device is intended for use in the electromagnetic environments listed below, and should only be used in such environments: Emissions test RF emissions CISPR 11 Compliance Group 1 RF emissions CISPR 11 Harmonic emissions IEC 61000-3-2 Voltage fluctuations/ flicker emissions IEC 61000-3-3 Class B Class A Complies Electromagnetic environment – guidance RF energy is used only to maintain device’s operation.
Appendix Recommended separation distances between portable and mobile RF communication equipment and the device. The device is intended for use in an electromagnetic environment where radiated RF disturbances are under control. User can help prevent electromagnetic interference by keeping the device at a minimum distance from portable and mobile RF communications equipment (transmitters).
Blood Pressure Diary Date: □Before □After Time: Systolic / Diastolic: Date: Pulse: □Before □After Time: Systolic / Diastolic: Date: □Before □After Time: □Before □After Time: □Before □After Time: □Before □After Time: □Before □After Time: □Before □After Time: □Before □After Time: Meal Pulse: □Before □After Time: Systolic / Diastolic: P/N:XXXXXXXXX Meal Pulse: Systolic / Diastolic: Date: Meal Pulse: Systolic / Diastolic: Date: Meal Pulse: Systolic / Diastolic: Date: Meal P